
Owner's Manual
Page 17
Pull up on the leverand the seat will go to decrease lumbar support. Release the leverto lock the seatback where you want it. Manual Lumbar Support (If Equipped) Reclining Seatbacks (Bucket Seats or 60/40 Bench) To adjust the front saatback, lift the leveron the outer side of the seat. Turn the knob to the left to increase lumbar support and to the right to an upright position. 1-3
Pull up on the leverand the seat will go to decrease lumbar support. Release the leverto lock the seatback where you want it. Manual Lumbar Support (If Equipped) Reclining Seatbacks (Bucket Seats or 60/40 Bench) To adjust the front saatback, lift the leveron the outer side of the seat. Turn the knob to the left to increase lumbar support and to the right to an upright position. 1-3
Owner's Manual
Page 109
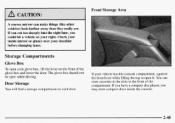
Check your inside mirror or glance over your vehicle has this consolecompartment, squeeze the front lever while lifting the top to open it. If you have a compact disc player, you could hit a vehicle on each door. ~ 2-45 You can store cassettesin the slots ...) look farther away than they really are. Door Storage You will find a storage compartment on yourright. The glovebox should not be open your glove box, lift the lever the front of compartment. If your shoulder before changinglanes. If you cut too sharply into the rightlane, you may store compact discs insidethe...
Check your inside mirror or glance over your vehicle has this consolecompartment, squeeze the front lever while lifting the top to open it. If you have a compact disc player, you could hit a vehicle on each door. ~ 2-45 You can store cassettesin the slots ...) look farther away than they really are. Door Storage You will find a storage compartment on yourright. The glovebox should not be open your glove box, lift the lever the front of compartment. If your shoulder before changinglanes. If you cut too sharply into the rightlane, you may store compact discs insidethe...
Owner's Manual
Page 110
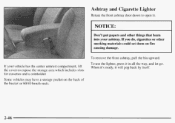
I f your ashtray.If you do, cigarettes or other things that burn into your vehicle has the center armrest compartment, lift the cover to open it. To use the lighter, press it will pop back by itself. When it's ready, it in all the way, and ...
I f your ashtray.If you do, cigarettes or other things that burn into your vehicle has the center armrest compartment, lift the cover to open it. To use the lighter, press it will pop back by itself. When it's ready, it in all the way, and ...

Owner's Manual
Page 111
You can make it overload, damaging the lighter and the heating element. Visor Vanity Mirror Pull the sun visor down and lift the mirror cover to turn on the lamps. 2-47 NOTICE: Don't hold a cigarette lighter in with your hand while it is heating.If you can ...swing down the top and bottom visors. Pull the sun visor down and lift the cover to -side. Your visors may have an extension that can be ableto back away from side-to expose the vanity mirror. That can...
You can make it overload, damaging the lighter and the heating element. Visor Vanity Mirror Pull the sun visor down and lift the mirror cover to turn on the lamps. 2-47 NOTICE: Don't hold a cigarette lighter in with your hand while it is heating.If you can ...swing down the top and bottom visors. Pull the sun visor down and lift the cover to -side. Your visors may have an extension that can be ableto back away from side-to expose the vanity mirror. That can...

Owner's Manual
Page 116
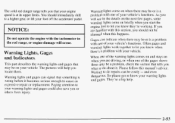
... per hour (km/h). Trip Odometer Tachometer (If Equipped) The tachometer displays the engine speed in revolutions per minute (rpm). If you have an automatic transmission, lift your speed in your vehicle needs a new odometer installed. You may wonder what happens if your vehicle. Each tachometer has a different limit depending on the...
... per hour (km/h). Trip Odometer Tachometer (If Equipped) The tachometer displays the engine speed in revolutions per minute (rpm). If you have an automatic transmission, lift your speed in your vehicle needs a new odometer installed. You may wonder what happens if your vehicle. Each tachometer has a different limit depending on the...
Owner's Manual
Page 117
... can indicate when there may be or is wrong before it becomes serious enough to your warning lights and gages. Waiting to a higher gear, or lift your foot off the accelerator pedal. 1 NOTICE: Do not operate theengine with the tachometer in the details on the next few pages, some warning lights...
... can indicate when there may be or is wrong before it becomes serious enough to your warning lights and gages. Waiting to a higher gear, or lift your foot off the accelerator pedal. 1 NOTICE: Do not operate theengine with the tachometer in the details on the next few pages, some warning lights...

Owner's Manual
Page 220
... has rear-wheel drive or four-wheel drive. Before you call, tell the towing service: 0 Whether your vehicle has been changed since it has been lifted by adding things like fog lamps, aero skirting, orspecial tires and wheels, these towing instructions. When you do anything, turn on the hazard warning flashers...
... has rear-wheel drive or four-wheel drive. Before you call, tell the towing service: 0 Whether your vehicle has been changed since it has been lifted by adding things like fog lamps, aero skirting, orspecial tires and wheels, these towing instructions. When you do anything, turn on the hazard warning flashers...

Owner's Manual
Page 222
... car-carrier equipment. Additional ramping may be required car-carrier equipment. Do not attach winch cables or J-hooks to wheel-lift equipment. Towing a vehicle over rough surfaces could damage a vehicle. Front Towing Tow Limits -- 35 mph (55 kmdh), 50 miles (80 km) Vehicles witlz.four-whee1drive ... the T-hook slots. To help avoid damage, install a towing dolly and raise the vehicle until adequate clearance is obtained between the ground and/or wheel-lift equipment. Damage can occur from the front. I 5-10
... car-carrier equipment. Additional ramping may be required car-carrier equipment. Do not attach winch cables or J-hooks to wheel-lift equipment. Towing a vehicle over rough surfaces could damage a vehicle. Front Towing Tow Limits -- 35 mph (55 kmdh), 50 miles (80 km) Vehicles witlz.four-whee1drive ... the T-hook slots. To help avoid damage, install a towing dolly and raise the vehicle until adequate clearance is obtained between the ground and/or wheel-lift equipment. Damage can occur from the front. I 5-10

Owner's Manual
Page 223
..., install a towing dolly and raise thevehicle until adequate clearance is obtained between the ground and/or wheel-lift equipment. NOTICE: Do not tow with sling-type equipmentor rear bumper valance damagewill occur. Use wheel-lift or car-carrier equipment. Use safety chains and wheel straps. Do not attach winch cables or J-hooks...
..., install a towing dolly and raise thevehicle until adequate clearance is obtained between the ground and/or wheel-lift equipment. NOTICE: Do not tow with sling-type equipmentor rear bumper valance damagewill occur. Use wheel-lift or car-carrier equipment. Use safety chains and wheel straps. Do not attach winch cables or J-hooks...

Owner's Manual
Page 225
... idle speed. See "Driving on , you get everyone out o the vehicle f until the engine speed is about 10 minutes. Bring the engine speed back to lift the hood but see if the warning stops. You may not be safe, driveslower for automatic transmissions. 5-13 Now see orhear no sign of steam...
... idle speed. See "Driving on , you get everyone out o the vehicle f until the engine speed is about 10 minutes. Bring the engine speed back to lift the hood but see if the warning stops. You may not be safe, driveslower for automatic transmissions. 5-13 Now see orhear no sign of steam...

Owner's Manual
Page 238
C. Rear Frame Hole (ZR2j 1. Don't remove them yet. Spring Hanger Hole (Standard Pickups) 2. Turn the jack handle to the right slightly to raise the jack lift head. 3. Using the wheel wrench, loosen all the wheel nuts. Fit the jack into the appropriate hole nearest the flat tire. 5-26 Front Frame Hole B. A. Xemoving the Flat Tire and Installing the Spare Tire ..., . .
C. Rear Frame Hole (ZR2j 1. Don't remove them yet. Spring Hanger Hole (Standard Pickups) 2. Turn the jack handle to the right slightly to raise the jack lift head. 3. Using the wheel wrench, loosen all the wheel nuts. Fit the jack into the appropriate hole nearest the flat tire. 5-26 Front Frame Hole B. A. Xemoving the Flat Tire and Installing the Spare Tire ..., . .

Owner's Manual
Page 239
... jacked upis off the flat tire. 5-27 the vehicle by a jack. If the vehicle slips the jack,you could be sure to fit the jack lift head into the proper location before raising the vehicle. 1 -I positioned can damage the vehicle and even make the vehicle fall. Remove all the wheel nuts...
... jacked upis off the flat tire. 5-27 the vehicle by a jack. If the vehicle slips the jack,you could be sure to fit the jack lift head into the proper location before raising the vehicle. 1 -I positioned can damage the vehicle and even make the vehicle fall. Remove all the wheel nuts...

Owner's Manual
Page 258
Checking Things Under the Hood Then go to the front of the vehicle and release the secondary hood release. . You may have a lamp that comes on when you lift the hood. 6-8 Lift the hood, release the hood prop from its retainer and put the hood prop into the slot in the hood.
Checking Things Under the Hood Then go to the front of the vehicle and release the secondary hood release. . You may have a lamp that comes on when you lift the hood. 6-8 Lift the hood, release the hood prop from its retainer and put the hood prop into the slot in the hood.

Owner's Manual
Page 259
Engine Oil Fill Cap and Dipstick E. Fuse Block 1. Coolant Recovery Tank C. Windshield Washer Fluid 6-9 Battery B. Air Cleaner H. Automatic Transmission Dipstick D. Power Steering Reservoir E Brake Master Cylinder G. When you lift the hood, you'll see these items on the 2.2L engine: A.
Engine Oil Fill Cap and Dipstick E. Fuse Block 1. Coolant Recovery Tank C. Windshield Washer Fluid 6-9 Battery B. Air Cleaner H. Automatic Transmission Dipstick D. Power Steering Reservoir E Brake Master Cylinder G. When you lift the hood, you'll see these items on the 2.2L engine: A.

Owner's Manual
Page 260
C. Windshield Washer Fluid Battery Coolant Recovery Tank Engine Oil Dipstick Engine Oil Fill E. Transmission Dipstick E Power Steering Reservoir G. Brake Master Cylinder H. Fuse Block J. D. Air Cleaner I. B. When you lift the hood, you'll see these items on the "VORTEC" 4300 engine: A.
C. Windshield Washer Fluid Battery Coolant Recovery Tank Engine Oil Dipstick Engine Oil Fill E. Transmission Dipstick E Power Steering Reservoir G. Brake Master Cylinder H. Fuse Block J. D. Air Cleaner I. B. When you lift the hood, you'll see these items on the "VORTEC" 4300 engine: A.

Owner's Manual
Page 261
... prop. In order to 30 cm) without pressing on the 2.2L engine is a yellow ring. 6-11 Before closing the hood, be on level ground. Then lift the hood to its retainer. If you get an accurate reading,the oil must be warm and the vehicle must be sure all the filler...
... prop. In order to 30 cm) without pressing on the 2.2L engine is a yellow ring. 6-11 Before closing the hood, be on level ground. Then lift the hood to its retainer. If you get an accurate reading,the oil must be warm and the vehicle must be sure all the filler...
Owner's Manual
Page 266
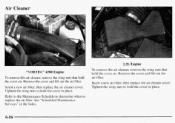
..." in place. Tighten the wine nuts to hold the cover on. Insert a new air filter, then replace the air cleaner cover. Remove the cover and lift o u t the ai r fi 1ter. Remove the cover andlift out the air filter. Tighten the wing nuts to replace the air filter. Refer to the Maintenance...
..." in place. Tighten the wine nuts to hold the cover on. Insert a new air filter, then replace the air cleaner cover. Remove the cover and lift o u t the ai r fi 1ter. Remove the cover andlift out the air filter. Tighten the wing nuts to replace the air filter. Refer to the Maintenance...

Owner's Manual
Page 285
... package. 2. Headlamps One-Piece Composite Headlamp System 1. Also, for your audio system, see"Theft-Deterrent Feature" in the Index. Remove the black retainer clips by lifting up. 3.
... package. 2. Headlamps One-Piece Composite Headlamp System 1. Also, for your audio system, see"Theft-Deterrent Feature" in the Index. Remove the black retainer clips by lifting up. 3.

Owner's Manual
Page 286
F 5. Turn the bulb assembly to the left to the right until it . 6. Pull the headlamp lens assembly out. 4. Unplug the electrical connector. 6-36 Open the hood. Put the new bulb assembly into the vehicle. Remove the black retainer clips by lifting up. 3. Two-Piece Composite Headlamp System 1. Put the headlamp lens assembly back into the headlamp assembly and turn it to remove it is tight. 7. Plug in the electrical connector. 8. Install the two retaining clips. 2.
F 5. Turn the bulb assembly to the left to the right until it . 6. Pull the headlamp lens assembly out. 4. Unplug the electrical connector. 6-36 Open the hood. Put the new bulb assembly into the vehicle. Remove the black retainer clips by lifting up. 3. Two-Piece Composite Headlamp System 1. Put the headlamp lens assembly back into the headlamp assembly and turn it to remove it is tight. 7. Plug in the electrical connector. 8. Install the two retaining clips. 2.

Owner's Manual
Page 290
... right until it locks into a vertical position. 3. Put the socket into the socket. 7. Close the tailgate. Open the tailgate. To remove the old wiper blades, lift the wiper arm until it . Pull the assembly away from the lamp assembly near the tailgate latch. Turn the socket to the left to remove...
... right until it locks into a vertical position. 3. Put the socket into the socket. 7. Close the tailgate. Open the tailgate. To remove the old wiper blades, lift the wiper arm until it . Pull the assembly away from the lamp assembly near the tailgate latch. Turn the socket to the left to remove...