

Owner's Manual
Page 19
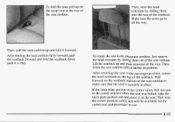
While the seat is automatically released. To return the seat to the passenger position, just lift up on the hooks at bottom the of the way. To fold the seat, pull on the seatback seat forward and fold the seatback onto the cushion. When you release theseat cushion, the seatback is in the foldedposition, hang the latch plate end of the outer passenger position safety belts on the seatback and push it rearward until it latches. 1-9 Pull the loop on the release handle at the top of each retractor cover, out of the seat cushion marked RELEASE.
While the seat is automatically released. To return the seat to the passenger position, just lift up on the hooks at bottom the of the way. To fold the seat, pull on the seatback seat forward and fold the seatback onto the cushion. When you release theseat cushion, the seatback is in the foldedposition, hang the latch plate end of the outer passenger position safety belts on the seatback and push it rearward until it latches. 1-9 Pull the loop on the release handle at the top of each retractor cover, out of the seat cushion marked RELEASE.
Owner's Manual
Page 21
... until it is securely in all the Then, way. After returning the seat to the passenger position, return the head restraints to the top of Lift the seatback up and push rearward all the way. Then, stow the head restraints by sliding them into the rear of the seatback. Pull forward...
... until it is securely in all the Then, way. After returning the seat to the passenger position, return the head restraints to the top of Lift the seatback up and push rearward all the way. Then, stow the head restraints by sliding them into the rear of the seatback. Pull forward...

Owner's Manual
Page 23
To create a load floor. Then lift the rear seatback up on the latch and fold them into the seatback. 1-13 That way, the center position safety belt will be available forthe ... passenger position, pull forward on the seatback and up and push rearward until it latches into place. To return the seat to the passenger position,lift the load floor panels and latch them out to use.
To create a load floor. Then lift the rear seatback up on the latch and fold them into the seatback. 1-13 That way, the center position safety belt will be available forthe ... passenger position, pull forward on the seatback and up and push rearward until it latches into place. To return the seat to the passenger position,lift the load floor panels and latch them out to use.
Owner's Manual
Page 24
... the seat forward until it latches. I ION: A seat that isn't locked into place properly when installing it stops. To release the easy entry second seat, lift up on the top of the seat down. Push the top of the seatback forward and tilt it easy to get in the vehicle could... you have one. After returning the seat to its upright position, then push the whole seat rearward until it . 1-14 Entry to the Rear Seat(Suburban Second Seat) The right side of the third seat. To return the seat to its regular position, return the seatback to its regular position, try...
... the seat forward until it latches. I ION: A seat that isn't locked into place properly when installing it stops. To release the easy entry second seat, lift up on the top of the seat down. Push the top of the seatback forward and tilt it easy to get in the vehicle could... you have one. After returning the seat to its upright position, then push the whole seat rearward until it . 1-14 Entry to the Rear Seat(Suburban Second Seat) The right side of the third seat. To return the seat to its regular position, return the seatback to its regular position, try...

Owner's Manual
Page 26
... it locks into the. To unlatch the seat from the floor, pull up on the center release handle at the rear of the seat and lift the rear seat up on the center release handle and let the seat drop into place. Pull up , off of the floor. Move the seatback...
... it locks into the. To unlatch the seat from the floor, pull up on the center release handle at the rear of the seat and lift the rear seat up on the center release handle and let the seat drop into place. Pull up , off of the floor. Move the seatback...
Owner's Manual
Page 83
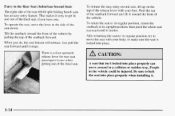
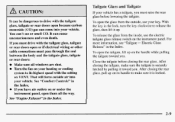
... use the electric tailgate glass release switch on the instrumentpanel. Electric Glass Release" in the lock, turn the key clockwise torelease the glass, then lift it up. Tailgate Glass and Tailgate If your vehicle has a tailgate,you must raise therear glass before closing the rear glass. If you . it...To open the glass from the inside,use the key in the Index. You can cause unconsciousness and even death. To open the tailgate,lift up on its highest speed with setting the on the handle while pulling the tailgatetoward you have air outlets on your vehicle. To release ...
... use the electric tailgate glass release switch on the instrumentpanel. Electric Glass Release" in the lock, turn the key clockwise torelease the glass, then lift it up. Tailgate Glass and Tailgate If your vehicle has a tailgate,you must raise therear glass before closing the rear glass. If you . it...To open the glass from the inside,use the key in the Index. You can cause unconsciousness and even death. To open the tailgate,lift up on its highest speed with setting the on the handle while pulling the tailgatetoward you have air outlets on your vehicle. To release ...
Owner's Manual
Page 106
... "Your Doors and How They Work" in LOCK. The shift lever must be in the Index. If you to activate the express down mode. Then, lift the window up to work. See "Power Doors Locks" in PARK (P) or NEUTRAL (N) for one second to lock or unlock all of the switch. When...
... "Your Doors and How They Work" in LOCK. The shift lever must be in the Index. If you to activate the express down mode. Then, lift the window up to work. See "Power Doors Locks" in PARK (P) or NEUTRAL (N) for one second to lock or unlock all of the switch. When...
Owner's Manual
Page 125
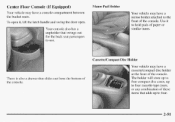
Use it , lift thelatch handle and swing the door open it to the front of these items that adds upto four. Your console also has a cupholder that slides ...
Use it , lift thelatch handle and swing the door open it to the front of these items that adds upto four. Your console also has a cupholder that slides ...

Owner's Manual
Page 126
Armrest Storage Compartment (If Equipped) To remove the cassettekompact disc holder, pull the front of the holder toward you and then lift it , fold down the armrest and press the latch handle located a t the front of the armrest. To open . 2-52 Your vehicle may have a center armrest ...
Armrest Storage Compartment (If Equipped) To remove the cassettekompact disc holder, pull the front of the holder toward you and then lift it , fold down the armrest and press the latch handle located a t the front of the armrest. To open . 2-52 Your vehicle may have a center armrest ...
Owner's Manual
Page 130
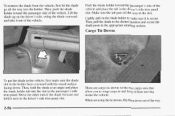
... the slot. Then, hold it next to strapcargo in and keep it out of 2-56 There are cargotie downs in thedriver's side trim panel slot. Lift the shade up on the shade holder make sure the shade slot in the passenger's side trim panel. to Lightly pull on the driver's side...
... the slot. Then, hold it next to strapcargo in and keep it out of 2-56 There are cargotie downs in thedriver's side trim panel slot. Lift the shade up on the shade holder make sure the shade slot in the passenger's side trim panel. to Lightly pull on the driver's side...

Owner's Manual
Page 133
... when you can also swing them out tohelp block glare at the front or side. Accessory Power Outlets Sun Visors To block out glare, you lift the mirror cover. 2-59 Use these outlets to power mobile designed to operate with lights. Your visor may have a strapto hold small items, such as...
... when you can also swing them out tohelp block glare at the front or side. Accessory Power Outlets Sun Visors To block out glare, you lift the mirror cover. 2-59 Use these outlets to power mobile designed to operate with lights. Your visor may have a strapto hold small items, such as...
Owner's Manual
Page 239
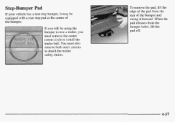
pad off. 4-57 When the pad releases fromthe bumper holes, lift the . If you will be equipped with a rear step at the center of the bumper and swing it may be using the bumper to tow a trailer, you must remove the center cutout circle to install the trailer ball.You must also remove both outer cutouts to attach the trailer safety chains. To remove the pad, lift the edge of the pad from the rear of pad the bumper. Step-Bumper Pad If your vehicle has a rear step bumper, it forward.
pad off. 4-57 When the pad releases fromthe bumper holes, lift the . If you will be equipped with a rear step at the center of the bumper and swing it may be using the bumper to tow a trailer, you must remove the center cutout circle to install the trailer ball.You must also remove both outer cutouts to attach the trailer safety chains. To remove the pad, lift the edge of the pad from the rear of pad the bumper. Step-Bumper Pad If your vehicle has a rear step bumper, it forward.
Owner's Manual
Page 248
... can move the shift lever for the transmission and transfer case, if you call, tell the towing service: 0 That your vehicle after it has been lifted by adding such things as fog lamps, aero skirting, or special tires and wheels, these towing instructions. Never get under your vehicle has rear-wheel...
... can move the shift lever for the transmission and transfer case, if you call, tell the towing service: 0 That your vehicle after it has been lifted by adding such things as fog lamps, aero skirting, or special tires and wheels, these towing instructions. Never get under your vehicle has rear-wheel...

Owner's Manual
Page 252
... warning doesn't come back on Grades" in the Index. If the warning continues, pull over, stop, and park your heater to NEUTRAL (N); otherwise, shift to lift the hood but see if the warning stops. If you still have the overheat warning, you can drive. Sometimes the engine canget a little too hot...
... warning doesn't come back on Grades" in the Index. If the warning continues, pull over, stop, and park your heater to NEUTRAL (N); otherwise, shift to lift the hood but see if the warning stops. If you still have the overheat warning, you can drive. Sometimes the engine canget a little too hot...
Owner's Manual
Page 253
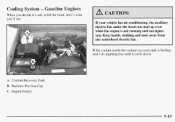
i A. Radiator Pressure Cap C. Keep hands, clothing and tools away from any underhood electric fan. If the coolant inside the coolant recovery tank is not running and can start up even when the engine is boiling, don't do anything else until it cools down. Engine Fan(s) 5-13 Coolant Recovery Tank €3. Gasoline Engines When you decide it's safe to lift the hood, here's what you'll see: A CAUTION: If your vehiclehas air conditioning, the auxiliary electric fan under thehood can injure you. Cooling System --
i A. Radiator Pressure Cap C. Keep hands, clothing and tools away from any underhood electric fan. If the coolant inside the coolant recovery tank is not running and can start up even when the engine is boiling, don't do anything else until it cools down. Engine Fan(s) 5-13 Coolant Recovery Tank €3. Gasoline Engines When you decide it's safe to lift the hood, here's what you'll see: A CAUTION: If your vehiclehas air conditioning, the auxiliary electric fan under thehood can injure you. Cooling System --

Owner's Manual
Page 265
... jackcover on four-door utility models, push the cover latches down and remove the cover. You can use them if needed later. If your Suburban has a jackcover, lift the tab up to replace them with the jack,so you will have a pair emergency gloves of Your vehicle may have them when changing...
... jackcover on four-door utility models, push the cover latches down and remove the cover. You can use them if needed later. If your Suburban has a jackcover, lift the tab up to replace them with the jack,so you will have a pair emergency gloves of Your vehicle may have them when changing...
Owner's Manual
Page 267
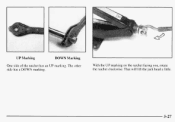
One side of the ratchet has an UP marking. The other side has aDOWN marking. 5-27 That will lift the jack head a little. UP Marking DOWN Marking With the UP marking on the ratchet facing you, rotate the ratchet clockwise.
One side of the ratchet has an UP marking. The other side has aDOWN marking. 5-27 That will lift the jack head a little. UP Marking DOWN Marking With the UP marking on the ratchet facing you, rotate the ratchet clockwise.

Owner's Manual
Page 269
I NOTICE: Raising yourvehicle with the jack improperly positioned will damage the vehicle or may allow the vehicle to fit the jack lift head into the proper location before raising your vehicle. 5-29 I Front Position Rear Position 3. Position the jack under a vehicle when it issupported only by a jack. I A ...
I NOTICE: Raising yourvehicle with the jack improperly positioned will damage the vehicle or may allow the vehicle to fit the jack lift head into the proper location before raising your vehicle. 5-29 I Front Position Rear Position 3. Position the jack under a vehicle when it issupported only by a jack. I A ...

Owner's Manual
Page 291
If your vehicle has air conditioning,it firmly. 6-9 Pull down the hood and close it may have an auxiliary engine fanin addition to thepassenger's side of the vehicle and pull up on the secondary hood release, located just to the belt driven fan. Lift the hood. Before closing the hood, be sure all filler caps areon properly. Then go to the front of the centerof the grill. Hood Release To open the hood, first pull the handle inside the vehicle.
If your vehicle has air conditioning,it firmly. 6-9 Pull down the hood and close it may have an auxiliary engine fanin addition to thepassenger's side of the vehicle and pull up on the secondary hood release, located just to the belt driven fan. Lift the hood. Before closing the hood, be sure all filler caps areon properly. Then go to the front of the centerof the grill. Hood Release To open the hood, first pull the handle inside the vehicle.
Owner's Manual
Page 292
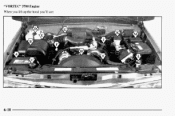
"VORTEC" 5700 Engine When you lift up the hood you'll see: 6-10
"VORTEC" 5700 Engine When you lift up the hood you'll see: 6-10
