
Owner's Manual
Page 17
...'t locked, it will return t o the reclined position. - - To return the seatback to access the storage area behind the seat. To fold the front seatback forward, lift the latch and push the seat forward. 1-6 If the seatback was reclined before being folded forward, it could cause injury to the person sitting there...
...'t locked, it will return t o the reclined position. - - To return the seatback to access the storage area behind the seat. To fold the front seatback forward, lift the latch and push the seat forward. 1-6 If the seatback was reclined before being folded forward, it could cause injury to the person sitting there...

Owner's Manual
Page 18
... seat. 0 Rear Seats Your vehicle has a folding rear seat which lets you fold the seatbacks down for more cargo space. To raise the seatbacks, just lift up on the handles. Then move . e Tilt the seatback completely forward again to get in the upright position. In a sudden stop or crash, person sitting...
... seat. 0 Rear Seats Your vehicle has a folding rear seat which lets you fold the seatbacks down for more cargo space. To raise the seatbacks, just lift up on the handles. Then move . e Tilt the seatback completely forward again to get in the upright position. In a sudden stop or crash, person sitting...

Owner's Manual
Page 118
... downs o n the fl oor. 2-57 A storage compartment under your radio may have a convenience net in the rear of your vehicle has the center armrest compartment, lift the cover to expose the storage area which includes slots for larger. Convenience Net (If Equipped) If your vehicle to help keepsmall items, like gloves...
... downs o n the fl oor. 2-57 A storage compartment under your radio may have a convenience net in the rear of your vehicle has the center armrest compartment, lift the cover to expose the storage area which includes slots for larger. Convenience Net (If Equipped) If your vehicle to help keepsmall items, like gloves...

Owner's Manual
Page 123
...swing down the top and bottom visors. Illuminated VisorVanity Mirror (If Equipped) To remove the front ashtray, lift the release tab as high as maps. Visor Vanity Mirror Pull the sun visor down and lift the mirror cover to side. I NOTICE: Don't put papers and other smoking materials could set them ...on the lamps. Pull the sun visor down and lift the cover t o expose the vanity mirror. 2-62 Sun Visors To block out glare, you do, cigarettes or other things that can be pulled out for...
...swing down the top and bottom visors. Illuminated VisorVanity Mirror (If Equipped) To remove the front ashtray, lift the release tab as high as maps. Visor Vanity Mirror Pull the sun visor down and lift the mirror cover to side. I NOTICE: Don't put papers and other smoking materials could set them ...on the lamps. Pull the sun visor down and lift the cover t o expose the vanity mirror. 2-62 Sun Visors To block out glare, you do, cigarettes or other things that can be pulled out for...
Owner's Manual
Page 132
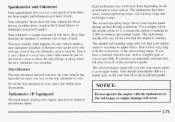
... in your vehicle. Your odometer is running . Each tachometer has a different l i m i t depending on the driver's door to a higher gear, or lift your foot off of the accelerator pedal. Your should immediately shift to show silver lines between the numbers if someone tries t o turn it means the...: Do not operate the engine with the tachometer in both miles per hour (mph) and kilometers per minute (rpm). If you have an automatic transmission, lift your foot off of the old odometer, then it 's set to a higher gear a s soon as possible. I f the new one can tell ...
... in your vehicle. Your odometer is running . Each tachometer has a different l i m i t depending on the driver's door to a higher gear, or lift your foot off of the accelerator pedal. Your should immediately shift to show silver lines between the numbers if someone tries t o turn it means the...: Do not operate the engine with the tachometer in both miles per hour (mph) and kilometers per minute (rpm). If you have an automatic transmission, lift your foot off of the old odometer, then it 's set to a higher gear a s soon as possible. I f the new one can tell ...

Owner's Manual
Page 229
.... Use T-hooks instead. is a being towed. 0 Never tow faster than safe or posted speeds. 0 Never tow with chains or steel cables before it has been lifted by edges underneath thetowed vehicle. Theywill damage drivetrain and suspension components. 5-8 This can be cut sharp by the tow truck. 0 Always use separate safety chains...
.... Use T-hooks instead. is a being towed. 0 Never tow faster than safe or posted speeds. 0 Never tow with chains or steel cables before it has been lifted by edges underneath thetowed vehicle. Theywill damage drivetrain and suspension components. 5-8 This can be cut sharp by the tow truck. 0 Always use separate safety chains...
Owner's Manual
Page 230
The transmission should be in 2HI. Follow these steps: 1. Push the base o f the shift lever boot forward \%7ith your vehicle is being towed. Lift the boot and find the white solenoid lever. I f your vehicle 11as a floor mounted shifter and no electrical power, the electrical solenoid lock must be i n NEUTRAL ( N ) ...
The transmission should be in 2HI. Follow these steps: 1. Push the base o f the shift lever boot forward \%7ith your vehicle is being towed. Lift the boot and find the white solenoid lever. I f your vehicle 11as a floor mounted shifter and no electrical power, the electrical solenoid lock must be i n NEUTRAL ( N ) ...

Owner's Manual
Page 231
Use safety chains and wheel straps. Do not attach winch cables or J-hooks to wheel-lift equipment. Use wheel-lift or car carrier equipment. Damage can occur from vehicle to ground or vehicle to suspension components when using car-carrier equipment. To help avoid ...damage, install a towing dolly and raise the vehicle until adequate clearance is obtained between the ground and/or wheel-lift equipment. Additional ramping may be required for car-carrier equipment. Always use T-hooks inserted in the T-hook slots. 5-10 NOTICE: Do not tow with...
Use safety chains and wheel straps. Do not attach winch cables or J-hooks to wheel-lift equipment. Use wheel-lift or car carrier equipment. Damage can occur from vehicle to ground or vehicle to suspension components when using car-carrier equipment. To help avoid ...damage, install a towing dolly and raise the vehicle until adequate clearance is obtained between the ground and/or wheel-lift equipment. Additional ramping may be required for car-carrier equipment. Always use T-hooks inserted in the T-hook slots. 5-10 NOTICE: Do not tow with...

Owner's Manual
Page 232
Use wheel-lift or car-carrier equipment. Use safety chains and wheel straps. Additional ramping may be required for...vehicle to ground orvehicle to suspension components when using car-carrier in equipment. Do not attach winch cables or ,J-hooks to wheel-lift equipment. Always use T-hooks inserted the T-hook slots. 5-11 Unless you have all-wheel drive, to help avoid damage,...towing dolly and raise the is vehicle until adequate clearance obtained between the ground and/or wheel-lift equipment. NOTICE: Do not tow with sling-type equipment or rear will bumper valance damage occur.
Use wheel-lift or car-carrier equipment. Use safety chains and wheel straps. Additional ramping may be required for...vehicle to ground orvehicle to suspension components when using car-carrier in equipment. Do not attach winch cables or ,J-hooks to wheel-lift equipment. Always use T-hooks inserted the T-hook slots. 5-11 Unless you have all-wheel drive, to help avoid damage,...towing dolly and raise the is vehicle until adequate clearance obtained between the ground and/or wheel-lift equipment. NOTICE: Do not tow with sling-type equipment or rear will bumper valance damage occur.

Owner's Manual
Page 234
the problem may decide not t o lift the hood but see if the warning stops. push the accelerator until it cools down. But then, if you still have the overheat warning.you ...
the problem may decide not t o lift the hood but see if the warning stops. push the accelerator until it cools down. But then, if you still have the overheat warning.you ...

Owner's Manual
Page 235
Coolant Recovery Tank B. A. here's what you'll see: r A CAUTION: If your vehicle has air conditioning, the auxiliary electric fan under the hood can injure you decide it cools down. Keep hands, clothing and tools away from any underhood electric fan. Radiator Pressure Cap C. If the coolant inside the coolant recovery tank is not running and can start up even when the engine is boiling, don't do anything else until it 's safe to lift the hood. When you . Engine Fan 5-14
Coolant Recovery Tank B. A. here's what you'll see: r A CAUTION: If your vehicle has air conditioning, the auxiliary electric fan under the hood can injure you decide it cools down. Keep hands, clothing and tools away from any underhood electric fan. Radiator Pressure Cap C. If the coolant inside the coolant recovery tank is not running and can start up even when the engine is boiling, don't do anything else until it 's safe to lift the hood. When you . Engine Fan 5-14

Owner's Manual
Page 249
Removing the FlatTire and Installing the Spare Tire 3. Fit the jack into the appropriate hole nearest the tlat tire. 1. Turn the jack handle clockwise to raise the jack lift head. 5-28 Using the wheel wrench, loosen all the wheel nuts. A. Rear Frame Hole (?-Door) or Spring Hanger Hole (+Door) 2. Don't remove them yet. Front Frame Hole B.
Removing the FlatTire and Installing the Spare Tire 3. Fit the jack into the appropriate hole nearest the tlat tire. 1. Turn the jack handle clockwise to raise the jack lift head. 5-28 Using the wheel wrench, loosen all the wheel nuts. A. Rear Frame Hole (?-Door) or Spring Hanger Hole (+Door) 2. Don't remove them yet. Front Frame Hole B.

Owner's Manual
Page 250
Never get under a vehicle when it is jacked up is dangerous. To help avoid personal injury lift and vehicle damage, he sure to fall. If the vehicle slipsoff the jack,you could be badly injuredo r killed. I Getting undera vehicle when it issupported only by a jack. NOTICE: Raising your vehicle with the jack improperly positioned can damage thevehicle and even make the vehicle to fit the jack head into the proper location before raising the vehicle. the 5-29
Never get under a vehicle when it is jacked up is dangerous. To help avoid personal injury lift and vehicle damage, he sure to fall. If the vehicle slipsoff the jack,you could be badly injuredo r killed. I Getting undera vehicle when it issupported only by a jack. NOTICE: Raising your vehicle with the jack improperly positioned can damage thevehicle and even make the vehicle to fit the jack head into the proper location before raising the vehicle. the 5-29

Owner's Manual
Page 267
Brake Master Cylinder H. Air Cleaner I ~ood, you'll see these items: A. Engine Oil Dipstick D. Transmission Dipstick E. Battery B. Coolant Re,covery Tank C. Engine Oil Fill E Power Steering Reservoir C. Windshield WasherFluid 6-8 When you lift the I .
Brake Master Cylinder H. Air Cleaner I ~ood, you'll see these items: A. Engine Oil Dipstick D. Transmission Dipstick E. Battery B. Coolant Re,covery Tank C. Engine Oil Fill E Power Steering Reservoir C. Windshield WasherFluid 6-8 When you lift the I .
Owner's Manual
Page 268
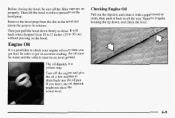
... the oil a few minutes to its retainer. return the prop to drain backinto the oil pan. Before closing the hood, sure all the way. Then lift the hood to check your engine oil every time you don't, the oil dipstick might not showthe actual level. 6-9 Engine Oil It's a good idea to...
... the oil a few minutes to its retainer. return the prop to drain backinto the oil pan. Before closing the hood, sure all the way. Then lift the hood to check your engine oil every time you don't, the oil dipstick might not showthe actual level. 6-9 Engine Oil It's a good idea to...

Owner's Manual
Page 297
... NOTICE: ~~~~ a. Install the lens. I 2. Rotate the lens downward. 2. Place the lamp assembly into t.he lamp assembly. 7 . To remove the old wiper blades, lift the wiper arm until it i n place. Snap the lens into a vertical position. Put a new bulb into the center slot at the bottom of the overhead... console lamp lens while pressing in order to lift out the lens. 3. Gently pry the screwdriver down in on the lamp assembly. 4. Slide the side tabs of the lens under the ...
... NOTICE: ~~~~ a. Install the lens. I 2. Rotate the lens downward. 2. Place the lamp assembly into t.he lamp assembly. 7 . To remove the old wiper blades, lift the wiper arm until it i n place. Snap the lens into a vertical position. Put a new bulb into the center slot at the bottom of the overhead... console lamp lens while pressing in order to lift out the lens. 3. Gently pry the screwdriver down in on the lamp assembly. 4. Slide the side tabs of the lens under the ...
