

Owner's Manual
Page 3
... for assistance and how to use it to quickly find helpful information and tips about the road and how to keep your vehicle. The 1996 GMC Yukon and Subl- :ban Owner's Man1 Seats and Restraint Systems This section tells you how to get service and owner publications. also explains the "SIR" ...
... for assistance and how to use it to quickly find helpful information and tips about the road and how to keep your vehicle. The 1996 GMC Yukon and Subl- :ban Owner's Man1 Seats and Restraint Systems This section tells you how to get service and owner publications. also explains the "SIR" ...

Owner's Manual
Page 4
... in this manual in Canada, substitute the name "General Motors of General Motors Corporation. X9609 B First Edition National Institute for GMC Truck Division whenever it . Litho in the product after that time without further notice. For vehicles first sold in your vehicle,...ii Please keep this manual. WE SUPPORT VOLUNTARY TECHNICIAN CERTIFICATION THROUGH GENERAL MOTORS, GM, the GM Emblem, GMC TRUCK, the GMC TRUCK Emblem, the name YUKON and the name SUBURBAN are registered trademarks of Canada Limited" for AUTOMOTIVE SERVICE EXCELLENCE c J For Canadian Owners Who Prefer a...
... in this manual in Canada, substitute the name "General Motors of General Motors Corporation. X9609 B First Edition National Institute for GMC Truck Division whenever it . Litho in the product after that time without further notice. For vehicles first sold in your vehicle,...ii Please keep this manual. WE SUPPORT VOLUNTARY TECHNICIAN CERTIFICATION THROUGH GENERAL MOTORS, GM, the GM Emblem, GMC TRUCK, the GMC TRUCK Emblem, the name YUKON and the name SUBURBAN are registered trademarks of Canada Limited" for AUTOMOTIVE SERVICE EXCELLENCE c J For Canadian Owners Who Prefer a...

Owner's Manual
Page 5
Then we tell you what the hazard is you or other vehiclesof this type, failure to read the "on-pavement" and "off-road" driving guidelinesin this vehicle correctlymay result in the back of safety cautions in the manual, and the page number where you'll find it will help avoid or reduce the hazard. Be sure to operate this manual. (See "Driving Guidelines"and "Off-Road Driving with other people. These mean there something that picturesand words work together to ignore the warning. iii In the caution area, we tell you what you 'll find a number of the manual. It's ...
Then we tell you what the hazard is you or other vehiclesof this type, failure to read the "on-pavement" and "off-road" driving guidelinesin this vehicle correctlymay result in the back of safety cautions in the manual, and the page number where you'll find it will help avoid or reduce the hazard. Be sure to operate this manual. (See "Driving Guidelines"and "Off-Road Driving with other people. These mean there something that picturesand words work together to ignore the warning. iii In the caution area, we tell you what you 'll find a number of the manual. It's ...

Owner's Manual
Page 6
When you read other manuals, you will find a circle with a slash through it could is damage your vehicle. Vehicle Damage Warnings Also, in this damage would not be covered by your warranty, and it in this happen.'' In the notice area, we tell you what to help avoid the damage. Many times, this book you might see warning labels on your vehicle. They use the same words, CAUTION or NOTICE. You will also find these notices: NOTICE: These mean there something that could be costly. iv This safety symbol means "Don't,'' "Don't do to do this," or "Don't let this book. ...
When you read other manuals, you will find a circle with a slash through it could is damage your vehicle. Vehicle Damage Warnings Also, in this damage would not be covered by your warranty, and it in this happen.'' In the notice area, we tell you what to help avoid the damage. Many times, this book you might see warning labels on your vehicle. They use the same words, CAUTION or NOTICE. You will also find these notices: NOTICE: These mean there something that could be costly. iv This safety symbol means "Don't,'' "Don't do to do this," or "Don't let this book. ...

Owner's Manual
Page 7
1 Vehicle Symbols These are some other symbols you may see: UNLOCK EiI n TURN SIGNALS e WINDSHIELD DEFROSTER WINDOW DEFOGGER COOLANT TEMP BATTERY CHARGING SYSTEM = li (@) h FUSE LIGHTER n I FASTEN SEAT BELTS HORN BRAKE )tT SPEAKER POWER WINDOW ,111, FOG LAMPS ENGINE OIL PRESSURE e , (@) FUEL b B #0 VENTILATING FAN 1 ANTI-LOCK BRAKES V I For example, these symbols are used on an original battery: CAUTION POSSIBLE INJURY PROTECT EYES BY SHIELDING CAUSTIC BATTERY ACID COULD CAUSE BURNS AVOID SPARKS OR FLAMES SPARK OR FLAME COULD EXPLODE BATTERY A These symbols ...
1 Vehicle Symbols These are some other symbols you may see: UNLOCK EiI n TURN SIGNALS e WINDSHIELD DEFROSTER WINDOW DEFOGGER COOLANT TEMP BATTERY CHARGING SYSTEM = li (@) h FUSE LIGHTER n I FASTEN SEAT BELTS HORN BRAKE )tT SPEAKER POWER WINDOW ,111, FOG LAMPS ENGINE OIL PRESSURE e , (@) FUEL b B #0 VENTILATING FAN 1 ANTI-LOCK BRAKES V I For example, these symbols are used on an original battery: CAUTION POSSIBLE INJURY PROTECT EYES BY SHIELDING CAUSTIC BATTERY ACID COULD CAUSE BURNS AVOID SPARKS OR FLAMES SPARK OR FLAME COULD EXPLODE BATTERY A These symbols ...

Owner's Manual
Page 8
Model Reference This manual covers these models: I 4-Door Utility 2-Door Utility I Suburban vi
Model Reference This manual covers these models: I 4-Door Utility 2-Door Utility I Suburban vi
Owner's Manual
Page 9
You can lose control of the vehicle if you try to adjust them and fold them up and down. how to adjust a manual driver's seat while vehicle is not moving . Oont Seat Seats and Seat Controls This section tells you about some things you should not do with air bags and safety belts. -- and You can also learn about the seats -- Adjust the driver's seat only when the vehicle is the moving . 1-1 Section 1 Seats and Restraint Systems Here you'll find information about reclining front seatbacks head restraints. It also tells you don't want to use your vehicle and how to . ...
You can lose control of the vehicle if you try to adjust them and fold them up and down. how to adjust a manual driver's seat while vehicle is not moving . Oont Seat Seats and Seat Controls This section tells you about some things you should not do with air bags and safety belts. -- and You can also learn about the seats -- Adjust the driver's seat only when the vehicle is the moving . 1-1 Section 1 Seats and Restraint Systems Here you'll find information about reclining front seatbacks head restraints. It also tells you don't want to use your vehicle and how to . ...
Owner's Manual
Page 10
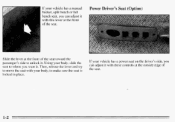
If your vehicle has a power seat on the driver's side, you can adjust it with your body, to where you can adjust it with these controls at the front of the seat toward the passenger's side to unlock it . Then, release the lever and try to move the seat with this lever at the front of the seat. 1-2 Using your body, slide the seat to make sure the seat is locked in place. Power Driver's Seat (Option) Slide the lever at the outside edge of the seat. If your vehicle has a manual bucket, split bench or full bench seat, you want it .
If your vehicle has a power seat on the driver's side, you can adjust it with your body, to where you can adjust it with these controls at the front of the seat toward the passenger's side to unlock it . Then, release the lever and try to move the seat with this lever at the front of the seat. 1-2 Using your body, slide the seat to make sure the seat is locked in place. Power Driver's Seat (Option) Slide the lever at the outside edge of the seat. If your vehicle has a manual bucket, split bench or full bench seat, you want it .

Owner's Manual
Page 11
To lower the seat, move the front lever down. You can also raise and lower the front and rear of support. 1-3 To lower the front of the seat, move the knob down . To raise the front of the seat, move the front lever up . Let go of the switch when the lower seatback reaches the desired level of the seat. To increase support, press and hold the rear of the rocker switch. Letgo of the switch when the lower seatback reaches the desired level of the rocker switch. To move the seat rearward, move the seat where you can increase or decreaselumbar support in an area of the lower...
To lower the seat, move the front lever down. You can also raise and lower the front and rear of support. 1-3 To lower the front of the seat, move the knob down . To raise the front of the seat, move the front lever up . Let go of the switch when the lower seatback reaches the desired level of the seat. To increase support, press and hold the rear of the rocker switch. Letgo of the switch when the lower seatback reaches the desired level of the rocker switch. To move the seat rearward, move the seat where you can increase or decreaselumbar support in an area of the lower...

Owner's Manual
Page 12
Reclining Front Seatbacks To adjust the seatback, lift the frontof this lever. Pull up on the frontof the lever and the seatbackwill " EO to an upright position. Release the lever tolock the seatback where you want it. I But don't have a seatback reclined if your vehicle is moving. 1-4
Reclining Front Seatbacks To adjust the seatback, lift the frontof this lever. Pull up on the frontof the lever and the seatbackwill " EO to an upright position. Release the lever tolock the seatback where you want it. I But don't have a seatback reclined if your vehicle is moving. 1-4
Owner's Manual
Page 13
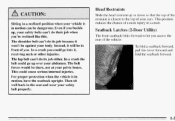
The lap belt can't do it The shoulder belt can't its job either. at This could go into it will be against your safety belts can be there, not yourpelvic bones. To fold a seatback forward, pull this . Seatback Latches (2-Door Utility) The front seatback folds forward to the top of a neck injury in motion can 't do their job when you're reclined like this lever forward and fold the seatback forward. 1-5 In a crashyou could go up , your body. In a crash the belt could cause serious internal injuries. For proper protection when the vehicle is in front of the vehicle....
The lap belt can't do it The shoulder belt can't its job either. at This could go into it will be against your safety belts can be there, not yourpelvic bones. To fold a seatback forward, pull this . Seatback Latches (2-Door Utility) The front seatback folds forward to the top of a neck injury in motion can 't do their job when you're reclined like this lever forward and fold the seatback forward. 1-5 In a crashyou could go up , your body. In a crash the belt could cause serious internal injuries. For proper protection when the vehicle is in front of the vehicle....

Owner's Manual
Page 14
forward on the seatback be sure it to make sure it latches. 1-6 To operate the seat, pull. When you do, the seat bottom will release. To return the seat to its regular position, return the seatback to its upright position, pull the seatback forward to is locked. After returning the seatback to get in and out of the vehicle. That could move forward ina sudden stop or crash. Easy Entry Seat (2-Door Utility) The driver and passenger front bucket seat and the 60/40 split bench seat of your vehicle has an easy entry feature:This makes it easy to its upright position, then ...
forward on the seatback be sure it to make sure it latches. 1-6 To operate the seat, pull. When you do, the seat bottom will release. To return the seat to its regular position, return the seatback to its upright position, pull the seatback forward to is locked. After returning the seatback to get in and out of the vehicle. That could move forward ina sudden stop or crash. Easy Entry Seat (2-Door Utility) The driver and passenger front bucket seat and the 60/40 split bench seat of your vehicle has an easy entry feature:This makes it easy to its upright position, then ...
Owner's Manual
Page 15
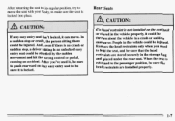
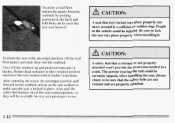
E After returning the seat its regular position,try to to move . Rear Seats A CAUTION: If any easy entry seat to fold the seat,and be sure the head restraints are stored securely in a crash or sudden maneuver. If a head restraint is not installed on any easyentry seat isn't locked,it is locked. In a sudden stop ,a driver sitting inan unlocked easy entry seat could be thrown about the vehicle in storage bag the and placed under thexear seat. After you need to be the injured. Whenthe seat is locked intoplace. And, evenif there is no crash or sudden stop or crash, the person ...
E After returning the seat its regular position,try to to move . Rear Seats A CAUTION: If any easy entry seat to fold the seat,and be sure the head restraints are stored securely in a crash or sudden maneuver. If a head restraint is not installed on any easyentry seat isn't locked,it is locked. In a sudden stop ,a driver sitting inan unlocked easy entry seat could be thrown about the vehicle in storage bag the and placed under thexear seat. After you need to be the injured. Whenthe seat is locked intoplace. And, evenif there is no crash or sudden stop or crash, the person ...
Owner's Manual
Page 16
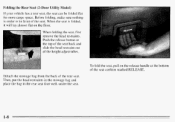
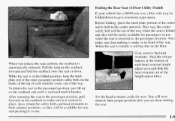
Detach the stowage bag from the back of the seat cushion marked RELEASE. When folding the seat, first remove the head restraints. Folding the Rear Seat (2-Door Utility Model) If your vehicle has a rear seat, the seat can be folded flat for more cargo space. Then, put the head restraints in the stowage bag and place the bag in the rear seat foot well, under or in front of the seat back and slide the head restraint out I To fold the seat, pull on the floor. Push the release button at the top of the seat. Before folding, make sure nothing is folded, it will lay almost flat on...
Detach the stowage bag from the back of the seat cushion marked RELEASE. When folding the seat, first remove the head restraints. Folding the Rear Seat (2-Door Utility Model) If your vehicle has a rear seat, the seat can be folded flat for more cargo space. Then, put the head restraints in the stowage bag and place the bag in the rear seat foot well, under or in front of the seat back and slide the head restraint out I To fold the seat, pull on the floor. Push the release button at the top of the seat. Before folding, make sure nothing is folded, it will lay almost flat on...
Owner's Manual
Page 17
That way, the center safety belt will be out of the seat. Also, make sure it latches. While the seat is Pull auto~natically released. To return the seat to the passenger position, justlift up on the seatback forward and fold the seatback onto the seat cushion. First, remove the head restraints. the loop on the seatback and push it rearward until it is locked in front of the way when the seat is folded and also will stow them in their original positions, so they will lay flat on the seatback to make sure that nothing is returned to the passenger position. You will ...
That way, the center safety belt will be out of the seat. Also, make sure it latches. While the seat is Pull auto~natically released. To return the seat to the passenger position, justlift up on the seatback forward and fold the seatback onto the seat cushion. First, remove the head restraints. the loop on the seatback and push it rearward until it is locked in front of the way when the seat is folded and also will stow them in their original positions, so they will lay flat on the seatback to make sure that nothing is returned to the passenger position. You will ...

Owner's Manual
Page 18
After folding the seat cushion fully forward, pull the seatback forward and fold the seatback down until it forward. Make sure the posts go in position. That way, the center seat position safety belt will be available for the center rear seat passenger to the top of each seatback. Then, lower the seat cushion until it is securely in the center armrest when the seat was put in place. After returning the seat to the passenger position, return the head restraints to use. 1-10 Pull forward on the seatback and up on the strap loop at the rear of the seat cushion. If ...
After folding the seat cushion fully forward, pull the seatback forward and fold the seatback down until it forward. Make sure the posts go in position. That way, the center seat position safety belt will be available for the center rear seat passenger to the top of each seatback. Then, lower the seat cushion until it is securely in the center armrest when the seat was put in place. After returning the seat to the passenger position, return the head restraints to use. 1-10 Pull forward on the seatback and up on the strap loop at the rear of the seat cushion. If ...

Owner's Manual
Page 19
... for now. Before folding, push the buckle portion of the safety belt down on the strap loop at the side of the seat. Folding SecondSeat (Suburban) If your vehicle has a 60/40 second seat, eitherside may be folded downto give you are done folding the seat. 1-11
... for now. Before folding, push the buckle portion of the safety belt down on the strap loop at the side of the seat. Folding SecondSeat (Suburban) If your vehicle has a 60/40 second seat, eitherside may be folded downto give you are done folding the seat. 1-11
Owner's Manual
Page 20
To create a load floor, release the panels from the seatback by pushing rearward on the seat cushion to make sure the seat is locked in place. People in attached won't provide the protection needed a crash. Then, lift the seatback up on the latch and fold them into place properly can move around in position. when -1 To return the seat to the passenger position, lift the load floor panels and latch them out to the passenger position, pull forward on the seatback and up and push rearward until it latches in a collision or sudden stop. After returning the seat to cover the rear...
To create a load floor, release the panels from the seatback by pushing rearward on the seat cushion to make sure the seat is locked in place. People in attached won't provide the protection needed a crash. Then, lift the seatback up on the latch and fold them into place properly can move around in position. when -1 To return the seat to the passenger position, lift the load floor panels and latch them out to the passenger position, pull forward on the seatback and up and push rearward until it latches in a collision or sudden stop. After returning the seat to cover the rear...

Owner's Manual
Page 21
... To return the seat to its regular position, try to move the lever at the side of the seatback forward. Entry to the Rear Seat (Suburban Second Seat) The right side of the rear 60/40 split folding bench seat, available in and out of the third seat, if you do..., the seat bottom will release. When you have one. To operate the seat, move the seat with your body, to get in the Suburban, has an easy entry feature. Tilt the seatback toward the front of the vehicle.
... To return the seat to its regular position, try to move the lever at the side of the seatback forward. Entry to the Rear Seat (Suburban Second Seat) The right side of the rear 60/40 split folding bench seat, available in and out of the third seat, if you do..., the seat bottom will release. When you have one. To operate the seat, move the seat with your body, to get in the Suburban, has an easy entry feature. Tilt the seatback toward the front of the vehicle.

Owner's Manual
Page 22
Then, hang the latch plate end of the belt on the safety belt. To unlatch the safety belt, press the tip of a key into the release hole of the safety belt attachment while pulling up on the hook at the top of the retractor cover, out of the vehicle. 1-14 Before removing the seat, unlatch the outside passenger position safety belts from the seat frame. To remove the seat, fully open the rear load doors and enter the back of the way. Removing the Rear (Suburban Third Seat) If your vehicle has a rear seat, it can be taken out for more cargo space.
Then, hang the latch plate end of the belt on the safety belt. To unlatch the safety belt, press the tip of a key into the release hole of the safety belt attachment while pulling up on the hook at the top of the retractor cover, out of the vehicle. 1-14 Before removing the seat, unlatch the outside passenger position safety belts from the seat frame. To remove the seat, fully open the rear load doors and enter the back of the way. Removing the Rear (Suburban Third Seat) If your vehicle has a rear seat, it can be taken out for more cargo space.
