

Owner's Manual
Page 23
Power Lumbar Adjustment To adjust the power lumbar, press the front of lever. Reclining Front Seatbacks To adjust the seatback, lift the front this of the lumbar switch at the side the seat. Release the lever to lock the seatback where you will go to upright position. 1-3 of Press the front the of support in the seatback. As you press the back the switch,you want up on the it. Press the rearof the switch to increase lumbar support. Pull an front of the lever and the seatback will hear air leaving the lumbar of switch to decrease lumbar support.
Power Lumbar Adjustment To adjust the power lumbar, press the front of lever. Reclining Front Seatbacks To adjust the seatback, lift the front this of the lumbar switch at the side the seat. Release the lever to lock the seatback where you will go to upright position. 1-3 of Press the front the of support in the seatback. As you press the back the switch,you want up on the it. Press the rearof the switch to increase lumbar support. Pull an front of the lever and the seatback will hear air leaving the lumbar of switch to decrease lumbar support.

Owner's Manual
Page 27
... seat down. To operate the seat, move the seatwith your foot. Justpull the seat forward until it stops. To release the easy entry second seat, lift on the top of the release lever up with your try body, to use when getting outof the third seat. Tilt the seatback toward the... of front of the vehicle. To return the seat to its regular position, return the seatback to get in Suburban, hasan easy entry feature. Easy Entry Seat (Suburban Second Seat) The right side of the rear 60/40 split folding bench seat, available the in and out of the...
... seat down. To operate the seat, move the seatwith your foot. Justpull the seat forward until it stops. To release the easy entry second seat, lift on the top of the release lever up with your try body, to use when getting outof the third seat. Tilt the seatback toward the... of front of the vehicle. To return the seat to its regular position, return the seatback to get in Suburban, hasan easy entry feature. Easy Entry Seat (Suburban Second Seat) The right side of the rear 60/40 split folding bench seat, available the in and out of the...
Owner's Manual
Page 29
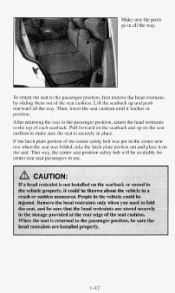
.... Also, return the safety belts and head restraints to their original positions, so they will be available for rear seat passengers to the passenger position, lift the seatback up with both hands and push it rearward until it to the passenger position, pull forward on the release handle at the top...
.... Also, return the safety belts and head restraints to their original positions, so they will be available for rear seat passengers to the passenger position, lift the seatback up with both hands and push it rearward until it to the passenger position, pull forward on the release handle at the top...
Owner's Manual
Page 32
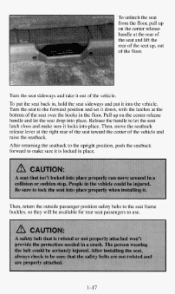
... on the seat. That way, the center seat position safety belt will be available for center rear seat passengers to the top of each seatback. Lift the seatback up on the seatback and up and push rearward all the way. If the latch plate portion of the seal cushion. After returning...
... on the seat. That way, the center seat position safety belt will be available for center rear seat passengers to the top of each seatback. Lift the seatback up on the seatback and up and push rearward all the way. If the latch plate portion of the seal cushion. After returning...

Owner's Manual
Page 35
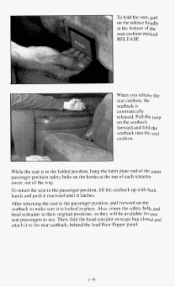
... the latch plate out of the seat cushion pockets, they so will be taken out for rear seat passengers to use. Removable Rear(Third) Seat (Suburban) If your vehicle has a rear seat,can be available for more cargo space. Then, lower the seat cushion it until latches.... Lift the seatback up cushion to the topof each seatback. Fold the load floor panels forward and latch'them into the seatback. After returning the seat ...
... the latch plate out of the seat cushion pockets, they so will be taken out for rear seat passengers to use. Removable Rear(Third) Seat (Suburban) If your vehicle has a rear seat,can be available for more cargo space. Then, lower the seat cushion it until latches.... Lift the seatback up cushion to the topof each seatback. Fold the load floor panels forward and latch'them into the seatback. After returning the seat ...
Owner's Manual
Page 37
... and put into the vehicle. To unlatch the seat from the floor, up pull on the center release handle atthe rear of the seat and lift the rear of the seat up on the center release handle and let the seat drop into place. After returning the seatback the upright position...
... and put into the vehicle. To unlatch the seat from the floor, up pull on the center release handle atthe rear of the seat and lift the rear of the seat up on the center release handle and let the seat drop into place. After returning the seatback the upright position...
Owner's Manual
Page 76
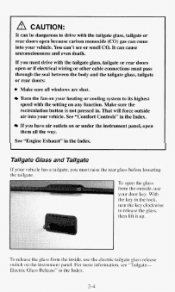
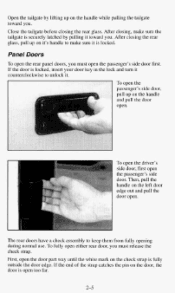
... your vehicle. To release the glass from the outside in the Index. It can come (CO) into your heatingcooling system to release the glass, then lift it up. See "Comfort Controls" in . You can't see '*TailgateElectric Glass Release" i n the Index. 2-4 Make sure the recirculation button is not pressed That will force...
... your vehicle. To release the glass from the outside in the Index. It can come (CO) into your heatingcooling system to release the glass, then lift it up. See "Comfort Controls" in . You can't see '*TailgateElectric Glass Release" i n the Index. 2-4 Make sure the recirculation button is not pressed That will force...
Owner's Manual
Page 77
First, open the door part until the white markon the check strap is open either rear door, must release the check strap. Open the tailgateby lifting up on the door, the If pin door is fully way outside the door edge. Close the tailgate before closing the rear it glass, pull ...
First, open the door part until the white markon the check strap is open either rear door, must release the check strap. Open the tailgateby lifting up on the door, the If pin door is fully way outside the door edge. Close the tailgate before closing the rear it glass, pull ...

Owner's Manual
Page 109
To release the glass, press the top of the switch button. If you have an automatic transmission, your electric tailgate glass release, see the caution under "Tailgate Glass, Tailgate and Rear Doors" in PARK (P) or NEUTRAL (N) for the release to work . 2-37 With a manual transmission, you release the tailgate glass. Electric Tailgate Glass Release Before operating your shift levermust be in this section. The electrichatch release button lets you must apply the parking brake for the release to work . Then, lift thewindow up to open.
To release the glass, press the top of the switch button. If you have an automatic transmission, your electric tailgate glass release, see the caution under "Tailgate Glass, Tailgate and Rear Doors" in PARK (P) or NEUTRAL (N) for the release to work . 2-37 With a manual transmission, you release the tailgate glass. Electric Tailgate Glass Release Before operating your shift levermust be in this section. The electrichatch release button lets you must apply the parking brake for the release to work . Then, lift thewindow up to open.

Owner's Manual
Page 131
Your console alsohas a cup holder that slides out at the bottom of the console. 2-5 9 the To open it, lift the latch handle and swing the door open. Center Floor Console Your vehicle may have a console compartment between bucket seats. There is also a drawer that swings out for the back seat passengers to use.
Your console alsohas a cup holder that slides out at the bottom of the console. 2-5 9 the To open it, lift the latch handle and swing the door open. Center Floor Console Your vehicle may have a console compartment between bucket seats. There is also a drawer that swings out for the back seat passengers to use.

Owner's Manual
Page 154
... have a cargo security shade, you can use the shade. Center High Mount Stop Lamp (CHMSL) If items are loaded on the roof of your vehicle. Lift the shade up on the cargo area trim panels. Let the shade move forward and latch the shade posts into the holcier.
... have a cargo security shade, you can use the shade. Center High Mount Stop Lamp (CHMSL) If items are loaded on the roof of your vehicle. Lift the shade up on the cargo area trim panels. Let the shade move forward and latch the shade posts into the holcier.

Owner's Manual
Page 158
... select a trailer with a rear step pad at the center of the bumper. Use this pad to attach the trailer safety chains. To remove the pad, lift the edge of the bumper and swing it forward. When the pad releases from the rear of the pad from the bumper holes..., lift the pad off. 2-86 If you must also remove both outer cutouts to improve footing when you leave it loose enough so the wiring won 't ...
... select a trailer with a rear step pad at the center of the bumper. Use this pad to attach the trailer safety chains. To remove the pad, lift the edge of the bumper and swing it forward. When the pad releases from the rear of the pad from the bumper holes..., lift the pad off. 2-86 If you must also remove both outer cutouts to improve footing when you leave it loose enough so the wiring won 't ...

Owner's Manual
Page 249
Gasoline Engines When you decide it's safe to lift the hood, here's what you still have the warning, turn o f t h e engine and get service help right away. Radiator pressure cap If the coolant inside the ... cools down . Bring the engine speed back to get everyone out of steam, push the accelerator until it cools down . 5-1 1 You may decide not to lift the hood but to normal idle speed after two or three minutes. Engine fan(s) C. But then, if you 'll see if the warning stops. Cooling...
Gasoline Engines When you decide it's safe to lift the hood, here's what you still have the warning, turn o f t h e engine and get service help right away. Radiator pressure cap If the coolant inside the ... cools down . Bring the engine speed back to get everyone out of steam, push the accelerator until it cools down . 5-1 1 You may decide not to lift the hood but to normal idle speed after two or three minutes. Engine fan(s) C. But then, if you 'll see if the warning stops. Cooling...

Owner's Manual
Page 256
The coolant level should be at or above the COLD mark. If it isn't, you 'll see: A. Engine fan(s) C. Radiator If the coolant inside the coolant surge tank is boiling, don't do anything else until it 's safe to lift the hood, here's what you may have a leak in the radiator hoses, heater hoses, radiator, water pump or somewhere else in the cooling system. 5-18 Diesel Engines ... , - ..::* When you decide it cools down. Coolant surge tank pressure cap B. Cooling System-
The coolant level should be at or above the COLD mark. If it isn't, you 'll see: A. Engine fan(s) C. Radiator If the coolant inside the coolant surge tank is boiling, don't do anything else until it 's safe to lift the hood, here's what you may have a leak in the radiator hoses, heater hoses, radiator, water pump or somewhere else in the cooling system. 5-18 Diesel Engines ... , - ..::* When you decide it cools down. Coolant surge tank pressure cap B. Cooling System-
Owner's Manual
Page 265
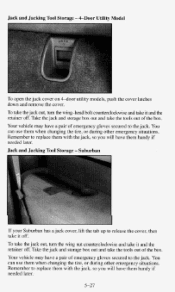
... Your vehicle may have them when changing thetire, or during otheremergency situations. Take thejack and storage box out and take it retainer off . Suburban If your Suburbanhas a jack cover, lift the tab up to the jack. To take out retainer off . if Remember to replace them with the jack, so you will...
... Your vehicle may have them when changing thetire, or during otheremergency situations. Take thejack and storage box out and take it retainer off . Suburban If your Suburbanhas a jack cover, lift the tab up to the jack. To take out retainer off . if Remember to replace them with the jack, so you will...

Owner's Manual
Page 272
... Tire Start with the jack, the jack handle and the ratchet. That will show you 'll need the jack handle extensions also. next part will lift the jack head a little. Remove the wheel trim and flat loosen the wheel nuts. Before you , rotate the ratchet clockwise. UP a One side of the...
... Tire Start with the jack, the jack handle and the ratchet. That will show you 'll need the jack handle extensions also. next part will lift the jack head a little. Remove the wheel trim and flat loosen the wheel nuts. Before you , rotate the ratchet clockwise. UP a One side of the...

Owner's Manual
Page 274
... your vehicle with the jack improperly positioned will damage thevehicle or may allow the vehicle to fit the jack head into the proper location before lift raising yourvehicle. Front Position Rear Position With UP on the jack handle. Raise the vehicle far enough off the ground so there is vehicle slipsoff...
... your vehicle with the jack improperly positioned will damage thevehicle or may allow the vehicle to fit the jack head into the proper location before lift raising yourvehicle. Front Position Rear Position With UP on the jack handle. Raise the vehicle far enough off the ground so there is vehicle slipsoff...

Owner's Manual
Page 292
... filter head. 5. Close the air bleed valve and replace the fuel cap. 1 0 . With the air bleed valve open, turn your ignition key to 15 seconds. Lift the element out of the filter head 8. Replace and tighten the ring nut to cool. Do this until the mating surfaces touch. 7. If there is...
... filter head. 5. Close the air bleed valve and replace the fuel cap. 1 0 . With the air bleed valve open, turn your ignition key to 15 seconds. Lift the element out of the filter head 8. Replace and tighten the ring nut to cool. Do this until the mating surfaces touch. 7. If there is...

Owner's Manual
Page 326
... you replace parts of your brakes may no longer work well together if the vehicle is t o have to be of your windshield wiper blade inserts, lift the wiper arm and rotate the blade until it is facing away from the holding clips. For example, if someone puts i n the wrong replacen.lent...
... you replace parts of your brakes may no longer work well together if the vehicle is t o have to be of your windshield wiper blade inserts, lift the wiper arm and rotate the blade until it is facing away from the holding clips. For example, if someone puts i n the wrong replacen.lent...

Owner's Manual
Page 333
Remove the screws and lift off the lens. 2. Put a new bulb into the side marker assembly and turn it to the right to tighten it is tight. 4. Put the socket back into the socket and push it in until it . 6. Replace the lens and tighten the screws. Replace the parkinghrn signal lamp assembly and tighten the screws. Roof Marker Lamps I . 5. Pull the bulb straight out of the socket. 3.
Remove the screws and lift off the lens. 2. Put a new bulb into the side marker assembly and turn it to the right to tighten it is tight. 4. Put the socket back into the socket and push it in until it . 6. Replace the lens and tighten the screws. Replace the parkinghrn signal lamp assembly and tighten the screws. Roof Marker Lamps I . 5. Pull the bulb straight out of the socket. 3.
