
Owner's Manual
Page 8
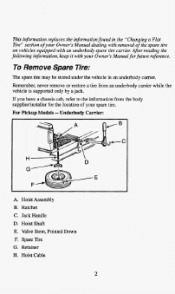
..."Changinga Flat Ere" section o your Owner's Manual dealing with removal the spare tire f of For Pickup Models -- of on vehicles equipped with your spare tire. Jack Handle D. Retainer H. Hoist Cable 2 After reading the following information, keepit with an underbody spare tire carrier. Remember, never removeor restore a tire from the body ... informationfound in an underbody carrier. If you havea chassis cab, refer to the information from an underbody carrier whil vehicle is supported only by a jack. Ratchet C. Hoist Shaft E. Valve Stem, Pointed Down E Spare Tire G.
..."Changinga Flat Ere" section o your Owner's Manual dealing with removal the spare tire f of For Pickup Models -- of on vehicles equipped with your spare tire. Jack Handle D. Retainer H. Hoist Cable 2 After reading the following information, keepit with an underbody spare tire carrier. Remember, never removeor restore a tire from the body ... informationfound in an underbody carrier. If you havea chassis cab, refer to the information from an underbody carrier whil vehicle is supported only by a jack. Ratchet C. Hoist Shaft E. Valve Stem, Pointed Down E Spare Tire G.

Owner's Manual
Page 9
...can be pulled out from under the vehicle. 3. One sideof the ratchet has anUP marking. Assemble the ratchet to lower the spare tire: 1. Jack Handle E. Insert the other side has DOWN a marking. Hoist Shaft C. Ratchet D. When the tire has been lowered, tilt the retainer at ...the end of the jack hand (as illustrated) with the DOWN marking facing you. For 4-DOOr Utility Models: D A. Hoist Assembly B. Retainer E Valve Stem, Pointed Down G. in...
...can be pulled out from under the vehicle. 3. One sideof the ratchet has anUP marking. Assemble the ratchet to lower the spare tire: 1. Jack Handle E. Insert the other side has DOWN a marking. Hoist Shaft C. Ratchet D. When the tire has been lowered, tilt the retainer at ...the end of the jack hand (as illustrated) with the DOWN marking facing you. For 4-DOOr Utility Models: D A. Hoist Assembly B. Retainer E Valve Stem, Pointed Down G. in...

Owner's Manual
Page 10
... Make retainer is stored securely and does not move. 4 Attach the ratchet, with the p marking facing you, near the hook at the rear of the jack handle as illustrated. Grasp and push against the underside of the 3. Insert the other end, on the ground at the U end of the vehicle. of...
... Make retainer is stored securely and does not move. 4 Attach the ratchet, with the p marking facing you, near the hook at the rear of the jack handle as illustrated. Grasp and push against the underside of the 3. Insert the other end, on the ground at the U end of the vehicle. of...

Owner's Manual
Page 262
... pressure cap. Under heavy vehicle loading, trailer towing and/or high outside temperatures, the Pan speed increases as the fan clutch partially disengages. Take your jacking equipment to cool the engine. Get the vehicle under control by steering the way you want the vehicle to "blow out" while you're driving...
... pressure cap. Under heavy vehicle loading, trailer towing and/or high outside temperatures, the Pan speed increases as the fan clutch partially disengages. Take your jacking equipment to cool the engine. Get the vehicle under control by steering the way you want the vehicle to "blow out" while you're driving...

Owner's Manual
Page 263
The equipment you how to a level place. Flat Tire B. Changing a Flat Tire If a tire goes flat, avoid further tire and wheel damage by driving slowly to use the jack and change a tire. Blocked Tire The following stepswill tell you 'll need is located in the rear cargo area. You'll also find your hazard warning flashers. A. Turn on your spare tire there. 5-25
The equipment you how to a level place. Flat Tire B. Changing a Flat Tire If a tire goes flat, avoid further tire and wheel damage by driving slowly to use the jack and change a tire. Blocked Tire The following stepswill tell you 'll need is located in the rear cargo area. You'll also find your hazard warning flashers. A. Turn on your spare tire there. 5-25

Owner's Manual
Page 264
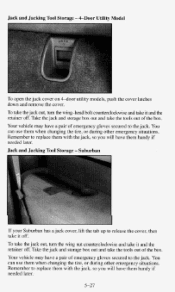
... wing nut counterclockwise and take it and the retainer- or during other emergency situations. Remember to the jack. Jack and Jacking Tool Storage - 2-Door Utility Model If your 2-door utility model has a jack cover, turn the wing nut counterclockwise and take the tools out of the box. The removal of ... may have them when changing the tire. Spare Tire- 2-Door Utility Model and Suburban First open the tire cover, if you will have a pair of emergency gloves secured to replace them with the jack, so you have one. Turn the wing nut counterclockwise and take the cover off...
... wing nut counterclockwise and take it and the retainer- or during other emergency situations. Remember to the jack. Jack and Jacking Tool Storage - 2-Door Utility Model If your 2-door utility model has a jack cover, turn the wing nut counterclockwise and take the tools out of the box. The removal of ... may have them when changing the tire. Spare Tire- 2-Door Utility Model and Suburban First open the tire cover, if you will have a pair of emergency gloves secured to replace them with the jack, so you have one. Turn the wing nut counterclockwise and take the cover off...
Owner's Manual
Page 265
...of emergency gloves secured to the jack. Jack and JackingTool Storage - Take thejack and storage box out and take the tools of emergency gloves securedto the jack.You can use themwhen changing thetire, or during other emergency situations. Suburban If your Suburbanhas a jack cover, lift the tab up to... replace themwith the jack, so you will have a pair of the box. out ...
...of emergency gloves secured to the jack. Jack and JackingTool Storage - Take thejack and storage box out and take the tools of emergency gloves securedto the jack.You can use themwhen changing thetire, or during other emergency situations. Suburban If your Suburbanhas a jack cover, lift the tab up to... replace themwith the jack, so you will have a pair of the box. out ...

Owner's Manual
Page 266
All Models 1. Nut 3. Bracket 5-28 Jack Handle 3. Secure in Vehicle as Shown 4. Socket 2. Retainer 2. Jacking Tool Storage Box 5 . Jacking Tool Storage - Ratchet Jack Storage %Door Utility Model 4. Jack Storage Box 5. Jack - Jack Handle Extension - 1.
All Models 1. Nut 3. Bracket 5-28 Jack Handle 3. Secure in Vehicle as Shown 4. Socket 2. Retainer 2. Jacking Tool Storage Box 5 . Jacking Tool Storage - Ratchet Jack Storage %Door Utility Model 4. Jack Storage Box 5. Jack - Jack Handle Extension - 1.

Owner's Manual
Page 267
Retainer 2. Jack Storage Box 5. Secure in Vehicle as Shown 4. Jack - Jack Storage Box 5 . Retainer 2. Bracket Jack Storage Suburban - 1 -2 n -3 -4 1. Jack Storage - &Door Utility Model 1. Nut 3. Bracket 5-29 Nut 3. Secure in Vehicle as Shown 4. Jack -
Retainer 2. Jack Storage Box 5. Secure in Vehicle as Shown 4. Jack - Jack Storage Box 5 . Retainer 2. Bracket Jack Storage Suburban - 1 -2 n -3 -4 1. Jack Storage - &Door Utility Model 1. Nut 3. Bracket 5-29 Nut 3. Secure in Vehicle as Shown 4. Jack -

Owner's Manual
Page 269
Ratchet 3. Hoist Shaft 5 . Valve Stem, Pointed Down ti. Hoist Assembly 2. Hoist Cable The &door utility spare tire is supported only by a jack. 5-3 I Retainer 8. Wheel Wrench 4. Spare Tire 7. Spare Tire - &Door Utility Model 1. Remember, never remove or restow a tire from an under-body carrier while the vehicle is stowed under the vehicle in an under-body carrier.
Ratchet 3. Hoist Shaft 5 . Valve Stem, Pointed Down ti. Hoist Assembly 2. Hoist Cable The &door utility spare tire is supported only by a jack. 5-3 I Retainer 8. Wheel Wrench 4. Spare Tire 7. Spare Tire - &Door Utility Model 1. Remember, never remove or restow a tire from an under-body carrier while the vehicle is stowed under the vehicle in an under-body carrier.

Owner's Manual
Page 272
... ratchet has an marking. The other side hasDOWN marking. Remove the wheel trim and flat loosen the wheel nuts. Changing the Tire Start with the jack, the jack handle and the ratchet. Attach thejack handle (andjack handle extension,if needed) to do The howthese things properly. 5-34 Before you , rotate the ratchet... clockwise. If the flat tireis on the ratchet facing you start, put the spare tire near the tire. next part will lift the jack head a little. UP a One side of the vehicle, you to the...
... ratchet has an marking. The other side hasDOWN marking. Remove the wheel trim and flat loosen the wheel nuts. Changing the Tire Start with the jack, the jack handle and the ratchet. Attach thejack handle (andjack handle extension,if needed) to do The howthese things properly. 5-34 Before you , rotate the ratchet... clockwise. If the flat tireis on the ratchet facing you start, put the spare tire near the tire. next part will lift the jack head a little. UP a One side of the vehicle, you to the...

Owner's Manual
Page 274
... for the spare tire to fit the jack head into the proper location before lift raising yourvehicle. I A CAUTION: NOTICE: Getting under a vehicle when it jacked up is vehicle slipsoff the jack, you , raise the vehicle by a jack. put the jack handle extension on the ratchet facing you... could badly injuredor killed. Be sure to fit. 5-36 Position the jack under a vehicle whenit is on the rear of...
... for the spare tire to fit the jack head into the proper location before lift raising yourvehicle. I A CAUTION: NOTICE: Getting under a vehicle when it jacked up is vehicle slipsoff the jack, you , raise the vehicle by a jack. put the jack handle extension on the ratchet facing you... could badly injuredor killed. Be sure to fit. 5-36 Position the jack under a vehicle whenit is on the rear of...

Owner's Manual
Page 277
For proper torque, see "Wheel Nut Torque" in a criss-cross sequence as shown. Thenext part, "Storing the Jack and Tire," will show you begin driving again. Remember, the jack, jacking equipment and tire must be properly stored in their original storage position before you how. 5-39 Rotate the wheel wrench clockwise. Put the wheel...
For proper torque, see "Wheel Nut Torque" in a criss-cross sequence as shown. Thenext part, "Storing the Jack and Tire," will show you begin driving again. Remember, the jack, jacking equipment and tire must be properly stored in their original storage position before you how. 5-39 Rotate the wheel wrench clockwise. Put the wheel...

Owner's Manual
Page 278
...vehicle with the valve stem pointed down. 2. Turn the ratchet clockwise to the wheel wrench with the bolt through the wheel opening. 3. Stowing the Jack and Jacking Tools Put the tools into the hoist shaft. 5. Secure the in the in the proper location for your vehicle has them, to make sure ...if your vehicle has one . 5-40 Turn the nut clockwise until the adapter is tight against the wheel. 5. Stowing the Tire 2-Door Utility Model and Suburban Stow the flat tire in the cargo area of the vehicle secured in the right direction as shown illustrations earlier this part. Be sure the...
...vehicle with the valve stem pointed down. 2. Turn the ratchet clockwise to the wheel wrench with the bolt through the wheel opening. 3. Stowing the Jack and Jacking Tools Put the tools into the hoist shaft. 5. Secure the in the in the proper location for your vehicle has them, to make sure ...if your vehicle has one . 5-40 Turn the nut clockwise until the adapter is tight against the wheel. 5. Stowing the Tire 2-Door Utility Model and Suburban Stow the flat tire in the cargo area of the vehicle secured in the right direction as shown illustrations earlier this part. Be sure the...

Owner's Manual
Page 483
... "Driving in the Rain") I If You're Stuck in Sand. or Snow ...5-41 Ignitionswitch ...2-12 Inflation-Tire Pressure (See "Tires") Instrument Cluster ...2-67 InstrumentPanel ...2-67 Jacking Equipment Storage ...5-26. 5-40 Jumpstarting ...5-2 5
... "Driving in the Rain") I If You're Stuck in Sand. or Snow ...5-41 Ignitionswitch ...2-12 Inflation-Tire Pressure (See "Tires") Instrument Cluster ...2-67 InstrumentPanel ...2-67 Jacking Equipment Storage ...5-26. 5-40 Jumpstarting ...5-2 5


