

Owner's Manual
Page 3
..., Yukon, Safari, Astro, Rally, Vandura, Chevrolet Van, Lumina Minivan and Trans Sport are registered trademarksof General Motors Corporation. We reserve the right to the 1995 C/K Series, Sierra, Suburban, Tahoe, Yukon, Safari, Astro, Rall' Vandura, Chevrolet Van, Lumina Minivan and Trans Sport Owner's Manuals This supplement includes the latest information at the timeofprinting...
..., Yukon, Safari, Astro, Rally, Vandura, Chevrolet Van, Lumina Minivan and Trans Sport are registered trademarksof General Motors Corporation. We reserve the right to the 1995 C/K Series, Sierra, Suburban, Tahoe, Yukon, Safari, Astro, Rall' Vandura, Chevrolet Van, Lumina Minivan and Trans Sport Owner's Manuals This supplement includes the latest information at the timeofprinting...

Owner's Manual
Page 4
The disc will take the disc out of the player. the radio display. The following these directions: To load CD into the player, hold the disc the label side up and insert it future reference. Remote Compact Disc ATC System (Optional) If you have the optional remote CD player, you can play normal size or 8 cm discs by following conditions may have caused the error: The road is dirty, scratched,or wet. The player will start playing.To remove the disc, not press the eject key and take ov If the at anytime, error has an occurred. It is too rough. the ignitionoff, simply ...
The disc will take the disc out of the player. the radio display. The following these directions: To load CD into the player, hold the disc the label side up and insert it future reference. Remote Compact Disc ATC System (Optional) If you have the optional remote CD player, you can play normal size or 8 cm discs by following conditions may have caused the error: The road is dirty, scratched,or wet. The player will start playing.To remove the disc, not press the eject key and take ov If the at anytime, error has an occurred. It is too rough. the ignitionoff, simply ...

Owner's Manual
Page 5
The track number will appear in the display. Press RECALL again to return the to to the tape player, press TAPE/AUX. PROG (2) - If you hold this button or press it hold this mode. While in the RDM mode, RANDOM appears in CD mode. 00 (5) - NEXT will also of REV (4) - reduce tape noise a cassette player is A" playing, press the . To return to time display. EJECT - Pressing PROG will CD appear in the display. PREV (1) - you press SEEK,PREV, or NEXT trackin the random sequence will start playing on the disc in minutes and tenthsa second. RDM (2) - Release ...
The track number will appear in the display. Press RECALL again to return the to to the tape player, press TAPE/AUX. PROG (2) - If you hold this button or press it hold this mode. While in the RDM mode, RANDOM appears in CD mode. 00 (5) - NEXT will also of REV (4) - reduce tape noise a cassette player is A" playing, press the . To return to time display. EJECT - Pressing PROG will CD appear in the display. PREV (1) - you press SEEK,PREV, or NEXT trackin the random sequence will start playing on the disc in minutes and tenthsa second. RDM (2) - Release ...
Owner's Manual
Page 7
For vehiclescfirst sold in Canada, substitute the name "General Motors of printing. We reserve the right to the 1995 Sierra, C/K Series, Yukon and Tahoe Owner's Manuals This supplement includes the latest information at the time of Canada" for General Motors wherever itappears in this supplement. @Copyright1995 General Motors Corporation. General Motors, Tahoe, Sierra Yukon are registered trademarksof and General Motors Corporation. Printed n i U.S.A. All rights reserved. STFF6S 1 Supplement to make changes in the product afier that time without jkrther notice.
For vehiclescfirst sold in Canada, substitute the name "General Motors of printing. We reserve the right to the 1995 Sierra, C/K Series, Yukon and Tahoe Owner's Manuals This supplement includes the latest information at the time of Canada" for General Motors wherever itappears in this supplement. @Copyright1995 General Motors Corporation. General Motors, Tahoe, Sierra Yukon are registered trademarksof and General Motors Corporation. Printed n i U.S.A. All rights reserved. STFF6S 1 Supplement to make changes in the product afier that time without jkrther notice.
Owner's Manual
Page 8
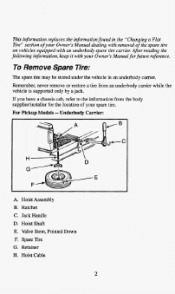
If you havea chassis cab, refer to the information from an underbody carrier whil vehicle is supported only by a jack. Underbody Carrier: A. Hoist Shaft E. Retainer H. Hoist Assembly B. Hoist Cable 2 Jack Handle D. Valve Stem, Pointed Down E Spare Tire G. To Remove Spare Tire: The spare tire may be stored under the vehicle in the "Changinga Flat Ere" section o your Owner's Manual dealing with removal the spare tire f of For Pickup Models -- Remember, never removeor restore a tire from the body supplier/installer for the location your Owner'sManual for future ...
If you havea chassis cab, refer to the information from an underbody carrier whil vehicle is supported only by a jack. Underbody Carrier: A. Hoist Shaft E. Retainer H. Hoist Assembly B. Hoist Cable 2 Jack Handle D. Valve Stem, Pointed Down E Spare Tire G. To Remove Spare Tire: The spare tire may be stored under the vehicle in the "Changinga Flat Ere" section o your Owner's Manual dealing with removal the spare tire f of For Pickup Models -- Remember, never removeor restore a tire from the body supplier/installer for the location your Owner'sManual for future ...

Owner's Manual
Page 9
For 4-DOOr Utility Models: D A. Ratchet D. Continue tothe ratchet until the spare tire can be pulled out from under the vehicle. 3. Jack Handle E. One sideof the ratchet has anUP marking. in turn 2. When the tire has been lowered, tilt the retainer at the end of the jack hand (as illustrated) with the DOWN marking facing you. Retainer E Valve Stem, Pointed Down G. Insert the other side has DOWN a marking. Turn the ratchet to lower the spare tire to the hook near the end of theso cable it can be pulled up through the hole the rear bumper and into the hoist shaft....
For 4-DOOr Utility Models: D A. Ratchet D. Continue tothe ratchet until the spare tire can be pulled out from under the vehicle. 3. Jack Handle E. One sideof the ratchet has anUP marking. in turn 2. When the tire has been lowered, tilt the retainer at the end of the jack hand (as illustrated) with the DOWN marking facing you. Retainer E Valve Stem, Pointed Down G. Insert the other side has DOWN a marking. Turn the ratchet to lower the spare tire to the hook near the end of theso cable it can be pulled up through the hole the rear bumper and into the hoist shaft....

Owner's Manual
Page 10
To Restore Spare or Flat Tire; 1. Tilt the retainer downward and through the holein the rear bumper and into the hoist shaft. 4. Raise the tirefully against the tire to the rear. 2. of vehicle. Attach the ratchet, with the p marking facing you, near the hook at the rear of the jack handle as illustrated. Continue turning the ratchet until there are two "clicks" or "ratchets." The spare tire hoist cannot be sure it is stored securely and does not move. 4 Position the tire so that the valve stem is fully seated across the underside wheel. Insert the other end, on the ...
To Restore Spare or Flat Tire; 1. Tilt the retainer downward and through the holein the rear bumper and into the hoist shaft. 4. Raise the tirefully against the tire to the rear. 2. of vehicle. Attach the ratchet, with the p marking facing you, near the hook at the rear of the jack handle as illustrated. Continue turning the ratchet until there are two "clicks" or "ratchets." The spare tire hoist cannot be sure it is stored securely and does not move. 4 Position the tire so that the valve stem is fully seated across the underside wheel. Insert the other end, on the ...
Owner's Manual
Page 11
How to Use this manual. Features & Controls This section explainshow to operate your audio system. Your Driving and the Road Here you'll find something you want to read. 1 Service & Appearance Care Here the manual tells you how to use your seats and safety belts properly. Customer Assistance Information This section tells you how to use your manual and includes safety and vehicle damagewarnings and symbols. Seats and Restraint Systems This section tells you how to contact GM for assistance and how to get service publications. It also explains the air bag system. Section ...
How to Use this manual. Features & Controls This section explainshow to operate your audio system. Your Driving and the Road Here you'll find something you want to read. 1 Service & Appearance Care Here the manual tells you how to use your seats and safety belts properly. Customer Assistance Information This section tells you how to use your manual and includes safety and vehicle damagewarnings and symbols. Seats and Restraint Systems This section tells you how to contact GM for assistance and how to get service publications. It also explains the air bag system. Section ...
Owner's Manual
Page 12
...help you enjoy safe and trouble-free operation of your 1995 GMC Truck Yukon and Suburban and to provide important safety information. GMC Truck Division General Motors Corporation Pontiac, Michigan n G Copyright 1994 General Motors Corporation, GMC Truck Division All Rights Reserved Second Edition Printed in your... needs both during and after the warranty period. We urge you to review all of the GMC Truck family. In some vehicles. Introduction 1995 GMC Truck Yukonand Suburban Owner's Manual Welcome This manual was prepared to acquaint you with your vehicle. This will help...
...help you enjoy safe and trouble-free operation of your 1995 GMC Truck Yukon and Suburban and to provide important safety information. GMC Truck Division General Motors Corporation Pontiac, Michigan n G Copyright 1994 General Motors Corporation, GMC Truck Division All Rights Reserved Second Edition Printed in your... needs both during and after the warranty period. We urge you to review all of the GMC Truck family. In some vehicles. Introduction 1995 GMC Truck Yukonand Suburban Owner's Manual Welcome This manual was prepared to acquaint you with your vehicle. This will help...

Owner's Manual
Page 13
... Drivers About This Manual Please keep thismanual in your Four-wheel Drive Vehicle" in the Index.) WE SUPPORT VOLUNTARY TECHNICIAN CERTIFICATION THROUGH National Institute for GMC Truck Division whenever it appears in this type, failure to operatethis vehicle correctly may result in loss of Canada Limited" for AUTOMOTIVE SERVICE EXCELLENCE 111...
... Drivers About This Manual Please keep thismanual in your Four-wheel Drive Vehicle" in the Index.) WE SUPPORT VOLUNTARY TECHNICIAN CERTIFICATION THROUGH National Institute for GMC Truck Division whenever it appears in this type, failure to operatethis vehicle correctly may result in loss of Canada Limited" for AUTOMOTIVE SERVICE EXCELLENCE 111...
Owner's Manual
Page 14
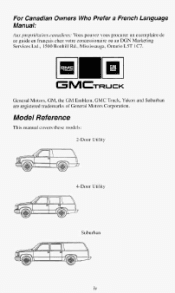
GMC Truck. Yukon and Suburban are registered trademarks of General Motors Corporation. Model Reference This nxmual covers these models: 3-Door Utility 4-Door Utility Suburban iV For Canadian Owners Who Prefer a French Language Manual: Aux propriktnires cancldierzs: Vous pouvez vous procurer un exemplaire de ce guide en franpis chez votre concessionaire ou au DGN Marketing Services Ltd., 1500 Bonhill Rd., Mississauga, Ontario L5T lC7. GMTRUCK General Motors, GM, the GM Emblem.
GMC Truck. Yukon and Suburban are registered trademarks of General Motors Corporation. Model Reference This nxmual covers these models: 3-Door Utility 4-Door Utility Suburban iV For Canadian Owners Who Prefer a French Language Manual: Aux propriktnires cancldierzs: Vous pouvez vous procurer un exemplaire de ce guide en franpis chez votre concessionaire ou au DGN Marketing Services Ltd., 1500 Bonhill Rd., Mississauga, Ontario L5T lC7. GMTRUCK General Motors, GM, the GM Emblem.

Owner's Manual
Page 15
Safety Warnings and Symbols You will find that pictures and words work together to ignore the warning. You will help avoid or reduce the hazard. Please read their owner's manual from beginning to end when they first receive their new vehicle. It's an alphabetical list of all that could be hurt. If you don't, you 'll find a number of the manual. This safety symbol means "Don't,'' "Don't do to look for your vehicle. INDEX: A good place to help you learn about things that 's in this happen." V Then we tell you what the hazard is the Index in this...
Safety Warnings and Symbols You will find that pictures and words work together to ignore the warning. You will help avoid or reduce the hazard. Please read their owner's manual from beginning to end when they first receive their new vehicle. It's an alphabetical list of all that could be hurt. If you don't, you 'll find a number of the manual. This safety symbol means "Don't,'' "Don't do to look for your vehicle. INDEX: A good place to help you learn about things that 's in this happen." V Then we tell you what the hazard is the Index in this...

Owner's Manual
Page 16
They use yellow for cautions, blue for notices and the words CAUTION or NOTICE. When you read other manuals, you will find these symbols are some of the symbols you might see warning labels on an original battery: A I I Avoid Sparks or Flames Vi But the notice will find on your vehicle. You'll also see CAUTION and NOTICE warnings in different colors OF in this damage would not be costly. Vehicle Damage Warnings Also, in different words. vehicle. Vehicle Symbols These are used on your vehicle. Many times, this book you will tell you what to do to help ...
They use yellow for cautions, blue for notices and the words CAUTION or NOTICE. When you read other manuals, you will find these symbols are some of the symbols you might see warning labels on an original battery: A I I Avoid Sparks or Flames Vi But the notice will find on your vehicle. You'll also see CAUTION and NOTICE warnings in different colors OF in this damage would not be costly. Vehicle Damage Warnings Also, in different words. vehicle. Vehicle Symbols These are used on your vehicle. Many times, this book you will tell you what to do to help ...

Owner's Manual
Page 17
These symbols are important you and your passengers whenever your for vehicle is driven: I I I Fasten Safety Door LocWUnlock Belts These symbols have to do with your lights: A I I I I Master Lighting Switch Turn Signal Direction Hazard Warning Flasher Headlight High Beam Fog Lights Daytime Running Lights vii
These symbols are important you and your passengers whenever your for vehicle is driven: I I I Fasten Safety Door LocWUnlock Belts These symbols have to do with your lights: A I I I I Master Lighting Switch Turn Signal Direction Hazard Warning Flasher Headlight High Beam Fog Lights Daytime Running Lights vii
Owner's Manual
Page 18
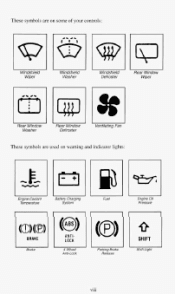
These symbols are on some of your controls: I I I Windshield Wiper Windshield Washer Windshield Defroster Rear Window Wiper I Rear Wlndow Washer Rear Window Defroster Ventilating Fan These symbols are used on warning and indicator lights: rc EBaffery Charging System Fuel Engine Oil Pressure Engine Coolant Temperature 1 7 BRAKE Brake II I I ANTILOCK 4 Wheel Anti-Lock (8) , SHIFT Parking Brake Release Shift Light Vlll ...
These symbols are on some of your controls: I I I Windshield Wiper Windshield Washer Windshield Defroster Rear Window Wiper I Rear Wlndow Washer Rear Window Defroster Ventilating Fan These symbols are used on warning and indicator lights: rc EBaffery Charging System Fuel Engine Oil Pressure Engine Coolant Temperature 1 7 BRAKE Brake II I I ANTILOCK 4 Wheel Anti-Lock (8) , SHIFT Parking Brake Release Shift Light Vlll ...

Owner's Manual
Page 19
Here are some other symbols you may see: ElE t Fuse Lighter Hood Release Horn Speaker ix
Here are some other symbols you may see: ElE t Fuse Lighter Hood Release Horn Speaker ix
Owner's Manual
Page 21
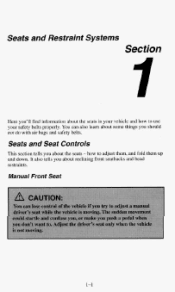
how to use the your safety belts properly. You can also learn about some things you restraints. It also tells about reclining front seatbacks and head you should not do with air bags and safety belts. Manual Front Seat 1-1 Seats and Seat Controls This section tells you 'll find information about seats in your vehicle and how to adjust them, fold themup and and down. Seats and Restraint Systems Section > Here you about the seats -
how to use the your safety belts properly. You can also learn about some things you restraints. It also tells about reclining front seatbacks and head you should not do with air bags and safety belts. Manual Front Seat 1-1 Seats and Seat Controls This section tells you 'll find information about seats in your vehicle and how to adjust them, fold themup and and down. Seats and Restraint Systems Section > Here you about the seats -

Owner's Manual
Page 22
Power Driver's Seat (Option) If your vehicle has a power seat on the driver's side, you can adjust it with this switch at the outside edge of the seat. To raise the seat, move the center switch knob down. To move the seat rearward, move the center knob toward the passenger side to move the front switch lever up. To raise the rear of the seat, move the seat where you want it . To lower the seat, move the center switch knob up . You can use the center switch knob to unlock it . To raise the front of the seat, move the front switch lever down . 1-2 Slide the lever at ...
Power Driver's Seat (Option) If your vehicle has a power seat on the driver's side, you can adjust it with this switch at the outside edge of the seat. To raise the seat, move the center switch knob down. To move the seat rearward, move the center knob toward the passenger side to move the front switch lever up. To raise the rear of the seat, move the seat where you want it . To lower the seat, move the center switch knob up . You can use the center switch knob to unlock it . To raise the front of the seat, move the front switch lever down . 1-2 Slide the lever at ...

Owner's Manual
Page 23
of Press the front the of lever. Press the rearof the switch to increase lumbar support. As you press the back the switch,you want up on the it. Release the lever to lock the seatback where you will go to upright position. 1-3 Reclining Front Seatbacks To adjust the seatback, lift the front this of switch to decrease lumbar support. Power Lumbar Adjustment To adjust the power lumbar, press the front of support in the seatback. Pull an front of the lever and the seatback will hear air leaving the lumbar of the lumbar switch at the side the seat.
of Press the front the of lever. Press the rearof the switch to increase lumbar support. As you press the back the switch,you want up on the it. Release the lever to lock the seatback where you will go to upright position. 1-3 Reclining Front Seatbacks To adjust the seatback, lift the front this of switch to decrease lumbar support. Power Lumbar Adjustment To adjust the power lumbar, press the front of support in the seatback. Pull an front of the lever and the seatback will hear air leaving the lumbar of the lumbar switch at the side the seat.
Owner's Manual
Page 24
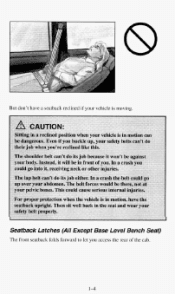
But don't have a seatback reclined if your vehicle is moving. Seatback Latches (All Except Base Level Bench Seat) The front seatback folds forward to let you access the rear of the cab. 1-4
But don't have a seatback reclined if your vehicle is moving. Seatback Latches (All Except Base Level Bench Seat) The front seatback folds forward to let you access the rear of the cab. 1-4
