
Owner's Manual
Page 3
... your service needs both during and after the warranty period. Thanks for all these publications carefully. INTRODUCTION 1994 GMC Safari Owner's Manual Welcome This manual was prepared to acquaint you with theoperation and maintenance of your 1994 GMC Safari and to assure you of our continuing interest in We your pleasure and satisfaction with your vehicle...
... your service needs both during and after the warranty period. Thanks for all these publications carefully. INTRODUCTION 1994 GMC Safari Owner's Manual Welcome This manual was prepared to acquaint you with theoperation and maintenance of your 1994 GMC Safari and to assure you of our continuing interest in We your pleasure and satisfaction with your vehicle...

Owner's Manual
Page 4
GMTRUCK General Motors, GM and the GM Emblem, GMC and the GMCEmblem, SAFARI and the SAFARI Emblem are registered trademarks of Canada Limited" for GMC TruckDivision whenever it . For vehicles first sold in it so the new owner can use it appears in this manual. For Canadian Owners Who Prefer a ...
GMTRUCK General Motors, GM and the GM Emblem, GMC and the GMCEmblem, SAFARI and the SAFARI Emblem are registered trademarks of Canada Limited" for GMC TruckDivision whenever it . For vehicles first sold in it so the new owner can use it appears in this manual. For Canadian Owners Who Prefer a ...

Owner's Manual
Page 5
Model Reference This manual covers these models: Passenger Model Cargo Model 111 ...
Model Reference This manual covers these models: Passenger Model Cargo Model 111 ...

Owner's Manual
Page 6
Table of almost every subject in this Manual This section tells you how to contact your vehicle. Section 7 - Section 8 - Section 4 - Index Here's analphabetical listing of Contents Introduction - You can use . It also gives you information on "Reporting Safety Defects"on the Road This section tells you what fluids and lubricants to use it to if you have a problem while do driving, such as aflat tire or engine overheating. ,ection 6 - Section 5 - Section 2 - This section tells you when to perform vehicle maintenance and what to quickly ...
Table of almost every subject in this Manual This section tells you how to contact your vehicle. Section 7 - Section 8 - Section 4 - Index Here's analphabetical listing of Contents Introduction - You can use . It also gives you information on "Reporting Safety Defects"on the Road This section tells you what fluids and lubricants to use it to if you have a problem while do driving, such as aflat tire or engine overheating. ,ection 6 - Section 5 - Section 2 - This section tells you when to perform vehicle maintenance and what to quickly ...

Owner's Manual
Page 7
This will also find customer satisfaction phone numbers (including customer satisfaction numbers for the hearing and speech impaired) as well as the mediatiodarbitration procedure. SECTIONS 1-6: Each section of this manual begins with a brief list of all that pictures and words work together to explain things quickly. It's an alphabetical list of its contents, so you can often find it. SECTION 8 CUSTOMER ASSISTANCE: This section includes important information about reporting safety defects and gives you need is theIndex in back of the manual covers the maintenance required for ...
This will also find customer satisfaction phone numbers (including customer satisfaction numbers for the hearing and speech impaired) as well as the mediatiodarbitration procedure. SECTIONS 1-6: Each section of this manual begins with a brief list of all that pictures and words work together to explain things quickly. It's an alphabetical list of its contents, so you can often find it. SECTION 8 CUSTOMER ASSISTANCE: This section includes important information about reporting safety defects and gives you need is theIndex in back of the manual covers the maintenance required for ...
Owner's Manual
Page 8
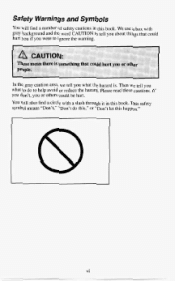
You will find a number of safety cautions in this happen." vi This safety symbol means "Don't," "Don't do to help avoid or reduce the hazard. Please read these cautions. In the gray caution area, we tell you what the hazard is. If you don't, you or others could hurt you if you were to ignore the warning. Safety Warnings and Symbols You will also finda circle with gray background and the word CAUTION to tell you about things that could be hurt. Then we tell you what to do this," or "Don't let this book. We use a box with a slash through it in this book.
You will find a number of safety cautions in this happen." vi This safety symbol means "Don't," "Don't do to help avoid or reduce the hazard. Please read these cautions. In the gray caution area, we tell you what the hazard is. If you don't, you or others could hurt you if you were to ignore the warning. Safety Warnings and Symbols You will also finda circle with gray background and the word CAUTION to tell you about things that could be hurt. Then we tell you what to do this," or "Don't let this book. We use a box with a slash through it in this book.

Owner's Manual
Page 9
Many times, thisdamage would not becovered by Shielding Caustic Battery Acid Spark or Flame Could Explode Battery Could Cause Burns I Avoid Sparks or Flames They use yellow for cautions, blue for notices and the words CAUTION or NOTICE. Vehicle Damage Warnings Also, in different words. But the notice will find on your vehicle.For example, these notices: NOTICE: These mean there is something that can damage your warranty, and it could damage vehicle. You'll also see CAUTION andNOTICE warnings in different colors or in this book you willfind these symbols are some of the ...
Many times, thisdamage would not becovered by Shielding Caustic Battery Acid Spark or Flame Could Explode Battery Could Cause Burns I Avoid Sparks or Flames They use yellow for cautions, blue for notices and the words CAUTION or NOTICE. Vehicle Damage Warnings Also, in different words. But the notice will find on your vehicle.For example, these notices: NOTICE: These mean there is something that can damage your warranty, and it could damage vehicle. You'll also see CAUTION andNOTICE warnings in different colors or in this book you willfind these symbols are some of the ...

Owner's Manual
Page 10
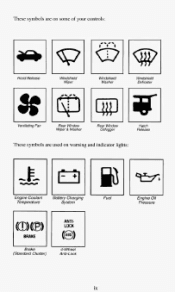
I Hazard Warning Flasher Headlight High Beam - These symbols are important for you and your passengers whenever your vehicle is driven: I Fasten Safety Belts Door LocWUnlock These symbols have to do with your lights: I Master Lighting Switch A '00 Turn Signal Direction I I I f o g Lights Parking Lights Daytime Running Lights Viii
I Hazard Warning Flasher Headlight High Beam - These symbols are important for you and your passengers whenever your vehicle is driven: I Fasten Safety Belts Door LocWUnlock These symbols have to do with your lights: I Master Lighting Switch A '00 Turn Signal Direction I I I f o g Lights Parking Lights Daytime Running Lights Viii
Owner's Manual
Page 11
Wheel Anti-Lock Brake (Standard Cluster) These symbols are on some of your controls: Hood Release Windshield Wiper Windshield Washer Windshield Defroster I I I Ventilating Fan Rear Window Wiper & Washer Rear Window Defogger Hatch Release These symbols are used on warning and indicator lights: lI 93 Battery Charging System Fuel Engine Oil Pressure Engine Coolant Temperature n ANTILOCK BRAKE 4-
Wheel Anti-Lock Brake (Standard Cluster) These symbols are on some of your controls: Hood Release Windshield Wiper Windshield Washer Windshield Defroster I I I Ventilating Fan Rear Window Wiper & Washer Rear Window Defogger Hatch Release These symbols are used on warning and indicator lights: lI 93 Battery Charging System Fuel Engine Oil Pressure Engine Coolant Temperature n ANTILOCK BRAKE 4-

Owner's Manual
Page 12
Here are some other symbols you may see: X
Here are some other symbols you may see: X

Owner's Manual
Page 13
Seats and Safety Belts Section Here you'll find information about some things you should not do with safety belts . You can also learn about the seats in your vehicle and how to Wear Safety Belts Properly ...1-16 Adults ...1-17 Driver Position ...1-17 Lap-Shoulder Belt ...Driver's Facial Air Bag System ...1-25 1-29 Safety Belt Use During Pregnancy ...Right Front Passenger Position ...1-30 1-31 Rear Seat Outside Passenger Positions ...1-34 Center Passenger Positions ...LapBelt ...1-34 Children ...1-35 1-36 Smaller Children and Babies ...1-37 Child Restraints ...Larger Children ...1-44 ...
Seats and Safety Belts Section Here you'll find information about some things you should not do with safety belts . You can also learn about the seats in your vehicle and how to Wear Safety Belts Properly ...1-16 Adults ...1-17 Driver Position ...1-17 Lap-Shoulder Belt ...Driver's Facial Air Bag System ...1-25 1-29 Safety Belt Use During Pregnancy ...Right Front Passenger Position ...1-30 1-31 Rear Seat Outside Passenger Positions ...1-34 Center Passenger Positions ...LapBelt ...1-34 Children ...1-35 1-36 Smaller Children and Babies ...1-37 Child Restraints ...Larger Children ...1-44 ...

Owner's Manual
Page 14
Slide the seat to adjust them, take them out and put them back in. Froni Seais Manual Front Seat Slide the lever at the front of the seat to the left to make sure the seat is locked into place. 1-2 Then release the lever and try to move the with your seat body, to unlockit. Seats and Seat Controls This section tells you want it. It also tells you about the seats-how to where you about bucket and bench seats, power seats, and headrestraints.
Slide the seat to adjust them, take them out and put them back in. Froni Seais Manual Front Seat Slide the lever at the front of the seat to the left to make sure the seat is locked into place. 1-2 Then release the lever and try to move the with your seat body, to unlockit. Seats and Seat Controls This section tells you want it. It also tells you about the seats-how to where you about bucket and bench seats, power seats, and headrestraints.

Owner's Manual
Page 15
Reclining Bucket Seats If you have this feature, you will have the knob, you have either a knob or a lever on the inside of the seat go up and down or forward and rearward. The center control makes the whole seat go up and down . The rear control makes the rear of the seat to the left or right. 1-3 Power Driver's Seat You can adjust the seatback by rotating the knob to adjust the seatback. The front control makes the frontof the seat go up and down . If you can adjust the seatbefore entering the vehicle.
Reclining Bucket Seats If you have this feature, you will have the knob, you have either a knob or a lever on the inside of the seat go up and down or forward and rearward. The center control makes the whole seat go up and down . The rear control makes the rear of the seat to the left or right. 1-3 Power Driver's Seat You can adjust the seatback by rotating the knob to adjust the seatback. The front control makes the frontof the seat go up and down . If you can adjust the seatbefore entering the vehicle.

Owner's Manual
Page 16
Don't have the lever, you can adjust the seatback by liftingthe lever. Release the lever to an upright position. Don't adjust the driver's seatback while your vehicle is moving . If you have a seatback reclined if your vehicleis moving . 1-4 Pull up on the lever and the seat will go to lock the seat back where you want it.
Don't have the lever, you can adjust the seatback by liftingthe lever. Release the lever to an upright position. Don't adjust the driver's seatback while your vehicle is moving . If you have a seatback reclined if your vehicleis moving . 1-4 Pull up on the lever and the seat will go to lock the seat back where you want it.

Owner's Manual
Page 17
They can also be used as rear seat armrests. Then release the lever and try to move the seat with moveable armrests, individual reclining seatbacks, adjustable headrests and a folddown center console. 1-5 The storage compartment and beverage cooler can also be removed to make sure the seat is locked into place. The optional touring bench seats come with your body, to increase storage space. or The center and rear benchseats can carry up to unlock it . The non-touring center bench seat has a pivoting right armrest. See "Front Seats" earlier in this section or in the Index. See...
They can also be used as rear seat armrests. Then release the lever and try to move the seat with moveable armrests, individual reclining seatbacks, adjustable headrests and a folddown center console. 1-5 The storage compartment and beverage cooler can also be removed to make sure the seat is locked into place. The optional touring bench seats come with your body, to increase storage space. or The center and rear benchseats can carry up to unlock it . The non-touring center bench seat has a pivoting right armrest. See "Front Seats" earlier in this section or in the Index. See...

Owner's Manual
Page 18
For details about headrests, see "Head Restraints" in an upright position. To adjust your seatback, pull up on the lever on the lower outside of the seat. To raise or lower the center console, press the button between the beverage holders. The center bench seatbacks willrecline further back thanthe rear benchseatbacks. Only sit in the center seating position when the console is in this section. 1-6
For details about headrests, see "Head Restraints" in an upright position. To adjust your seatback, pull up on the lever on the lower outside of the seat. To raise or lower the center console, press the button between the beverage holders. The center bench seatbacks willrecline further back thanthe rear benchseatbacks. Only sit in the center seating position when the console is in this section. 1-6

Owner's Manual
Page 19
Seatback Latches (Non-Touring Bench Seats) To fold your non-touring seatback forward, pull up on the right rear of your seat. The leveris on the latch release lever while pulling the seatback toward you. To raise the seatback, unlock the seat by pushing forward on the lever. Removable Seats (Touring and Non-Touring Bench Seats) To Remove The Seat 1. Make sure the seatback is locked when it locks in place. Disconnect the quick release latch plates for the lap-shoulder belt from the buckles in the upright position. After the latch has been released, push the seatback down ...
Seatback Latches (Non-Touring Bench Seats) To fold your non-touring seatback forward, pull up on the right rear of your seat. The leveris on the latch release lever while pulling the seatback toward you. To raise the seatback, unlock the seat by pushing forward on the lever. Removable Seats (Touring and Non-Touring Bench Seats) To Remove The Seat 1. Make sure the seatback is locked when it locks in place. Disconnect the quick release latch plates for the lap-shoulder belt from the buckles in the upright position. After the latch has been released, push the seatback down ...

Owner's Manual
Page 20
If you are near the floor on the rear legs of the safety belt attachment while pulling up on the seat release latch. I 2. To relieve pressure on the latch, pull back on your seat, pull the safety belt all the way out through the guide. 4. Push the seatback down until it locks in place (non-touring bench seats only). 5. Lift up on the seatback latch on the right rear of the front seat. I BELTFOR \ SEAT REMOVAL 1 I 3. Pull up on the safety belt. If you have a safety beltguide on the seat. The latches are removing the center seat, remove the right lapshoulder...
If you are near the floor on the rear legs of the safety belt attachment while pulling up on the seat release latch. I 2. To relieve pressure on the latch, pull back on your seat, pull the safety belt all the way out through the guide. 4. Push the seatback down until it locks in place (non-touring bench seats only). 5. Lift up on the seatback latch on the right rear of the front seat. I BELTFOR \ SEAT REMOVAL 1 I 3. Pull up on the safety belt. If you have a safety beltguide on the seat. The latches are removing the center seat, remove the right lapshoulder...

Owner's Manual
Page 21
To Install The Seat 1. Lower the seat into position. Raise the seatback by pulling up position. Pull up on the latch at the right rear of the seat. 6. Make sure the seat is locked in by pushing forward on the seatback until it is locked securely in the up and down to remove the seat assembly from the rear latch pins. Pull the seat down on the rear of the vehicle. Lift up on the seat. _I 1-9 2. Make sure the front retainers are hooked onto the anchor pins. Then, pull back and lift the seat out of the seat to latch the rear retainers.
To Install The Seat 1. Lower the seat into position. Raise the seatback by pulling up position. Pull up on the latch at the right rear of the seat. 6. Make sure the seat is locked in by pushing forward on the seatback until it is locked securely in the up and down to remove the seat assembly from the rear latch pins. Pull the seat down on the rear of the vehicle. Lift up on the seat. _I 1-9 2. Make sure the front retainers are hooked onto the anchor pins. Then, pull back and lift the seat out of the seat to latch the rear retainers.

Owner's Manual
Page 22
Attach the quick release latch plate to the attachment on your vehicle has the optional touring package, you haveadjustable head restraints. If you installed the safety belt with the release hole facing inward (toward the seat), slide the plastic cover up you are installing the center seat, connect the rightlapshoulder belt to the buckles in the proper positions so the safety belts work properly. will Head Restraints If your seat, pull the belt through the guide before reattaching the lap-shoulder belt to the topof your ears. Slide the cover back down so that the top ...
Attach the quick release latch plate to the attachment on your vehicle has the optional touring package, you haveadjustable head restraints. If you installed the safety belt with the release hole facing inward (toward the seat), slide the plastic cover up you are installing the center seat, connect the rightlapshoulder belt to the buckles in the proper positions so the safety belts work properly. will Head Restraints If your seat, pull the belt through the guide before reattaching the lap-shoulder belt to the topof your ears. Slide the cover back down so that the top ...
