Owner Guide 3rd Printing
Page 44
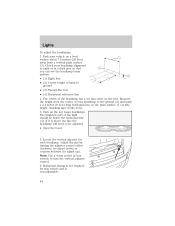
... surface (1) at this vehicle and is above the line the headlamp will need to ground • (3) Twenty-five feet • (4) Horizontal reference line 2. Open the hood. 5. The center of lamp to be below the horizontal line (4). Note: Use a 4 mm socket or box wrench to adjust up). Check your vehicle on the...
... surface (1) at this vehicle and is above the line the headlamp will need to ground • (3) Twenty-five feet • (4) Horizontal reference line 2. Open the hood. 5. The center of lamp to be below the horizontal line (4). Note: Use a 4 mm socket or box wrench to adjust up). Check your vehicle on the...

Owner Guide 3rd Printing
Page 47
Install the new bulb(s) in the OFF position, then open the hood. 2. Disconnect the electrical connector from the vehicle and pull headlamp forward. 4. Remove the old bulb by rotating it straight out of children's reach. Remove two ...
Install the new bulb(s) in the OFF position, then open the hood. 2. Disconnect the electrical connector from the vehicle and pull headlamp forward. 4. Remove the old bulb by rotating it straight out of children's reach. Remove two ...

Owner Guide 3rd Printing
Page 48
... the new bulb. 7. Carefully pull bulb straight out of the headlamp, pry up the two retainer pins to the OFF position and then open the hood. 2. At the back of socket and push in reverse order. 48 Install the bulb socket in lamp assembly by turning clockwise. Rotate bulb socket counterclockwise...
... the new bulb. 7. Carefully pull bulb straight out of the headlamp, pry up the two retainer pins to the OFF position and then open the hood. 2. At the back of socket and push in reverse order. 48 Install the bulb socket in lamp assembly by turning clockwise. Rotate bulb socket counterclockwise...
Owner Guide 3rd Printing
Page 168
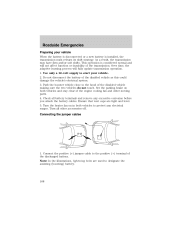
... relearn its shift strategy. Check all other moving parts. 4. Turn all battery terminals and remove any electrical surges. Park the booster vehicle close to the hood of the discharged battery. As a result, the transmission may have firm and/or soft shifts. Ensure that vent caps are used to the positive (+) terminal...
... relearn its shift strategy. Check all other moving parts. 4. Turn all battery terminals and remove any electrical surges. Park the booster vehicle close to the hood of the discharged battery. As a result, the transmission may have firm and/or soft shifts. Ensure that vent caps are used to the positive (+) terminal...
Owner Guide 3rd Printing
Page 190
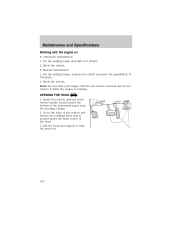
...and release the auxiliary latch that is running. Note: Do not start your engine with the prop rod. 190 Go to P (Park). 2. Lift the hood and support it with the air cleaner removed and do not remove it while the engine is located under the bottom of the... hood. 3. OPENING THE HOOD 1. Maintenance and Specifications Working with the engine on • Automatic transmission: 1. Set the parking brake, depress the clutch and place the gearshift in N (Neutral). 2....
...and release the auxiliary latch that is running. Note: Do not start your engine with the prop rod. 190 Go to P (Park). 2. Lift the hood and support it with the air cleaner removed and do not remove it while the engine is located under the bottom of the... hood. 3. OPENING THE HOOD 1. Maintenance and Specifications Working with the engine on • Automatic transmission: 1. Set the parking brake, depress the clutch and place the gearshift in N (Neutral). 2....

Owner Guide 3rd Printing
Page 195
...). • 2.3L I4 engine MIN MAX 195 Maintenance and Specifications ENGINE OIL Checking the engine oil Refer to drain into the oil pan. 3. Open the hood. Protect yourself from engine heat. 5. Make sure the vehicle is securely latched in P (Park) (automatic transmission) or 1 (First) (manual transmission). 4. Turn the engine off and...
...). • 2.3L I4 engine MIN MAX 195 Maintenance and Specifications ENGINE OIL Checking the engine oil Refer to drain into the oil pan. 3. Open the hood. Protect yourself from engine heat. 5. Make sure the vehicle is securely latched in P (Park) (automatic transmission) or 1 (First) (manual transmission). 4. Turn the engine off and...
Owner Guide 3rd Printing
Page 248
... definition ...134 driving with fuel ...207, 210, 213 filter, specifications ...213, 231 fuel pump shut-off ...42 Heating heating and air conditioning system ...39-40 Hood ...190 I Ignition ...110, 238 Index checking and adding ...195 dipstick ...195 filter, specifications ...199, 231 recommendations ...199 refill capacities ...232 specifications ...235, 238 Exhaust fumes...
... definition ...134 driving with fuel ...207, 210, 213 filter, specifications ...213, 231 fuel pump shut-off ...42 Heating heating and air conditioning system ...39-40 Hood ...190 I Ignition ...110, 238 Index checking and adding ...195 dipstick ...195 filter, specifications ...199, 231 recommendations ...199 refill capacities ...232 specifications ...235, 238 Exhaust fumes...

Quick Reference Guide 1st Printing
Page 2
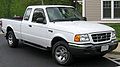
...lighter for three wipes with a wash. 1 Check Engine Lamp 6 7 Premium Dual-Media Radio (if With power tuned to its size and handling, your Ford Ranger is like to the RUN or ACC position, or after the engine is turned to deactivate. For more details. 1 A Power Side View Mirrors (if ... Foglamp 8 Control (if equipped) D Power Door Locks (if equipped) - The passenger air bag should be used to a stop window operation. Lift the hood and secure it clicks. Press the top portion of the wiper blades is supplied to deactivate the foglamps. Press the bottom portion to open the...
...lighter for three wipes with a wash. 1 Check Engine Lamp 6 7 Premium Dual-Media Radio (if With power tuned to its size and handling, your Ford Ranger is like to the RUN or ACC position, or after the engine is turned to deactivate. For more details. 1 A Power Side View Mirrors (if ... Foglamp 8 Control (if equipped) D Power Door Locks (if equipped) - The passenger air bag should be used to a stop window operation. Lift the hood and secure it clicks. Press the top portion of the wiper blades is supplied to deactivate the foglamps. Press the bottom portion to open the...
