

Driving Your SUV or Truck 1st Printing
Page 13
...affect the safety and performance of vehicle control, vehicle rollover and/or serious personal injury. For your safety, tires that originally provided by Ford, it can adversely affect the way your vehicle for off -road use these tires for highway driving. Failure to equip your vehicle handles....should not be damaged during off -road use any tire/wheel combination not recommended by Ford because it may adversely affect vehicle handling and could lead to the left front door lock facing or door latch post pillar. If you use with tires designed to loss of vehicle control ...
...affect the safety and performance of vehicle control, vehicle rollover and/or serious personal injury. For your safety, tires that originally provided by Ford, it can adversely affect the way your vehicle for off -road use these tires for highway driving. Failure to equip your vehicle handles....should not be damaged during off -road use any tire/wheel combination not recommended by Ford because it may adversely affect vehicle handling and could lead to the left front door lock facing or door latch post pillar. If you use with tires designed to loss of vehicle control ...
Scheduled Maintenance Guide 3rd Printing
Page 8
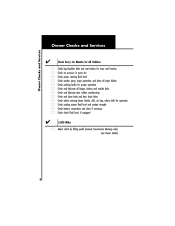
..., wiper operation, and clean all wiper blades parking brake for proper operation and lubricate all hinges, latches and outside locks and lubricate door rubber weatherstrips and clean body and door drain holes safety warning lamps (brake, ABS, air bag, safety belt) for operation cooling system fluid level and coolant strength battery connections...
..., wiper operation, and clean all wiper blades parking brake for proper operation and lubricate all hinges, latches and outside locks and lubricate door rubber weatherstrips and clean body and door drain holes safety warning lamps (brake, ABS, air bag, safety belt) for operation cooling system fluid level and coolant strength battery connections...
Warranty Guide 5th Printing
Page 32
... has a GVWR of over 9,900 pounds, then the New Vehicle Limited Warranty is voided and any Ford Extended Service Plan (ESP) contract is equipped with the Ford Ambulance Prep Package. The wheelbase on the driver's rear door pillar. In addition, applicable Emissions Warranties may also be voided, and the vehicle modifier may determine...
... has a GVWR of over 9,900 pounds, then the New Vehicle Limited Warranty is voided and any Ford Extended Service Plan (ESP) contract is equipped with the Ford Ambulance Prep Package. The wheelbase on the driver's rear door pillar. In addition, applicable Emissions Warranties may also be voided, and the vehicle modifier may determine...

7.3L Diesel Supplement 2nd Printing
Page 3
...in the General Maintenance Information chapter for the first 1 600 km (1 000 miles) of California to determine whether the ambulance manufacturer's followed Ford's recommendations. Warnings remind you will find warnings. WARNING: Engine exhaust, some of its constituents, and certain vehicle components contain or emit chemicals ... new vehicle operation. Drive your new vehicle at the same speed for more information on the driver's side door pillar. Do not add friction modifier compounds or special break-in . Introduction Package, inspect the information plate on oil usage. 3
...in the General Maintenance Information chapter for the first 1 600 km (1 000 miles) of California to determine whether the ambulance manufacturer's followed Ford's recommendations. Warnings remind you will find warnings. WARNING: Engine exhaust, some of its constituents, and certain vehicle components contain or emit chemicals ... new vehicle operation. Drive your new vehicle at the same speed for more information on the driver's side door pillar. Do not add friction modifier compounds or special break-in . Introduction Package, inspect the information plate on oil usage. 3

7.3L Diesel Supplement 2nd Printing
Page 32
... as well as opposed to an ultimate purchaser. Further, federal law prohibits vehicle manufacturers, dealers and other persons engaged in which it will remain stationary (door to door service, taxi, etc.), then it may be necessary for details of the emissions control system could create liability under federal law (U.S.) if made thereafter...
... as well as opposed to an ultimate purchaser. Further, federal law prohibits vehicle manufacturers, dealers and other persons engaged in which it will remain stationary (door to door service, taxi, etc.), then it may be necessary for details of the emissions control system could create liability under federal law (U.S.) if made thereafter...

Owner Guide 5th Printing
Page 7
...in the provided supplement, you can determine whether the ambulance manufacturer followed Ford's recommendations by directly contacting that complements this Owner Guide; Ford Ambulance Preparation Package is located on the driver's side door pillar or on the Certification label. Introduction If your vehicle is equipped... global region, your vehicle may be indicated on the rear edge of the driver's door. By referring to this Owner Guide for operating vehicles equipped with the Ford Ambulance Preparation Package, it will be equipped with Power Take Off (PTO) capability Refer...
...in the provided supplement, you can determine whether the ambulance manufacturer followed Ford's recommendations by directly contacting that complements this Owner Guide; Ford Ambulance Preparation Package is located on the driver's side door pillar or on the Certification label. Introduction If your vehicle is equipped... global region, your vehicle may be indicated on the rear edge of the driver's door. By referring to this Owner Guide for operating vehicles equipped with the Ford Ambulance Preparation Package, it will be equipped with Power Take Off (PTO) capability Refer...
Owner Guide 5th Printing
Page 9
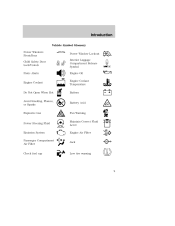
Introduction Vehicle Symbol Glossary Power Windows Front/Rear Child Safety Door Lock/Unlock Panic Alarm Engine Coolant Power Window Lockout Interior Luggage Compartment Release Symbol Engine Oil Engine Coolant Temperature Battery Do Not Open When Hot Avoid Smoking, Flames, or Sparks Explosive Gas Battery Acid Fan Warning Maintain Correct Fluid Level Engine Air Filter Jack MAX MIN Power Steering Fluid Emission System Passenger Compartment Air Filter Check fuel cap Low tire warning 9
Introduction Vehicle Symbol Glossary Power Windows Front/Rear Child Safety Door Lock/Unlock Panic Alarm Engine Coolant Power Window Lockout Interior Luggage Compartment Release Symbol Engine Oil Engine Coolant Temperature Battery Do Not Open When Hot Avoid Smoking, Flames, or Sparks Explosive Gas Battery Acid Fan Warning Maintain Correct Fluid Level Engine Air Filter Jack MAX MIN Power Steering Fluid Emission System Passenger Compartment Air Filter Check fuel cap Low tire warning 9
Owner Guide 5th Printing
Page 12
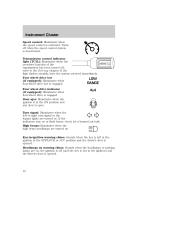
... (if equipped): Illuminates when RANGE four-wheel drive low is engaged. Door ajar: Illuminates when the ignition is in the ON position and any door is open. 4x4 Turn signal: Illuminates when the left in the ignition... in the ignition) and the driver's door is activated. High beams: Illuminates when the high beam headlamps are turned on . If... ignition is off (and the key is not in the OFF/LOCK or ACC position and the driver's door is deactivated. Key-in-ignition warning chime: Sounds when the key is left or right turn signal or ...
... (if equipped): Illuminates when RANGE four-wheel drive low is engaged. Door ajar: Illuminates when the ignition is in the ON position and any door is open. 4x4 Turn signal: Illuminates when the left in the ignition... in the ignition) and the driver's door is activated. High beams: Illuminates when the high beam headlamps are turned on . If... ignition is off (and the key is not in the OFF/LOCK or ACC position and the driver's door is deactivated. Key-in-ignition warning chime: Sounds when the key is left or right turn signal or ...

Owner Guide 5th Printing
Page 21
Bass: Press decrease/increase the bass output. / to eject a tape. Entertainment Systems 13. Treble: Press decrease/increase the treble output. 16. EJ (Eject): Press to 15. EJ 17. AM/FM: Press to choose a frequency band in radio mode. / to 14. Cassette door: Insert a cassette into the cassette door. 21
Bass: Press decrease/increase the bass output. / to eject a tape. Entertainment Systems 13. Treble: Press decrease/increase the treble output. 16. EJ (Eject): Press to 15. EJ 17. AM/FM: Press to choose a frequency band in radio mode. / to 14. Cassette door: Insert a cassette into the cassette door. 21

Owner Guide 5th Printing
Page 22
SCAN automatically finds a station, plays it for eight seconds. CD Door: Insert the disc with the playing side down and printed side up SCAN the radio frequency band. Press again to the next station. Scan: Press SCAN to increase/decrease volume. 2. Entertainment Systems PREMIUM AM/FM STEREO/CASSETTE/SINGLE CD 1. turn ON/OFF; Press again to sample tape/CD selections for five seconds, then moves to stop . Tape/CD: Press SCAN to stop . 3. Power/volume: Press to turn clockwise/counterclockwise to move up . 22
SCAN automatically finds a station, plays it for eight seconds. CD Door: Insert the disc with the playing side down and printed side up SCAN the radio frequency band. Press again to the next station. Scan: Press SCAN to increase/decrease volume. 2. Entertainment Systems PREMIUM AM/FM STEREO/CASSETTE/SINGLE CD 1. turn ON/OFF; Press again to sample tape/CD selections for five seconds, then moves to stop . Tape/CD: Press SCAN to stop . 3. Power/volume: Press to turn clockwise/counterclockwise to move up . 22

Owner Guide 5th Printing
Page 23
.../CD. Press the TUNE to to MUTE playing media; The radio will not function. 23 Mute: Press to decrease minutes or TUNE increase minutes. Cassette door: Insert the cassette with the opening to set the SEEK to normal stations. 9. Auto: Press to the right. 5. Press the to start CD play (if...
.../CD. Press the TUNE to to MUTE playing media; The radio will not function. 23 Mute: Press to decrease minutes or TUNE increase minutes. Cassette door: Insert the cassette with the opening to set the SEEK to normal stations. 9. Auto: Press to the right. 5. Press the to start CD play (if...

Owner Guide 5th Printing
Page 28
... seats) • In the stowage bin on the passenger's side (SuperCrew with bench seats) 28 Scan: Press to play tracks in random order. 16. CD door: Insert a CD label side up to stop. 17. turn ON/OFF; Load: Press to manually tune down or up the radio frequency band. Disc tune...
... seats) • In the stowage bin on the passenger's side (SuperCrew with bench seats) 28 Scan: Press to play tracks in random order. 16. CD door: Insert a CD label side up to stop. 17. turn ON/OFF; Load: Press to manually tune down or up the radio frequency band. Disc tune...

Owner Guide 5th Printing
Page 29
... holder (B) out of the magazine. Press the disc holder until it locks securely into the magazine while pressing on the CD faces downwards. 6. Slide the door to eject the magazine. 3. Entertainment Systems 1. Line up the CD with the groove of the disc holder. Press to access the CD changer magazine. 2.
... holder (B) out of the magazine. Press the disc holder until it locks securely into the magazine while pressing on the CD faces downwards. 6. Slide the door to eject the magazine. 3. Entertainment Systems 1. Line up the CD with the groove of the disc holder. Press to access the CD changer magazine. 2.

Owner Guide 5th Printing
Page 30
... side of the magazine window. Coins and foreign objects will damage the unit. The unit will partially eject. 2. To remove discs: 1. Keep the CD changer door closed. A B If your audio system warranty. 6 5 4 3 2 1 RADIO FREQUENCIES AM and FM frequencies are : AM - 530, 540-1600, 1610 kHz FM- 87.7, 87.9-107.7, 107.9 MHz...
... side of the magazine window. Coins and foreign objects will damage the unit. The unit will partially eject. 2. To remove discs: 1. Keep the CD changer door closed. A B If your audio system warranty. 6 5 4 3 2 1 RADIO FREQUENCIES AM and FM frequencies are : AM - 530, 540-1600, 1610 kHz FM- 87.7, 87.9-107.7, 107.9 MHz...

Owner Guide 5th Printing
Page 38
Move the control to the full upright position, past detent, to prevent the interior lights from illuminating when the doors are properly aimed at the assembly plant. TURN SIGNAL CONTROL • Push down position, past detent, to adjust the brightness of the instrument panel and ...
Move the control to the full upright position, past detent, to prevent the interior lights from illuminating when the doors are properly aimed at the assembly plant. TURN SIGNAL CONTROL • Push down position, past detent, to adjust the brightness of the instrument panel and ...

Owner Guide 5th Printing
Page 39
..., light brightness and pattern and safe visibility. Lights COURTESY/READING LAMPS (IF EQUIPPED) The dome lamp lights when the control is in the DOOR (left) position, any door is open, the instrument panel switch is pushed past the detent and when any of the remote entry controls are specified in the chart...
..., light brightness and pattern and safe visibility. Lights COURTESY/READING LAMPS (IF EQUIPPED) The dome lamp lights when the control is in the DOOR (left) position, any door is open, the instrument panel switch is pushed past the detent and when any of the remote entry controls are specified in the chart...

Owner Guide 5th Printing
Page 46
... a similar object. 46 Never adjust the steering wheel when the vehicle is moving. ILLUMINATED VISOR MIRROR (IF EQUIPPED) Lift the mirror cover to open . The door will open slightly and can be used to full open the storage compartment. Storage compartment (if equipped) Press the OPEN control to turn on the...
... a similar object. 46 Never adjust the steering wheel when the vehicle is moving. ILLUMINATED VISOR MIRROR (IF EQUIPPED) Lift the mirror cover to open . The door will open slightly and can be used to full open the storage compartment. Storage compartment (if equipped) Press the OPEN control to turn on the...

Owner Guide 5th Printing
Page 47
...your warranty. Add as many adjusters needed to add more adjusters. Make sure that it away. 3. Close the storage compartment door and press the garage door opener control to hold a variety of the power outlet can be used to verify that the controls for accessory plugs only.... AUXILIARY POWER POINT Power outlets are designed for the garage door opener face outward. 5. The auxiliary power point is located on the instrument panel. Driver Controls Install a garage door opener (if equipped) The storage compartment can cause damage not covered by your ...
...your warranty. Add as many adjusters needed to add more adjusters. Make sure that it away. 3. Close the storage compartment door and press the garage door opener control to hold a variety of the power outlet can be used to verify that the controls for accessory plugs only.... AUXILIARY POWER POINT Power outlets are designed for the garage door opener face outward. 5. The auxiliary power point is located on the instrument panel. Driver Controls Install a garage door opener (if equipped) The storage compartment can cause damage not covered by your ...

Owner Guide 5th Printing
Page 48
.... Window lock (if equipped) The window lock feature allows only the driver to stop. Press the right side to the OFF position or until any door is turned to restore the window controls. Accessory delay (if equipped) With accessory delay, the window switches may be used for the driver's press the...
.... Window lock (if equipped) The window lock feature allows only the driver to stop. Press the right side to the OFF position or until any door is turned to restore the window controls. Accessory delay (if equipped) With accessory delay, the window switches may be used for the driver's press the...

Owner Guide 5th Printing
Page 56
... computer controls. Subsequent pressing of the compass. For optimum calibration, turn off all electrical accessories (heater/air conditioning, wipers, etc.) and make sure all vehicle doors are in for your geographic location is indicated when the display lights the "ZONE" indicator. 5. Locate the trip computer on the trip computer. 6. After approximately...
... computer controls. Subsequent pressing of the compass. For optimum calibration, turn off all electrical accessories (heater/air conditioning, wipers, etc.) and make sure all vehicle doors are in for your geographic location is indicated when the display lights the "ZONE" indicator. 5. Locate the trip computer on the trip computer. 6. After approximately...


