
7.3L Diesel Supplement 2nd Printing
Page 18
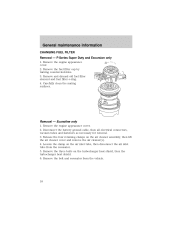
... bolts on the air cleaner assembly, then lift the air cleaner cover and remove the air cleaner(s). 4. F-Series Super Duty and Excursion only 1. Disconnect the battery ground cable, then all electrical connectors, vacuum tubes and fasteners as necessary for removal. 3. Removal - General maintenance information CHANGING FUEL FILTER Removal -
... bolts on the air cleaner assembly, then lift the air cleaner cover and remove the air cleaner(s). 4. F-Series Super Duty and Excursion only 1. Disconnect the battery ground cable, then all electrical connectors, vacuum tubes and fasteners as necessary for removal. 3. Removal - General maintenance information CHANGING FUEL FILTER Removal -

7.3L Diesel Supplement 2nd Printing
Page 20
.... 8. Apply a coating of clean diesel fuel to be replaced more than average impurities may run properly if the fuel filter is completely eliminated. Connect the battery ground cable, then all electrical connectors, vacuum tubes and fasteners as it contacts the housing. 5. Tighten cap until the air is not installed in housing. 1. Install...
.... 8. Apply a coating of clean diesel fuel to be replaced more than average impurities may run properly if the fuel filter is completely eliminated. Connect the battery ground cable, then all electrical connectors, vacuum tubes and fasteners as it contacts the housing. 5. Tighten cap until the air is not installed in housing. 1. Install...

7.3L Diesel Supplement 2nd Printing
Page 34
... the system by turning the ignition key to OFF and then back to the engine grounding point and at the starter relay terminals. Check the battery connections at the starter terminal. If the lights are tight and you need assistance to the starter motor. • Check the fuel gauge. If ... key ON for the starter to its mounting surface. If the starter relay clicks, but the starter does not crank, check the connections at the battery posts, cable connection to ON again. 34 Should the switch be out of 30 seconds) could cause damage to start, see "Jump Starting Your Vehicle" in...
... the system by turning the ignition key to OFF and then back to the engine grounding point and at the starter relay terminals. Check the battery connections at the starter terminal. If the lights are tight and you need assistance to the starter motor. • Check the fuel gauge. If ... key ON for the starter to its mounting surface. If the starter relay clicks, but the starter does not crank, check the connections at the battery posts, cable connection to ON again. 34 Should the switch be out of 30 seconds) could cause damage to start, see "Jump Starting Your Vehicle" in...
Owner Guide 5th Printing
Page 174
Failure to properly stow the spare tire may result in failure of the winch cable and loss of your vehicle When the battery is disconnected or a new battery is raised to its shift strategy. If removed, install the spare tire lock (if equipped) into the bumper drive tube with the jack ... (own2002) USA English (fus) If the spare tire carrier ratchets or slips with the valve stem facing in injury or vehicle damage. Batteries contain sulfuric acid which can explode if exposed to push-start capability; Preparing your ability, to align the components at any time that the...
Failure to properly stow the spare tire may result in failure of the winch cable and loss of your vehicle When the battery is disconnected or a new battery is raised to its shift strategy. If removed, install the spare tire lock (if equipped) into the bumper drive tube with the jack ... (own2002) USA English (fus) If the spare tire carrier ratchets or slips with the valve stem facing in injury or vehicle damage. Batteries contain sulfuric acid which can explode if exposed to push-start capability; Preparing your ability, to align the components at any time that the...

Owner Guide 5th Printing
Page 175
... of the disabled vehicle making sure the two vehicles do not touch. Turn all battery terminals and remove any electrical surges. Connect the positive (+) booster cable to protect any excessive corrosion before you attach the battery cables. Connecting the jumper cables 1. Park the booster vehicle close to start your vehicle. 2. Use only a 12-volt supply...
... of the disabled vehicle making sure the two vehicles do not touch. Turn all battery terminals and remove any electrical surges. Connect the positive (+) booster cable to protect any excessive corrosion before you attach the battery cables. Connecting the jumper cables 1. Park the booster vehicle close to start your vehicle. 2. Use only a 12-volt supply...

Owner Guide 5th Printing
Page 176
..., belts, moving parts of both engines, or any fuel delivery system parts. Make the final connection of the negative (-) cable to the negative (-) terminal of the stalled vehicle's engine, away from the battery and the carburetor/fuel injection system. Jump starting 1. Do not use fuel lines, engine rocker covers or the intake...
..., belts, moving parts of both engines, or any fuel delivery system parts. Make the final connection of the negative (-) cable to the negative (-) terminal of the stalled vehicle's engine, away from the battery and the carburetor/fuel injection system. Jump starting 1. Do not use fuel lines, engine rocker covers or the intake...

Owner Guide 5th Printing
Page 177
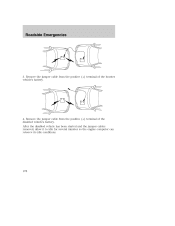
Roadside Emergencies 2. Remove the jumper cable on the negative (-) connection of the disabled vehicle. 3. Removing the jumper cables Remove the jumper cables in the reverse order that they were connected. 1. Start the engine of the booster vehicle's battery. - - - - + + + + 177 Note: In the illustrations, lightning bolts are used to designate the assisting (boosting) battery. 2. Remove the jumper cable from the ground metal surface. Once the disabled vehicle has been started, run both engines for an additional three minutes before disconnecting the jumper cables.
Roadside Emergencies 2. Remove the jumper cable on the negative (-) connection of the disabled vehicle. 3. Removing the jumper cables Remove the jumper cables in the reverse order that they were connected. 1. Start the engine of the booster vehicle's battery. - - - - + + + + 177 Note: In the illustrations, lightning bolts are used to designate the assisting (boosting) battery. 2. Remove the jumper cable from the ground metal surface. Once the disabled vehicle has been started, run both engines for an additional three minutes before disconnecting the jumper cables.
Owner Guide 5th Printing
Page 178
Roadside Emergencies 3. Remove the jumper cable from the positive (+) terminal of the booster vehicle's battery. 4. Remove the jumper cable from the positive (+) terminal of the disabled vehicle's battery. After the disabled vehicle has been started and the jumper cables removed, allow it to idle for several minutes so the engine computer can relearn its idle conditions. 178 - - - + + - + +
Roadside Emergencies 3. Remove the jumper cable from the positive (+) terminal of the booster vehicle's battery. 4. Remove the jumper cable from the positive (+) terminal of the disabled vehicle's battery. After the disabled vehicle has been started and the jumper cables removed, allow it to idle for several minutes so the engine computer can relearn its idle conditions. 178 - - - + + - + +
Owner Guide 5th Printing
Page 202
...personal injury. If the battery needs water often, have the charging system checked. When the battery is low, you can add plain tap water to come near the battery, always shield your face and protect your battery has a cover/shield, make certain the battery cables are always tightly fastened... to only fill the battery cells with a solution of the battery clean and dry. Therefore, do not use hard ...
...personal injury. If the battery needs water often, have the charging system checked. When the battery is low, you can add plain tap water to come near the battery, always shield your face and protect your battery has a cover/shield, make certain the battery cables are always tightly fastened... to only fill the battery cells with a solution of the battery clean and dry. Therefore, do not use hard ...


