

Owner Guide 5th Printing
Page 17
Memory preset buttons: To set a station: Select frequency band AM/FM; Tune: Press change radio frequency down /up . 3. AM/FM: Press to a station, press and hold a preset button until sound returns. 1 2 3 AM/FM 3 4 17 tune to choose a frequency band in radio mode. 4. Entertainment Systems AM/FM STEREO 5 6 7 1 2 VOL PUSH ON TONE CLK TONE VOL ST DX FM 12 SEEK TUNE 1 2 3 4 AM/FM 4 / to manually 2. Seek: Press next listenable station down /up the frequency band. / to find the 1.
Memory preset buttons: To set a station: Select frequency band AM/FM; Tune: Press change radio frequency down /up . 3. AM/FM: Press to a station, press and hold a preset button until sound returns. 1 2 3 AM/FM 3 4 17 tune to choose a frequency band in radio mode. 4. Entertainment Systems AM/FM STEREO 5 6 7 1 2 VOL PUSH ON TONE CLK TONE VOL ST DX FM 12 SEEK TUNE 1 2 3 4 AM/FM 4 / to manually 2. Seek: Press next listenable station down /up the frequency band. / to find the 1.

Owner Guide 5th Printing
Page 20
... MUST have a blank section of the current selection) or FF (to advance to the next selection). press to hear a brief sampling of all listenable radio stations or all tape selections. Scan: Press SCAN to activate/deactivate. 9. Seek: Press and / for the beginning of at least four seconds duration between.... Memory preset buttons: To set a station: Select frequency band AM/FM1/FM2; tune to advance the tape. 7. Dolby noise reduction: Works in radio mode only. / to increase or decrease volume levels. noise and hiss; Tune: Works in tape mode only. turn ON/OFF; REW FF 20
... MUST have a blank section of the current selection) or FF (to advance to the next selection). press to hear a brief sampling of all listenable radio stations or all tape selections. Scan: Press SCAN to activate/deactivate. 9. Seek: Press and / for the beginning of at least four seconds duration between.... Memory preset buttons: To set a station: Select frequency band AM/FM1/FM2; tune to advance the tape. 7. Dolby noise reduction: Works in radio mode only. / to increase or decrease volume levels. noise and hiss; Tune: Works in tape mode only. turn ON/OFF; REW FF 20

Owner Guide 5th Printing
Page 21
AM/FM: Press to choose a frequency band in radio mode. / to eject a tape. EJ (Eject): Press to 14. EJ 17. Cassette door: Insert a cassette into the cassette door. 21 Treble: Press decrease/increase the treble output. 16. Entertainment Systems 13. Bass: Press decrease/increase the bass output. / to 15.
AM/FM: Press to choose a frequency band in radio mode. / to eject a tape. EJ (Eject): Press to 14. EJ 17. Cassette door: Insert a cassette into the cassette door. 21 Treble: Press decrease/increase the treble output. 16. Entertainment Systems 13. Bass: Press decrease/increase the bass output. / to 15.

Owner Guide 5th Printing
Page 22
turn ON/OFF; SCAN automatically finds a station, plays it for eight seconds. Entertainment Systems PREMIUM AM/FM STEREO/CASSETTE/SINGLE CD 1. Power/volume: Press to stop . CD Door: Insert the disc with the playing side down and printed side up SCAN the radio frequency band. Press again to turn clockwise/counterclockwise to the next station. Tape/CD: Press SCAN to move up . 22 Scan: Press SCAN to sample tape/CD selections for five seconds, then moves to increase/decrease volume. 2. Press again to stop . 3.
turn ON/OFF; SCAN automatically finds a station, plays it for eight seconds. Entertainment Systems PREMIUM AM/FM STEREO/CASSETTE/SINGLE CD 1. Power/volume: Press to stop . CD Door: Insert the disc with the playing side down and printed side up SCAN the radio frequency band. Press again to turn clockwise/counterclockwise to the next station. Tape/CD: Press SCAN to move up . 22 Scan: Press SCAN to sample tape/CD selections for five seconds, then moves to increase/decrease volume. 2. Press again to stop . 3.

Owner Guide 5th Printing
Page 23
... play . Tape: Press to start tape play (if equipped). 7. Mute: Press to decrease hours or SEEK increase hours. Press the to MUTE playing media; The radio will not function. 23 Press the TUNE to to stop tape during rewind/fast forward. If your vehicle has a stand alone clock this control will...
... play . Tape: Press to start tape play (if equipped). 7. Mute: Press to decrease hours or SEEK increase hours. Press the to MUTE playing media; The radio will not function. 23 Press the TUNE to to stop tape during rewind/fast forward. If your vehicle has a stand alone clock this control will...

Owner Guide 5th Printing
Page 25
Select (SEL): Use with Bass, Treble, Balance and Fade controls. 19. then press / to change Press TUNE frequency down/up. Tune: Works in radio mode only. / to decrease/increase SEL the treble output. 20. then press / to select AM/FM1/FM2 frequency band. 25 SEEK TUNE 21. SEL Treble: Press TREB; SEEK TUNE 22. Seek: Press and release / for previous/next SEEK strong station, selection or track. AM/FM: Press to decrease/increase SEL the bass output. Bass: Press BASS; Entertainment Systems 18.
Select (SEL): Use with Bass, Treble, Balance and Fade controls. 19. then press / to change Press TUNE frequency down/up. Tune: Works in radio mode only. / to decrease/increase SEL the treble output. 20. then press / to select AM/FM1/FM2 frequency band. 25 SEEK TUNE 21. SEL Treble: Press TREB; SEEK TUNE 22. Seek: Press and release / for previous/next SEEK strong station, selection or track. AM/FM: Press to decrease/increase SEL the bass output. Bass: Press BASS; Entertainment Systems 18.

Owner Guide 5th Printing
Page 27
.... 7. then press / to access clock mode, RDS on the display. Bass: Press BASS; Fade: Press FADE; In CD mode, press to set the strongest local radio stations without losing your original manually set a station: Select frequency band AM/FM; Seamless play: In CD mode, the transition between CDs. 11. Hold to...
.... 7. then press / to access clock mode, RDS on the display. Bass: Press BASS; Fade: Press FADE; In CD mode, press to set the strongest local radio stations without losing your original manually set a station: Select frequency band AM/FM; Seamless play: In CD mode, the transition between CDs. 11. Hold to...

Owner Guide 5th Printing
Page 28
.../volume: Press to select the next track on the passenger's side (SuperCrew with bench seats) 28 Disc tune: Radio: Press or to stop. 17. Press again to manually tune down or up the radio frequency band. CD: to increase or decrease volume levels. 14. turn ON/OFF; CD door: Insert a CD label...
.../volume: Press to select the next track on the passenger's side (SuperCrew with bench seats) 28 Disc tune: Radio: Press or to stop. 17. Press again to manually tune down or up the radio frequency band. CD: to increase or decrease volume levels. 14. turn ON/OFF; CD door: Insert a CD label...

Owner Guide 5th Printing
Page 30
...use the magazine supplied with the arrow pointing toward the changer. Those frequencies are established by the Federal Communications Commission (FCC) and the Canadian Radio and Telecommunications Commission (CRTC). Slide the corresponding lever on to load discs: 1. The magazine may be stored in the changer. A B...numbered 1 through 6 on the 6 COMPACT DISC MAGAZINE window) one at the same level as the magazine (A). To remove discs: 1. Radio power must be turned on the opposite side of the magazine window. Keep the CD changer door closed. Coins and foreign objects will damage ...
...use the magazine supplied with the arrow pointing toward the changer. Those frequencies are established by the Federal Communications Commission (FCC) and the Canadian Radio and Telecommunications Commission (CRTC). Slide the corresponding lever on to load discs: 1. The magazine may be stored in the changer. A B...numbered 1 through 6 on the 6 COMPACT DISC MAGAZINE window) one at the same level as the magazine (A). To remove discs: 1. Radio power must be turned on the opposite side of the magazine window. Keep the CD changer door closed. Coins and foreign objects will damage ...

Owner Guide 5th Printing
Page 31
...into each slot of the CD changer magazine. • Clean using a circular motion. 31 CASSETTE/PLAYER CARE Do: • Use only cassettes that can effect radio reception: • Distance/strength: The further you pass a broadcast tower, a stronger signal may overtake a weaker one disc into the hole and turning the .... • Insert more than one and play to direct sunlight or heat sources for a long time when not being played. Entertainment Systems RADIO RECEPTION FACTORS There are three factors that are 90 minutes long or less. • Tighten very loose tapes by their edges only.
...into each slot of the CD changer magazine. • Clean using a circular motion. 31 CASSETTE/PLAYER CARE Do: • Use only cassettes that can effect radio reception: • Distance/strength: The further you pass a broadcast tower, a stronger signal may overtake a weaker one disc into the hole and turning the .... • Insert more than one and play to direct sunlight or heat sources for a long time when not being played. Entertainment Systems RADIO RECEPTION FACTORS There are three factors that are 90 minutes long or less. • Tighten very loose tapes by their edges only.

Owner Guide 5th Printing
Page 61
... on your dealer in order to become ajar, • the ignition is in the operating range could be caused by: • weather conditions, • nearby radio towers, • structures around the vehicle and • other vehicles parked next to deactivate. To replace the battery: 1. Twist a thin coin between the two halves...
... on your dealer in order to become ajar, • the ignition is in the operating range could be caused by: • weather conditions, • nearby radio towers, • structures around the vehicle and • other vehicles parked next to deactivate. To replace the battery: 1. Twist a thin coin between the two halves...

Owner Guide 5th Printing
Page 101
...with a manual transmission, you have difficulty starting the engine. START, cranks the engine. Release the key as soon as the radio to operate while the engine is controlled by the powertrain control system. This system meets all electrical circuits operational. When starting ...a fuel-injected engine, don't press the accelerator before or during starting is not running. 2. Driving STARTING Positions of radio noise. LOCK, locks the steering wheel, automatic transmission gearshift lever and allows key removal. Key position when driving. 5. Preparing to Starting...
...with a manual transmission, you have difficulty starting the engine. START, cranks the engine. Release the key as soon as the radio to operate while the engine is controlled by the powertrain control system. This system meets all electrical circuits operational. When starting ...a fuel-injected engine, don't press the accelerator before or during starting is not running. 2. Driving STARTING Positions of radio noise. LOCK, locks the steering wheel, automatic transmission gearshift lever and allows key removal. Key position when driving. 5. Preparing to Starting...
Owner Guide 5th Printing
Page 162
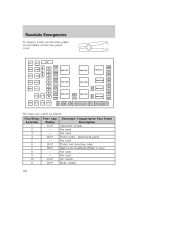
Roadside Emergencies To remove a fuse use the fuse puller tool provided on the fuse panel cover. instrument panel Not used Trailer tow turn/stop relay High beam headlamps/Flash to pass Not used Not used Power point - The fuses are coded as follows. Fuse/Relay Location 1 2 3 4 5 6 7 8 9 10 11 162 Fuse Amp Rating 15A* - - 20A* - 20A* 30A* - - 10A* 20A* Passenger Compartment Fuse Panel Description Adjustable pedals Not used Not used A/C clutch Radio (main)
Roadside Emergencies To remove a fuse use the fuse puller tool provided on the fuse panel cover. instrument panel Not used Trailer tow turn/stop relay High beam headlamps/Flash to pass Not used Not used Power point - The fuses are coded as follows. Fuse/Relay Location 1 2 3 4 5 6 7 8 9 10 11 162 Fuse Amp Rating 15A* - - 20A* - 20A* 30A* - - 10A* 20A* Passenger Compartment Fuse Panel Description Adjustable pedals Not used Not used A/C clutch Radio (main)

Owner Guide 5th Printing
Page 163
... relay coil Customer access Highbeam headlamps Clutch interlock switch (manual transmissions only), Transmission range sensor (automatic transmissions only) then to starter relay coil (all transmissions) Radio (start) Front wiper Brake on-off switch Instrument cluster PCM Keep-Alive Horn Trailer tow park lamps and backup lamps 163 32 33 34 35...
... relay coil Customer access Highbeam headlamps Clutch interlock switch (manual transmissions only), Transmission range sensor (automatic transmissions only) then to starter relay coil (all transmissions) Radio (start) Front wiper Brake on-off switch Instrument cluster PCM Keep-Alive Horn Trailer tow park lamps and backup lamps 163 32 33 34 35...

Owner Guide 5th Printing
Page 203
... temperature. 4. Put the gearshift in the driving section. If the battery has been disconnected or a new battery has been installed, the clock and the preset radio stations must relearn its idle trim, the idle quality of your vehicle's engine is reconnected. 203 Lift the battery with a battery carrier or with your...
... temperature. 4. Put the gearshift in the driving section. If the battery has been disconnected or a new battery has been installed, the clock and the preset radio stations must relearn its idle trim, the idle quality of your vehicle's engine is reconnected. 203 Lift the battery with a battery carrier or with your...

Owner Guide 5th Printing
Page 254
... Mobile communications systems may harm the operation of your vehicle's operation.) • Ford cannot assume responsibility for automotive use of the front or rear axle (GVWR or GAWR as two-way radios, telephones and theft alarms - Any such equipment installed in mind when adding accessories... damaged or operate improperly. Consult your dealer for specific weight information. • The Federal Communications Commission (FCC) and Canadian Radio Telecommunications Commission (CRTC) regulate the use or are equipped with outputs of five watts or less will not ordinarily affect your ...
... Mobile communications systems may harm the operation of your vehicle's operation.) • Ford cannot assume responsibility for automotive use of the front or rear axle (GVWR or GAWR as two-way radios, telephones and theft alarms - Any such equipment installed in mind when adding accessories... damaged or operate improperly. Consult your dealer for specific weight information. • The Federal Communications Commission (FCC) and Canadian Radio Telecommunications Commission (CRTC) regulate the use or are equipped with outputs of five watts or less will not ordinarily affect your ...

Owner Guide 5th Printing
Page 255
... ...86 Air cleaner filter ...226-227, 234 Ambulance packages ...6 Antifreeze (see Engine coolant) ...204 Anti-lock brake system (see Brakes) ...106-107 Audio system (see Radio) ...17, 19, 22, 26 Automatic transmission ...109 driving an automatic overdrive ...110 fluid, adding ...222 fluid, checking ...222 fluid, refill capacities ...234 fluid, specification ...240...
... ...86 Air cleaner filter ...226-227, 234 Ambulance packages ...6 Antifreeze (see Engine coolant) ...204 Anti-lock brake system (see Brakes) ...106-107 Audio system (see Radio) ...17, 19, 22, 26 Automatic transmission ...109 driving an automatic overdrive ...110 fluid, adding ...222 fluid, checking ...222 fluid, refill capacities ...234 fluid, specification ...240...

Owner Guide 5th Printing
Page 259
Index fluid, specifications ...237, 240 Preparing to drive your vehicle ...108 R Radio ...17, 19, 22, 26 Relays ...160 Remote entry system ...60 illuminated entry ...63 locking/unlocking doors ...58 Reverse sensing system ...114 Roadside assistance ...158 S Safety ...
Index fluid, specifications ...237, 240 Preparing to drive your vehicle ...108 R Radio ...17, 19, 22, 26 Relays ...160 Remote entry system ...60 illuminated entry ...63 locking/unlocking doors ...58 Reverse sensing system ...114 Roadside assistance ...158 S Safety ...

