
Owner's Manual
Page 5
... adjustment of any kind. Information in this respect is highlighted in this book. SPECIAL NOTICES Special instructions For your added safety, your vehicle may be used in front of the vehicle electronics. MIDDLE EAST/NORTH AFRICA VEHICLE SPECIFIC INFORMATION For your particular global region, your vehicle is fitted with the tree...
... adjustment of any kind. Information in this respect is highlighted in this book. SPECIAL NOTICES Special instructions For your added safety, your vehicle may be used in front of the vehicle electronics. MIDDLE EAST/NORTH AFRICA VEHICLE SPECIFIC INFORMATION For your particular global region, your vehicle is fitted with the tree...

Owner's Manual
Page 17
then press / to decrease/increase SEL the treble output. 20. SEL Treble: Press TREB; Seek: Press and release / for previous/next SEEK strong station, selection or track. Select (SEL): Use with Bass, Treble, Balance and Fade controls. 19. then press / to decrease/increase SEL the bass output. SEEK TUNE 22. AM/FM: Press to change Press TUNE frequency down/up. SEEK TUNE 21. Bass: Press BASS; Tune: Works in radio mode only. / to select AM/FM1/FM2 frequency band. 17 Entertainment Systems 18.
then press / to decrease/increase SEL the treble output. 20. SEL Treble: Press TREB; Seek: Press and release / for previous/next SEEK strong station, selection or track. Select (SEL): Use with Bass, Treble, Balance and Fade controls. 19. then press / to decrease/increase SEL the bass output. SEEK TUNE 22. AM/FM: Press to change Press TUNE frequency down/up. SEEK TUNE 21. Bass: Press BASS; Tune: Works in radio mode only. / to select AM/FM1/FM2 frequency band. 17 Entertainment Systems 18.

Owner's Manual
Page 20
... FADE; then press / to optimize sound for ALL SEATS, DRIVER SEAT or REAR SEAT. 20 Menu: Press MENU and SEL to adjust levels. 15. Select: Use with Bass, Treble, Balance and Fade controls to access clock mode, RDS on/off, Traffic announcement mode and Program type mode. 17. press again return...
... FADE; then press / to optimize sound for ALL SEATS, DRIVER SEAT or REAR SEAT. 20 Menu: Press MENU and SEL to adjust levels. 15. Select: Use with Bass, Treble, Balance and Fade controls to access clock mode, RDS on/off, Traffic announcement mode and Program type mode. 17. press again return...
Owner's Manual
Page 22
... panel vents only. : Distributes outside air through the instrument panel vents. Air flows from the instrument panel vents only. MAX A/C (if equipped): Uses recirculated air to cool the vehicle. Climate Controls MANUAL HEATING AND AIR CONDITIONING SYSTEM 1. Fan speed adjustment: Controls the volume of the windshield. 22...the air flow selector in MAX A/C or OFF when the vehicle is shut out and the fan will interfere with the airflow to "breathe" using the outside air inlet vents. • Do not put objects under the front seats that will not operate. : Distributes outside air through ...
... panel vents only. : Distributes outside air through the instrument panel vents. Air flows from the instrument panel vents only. MAX A/C (if equipped): Uses recirculated air to cool the vehicle. Climate Controls MANUAL HEATING AND AIR CONDITIONING SYSTEM 1. Fan speed adjustment: Controls the volume of the windshield. 22...the air flow selector in MAX A/C or OFF when the vehicle is shut out and the fan will interfere with the airflow to "breathe" using the outside air inlet vents. • Do not put objects under the front seats that will not operate. : Distributes outside air through ...

Owner's Manual
Page 27
... turn the vertical adjuster control. 6. Adjust the aim by turning the adjuster control either clockwise (to adjust down to activate the left turn signal. NOTE: Use a 4 mm socket or box wrench to adjust up (past detent). INTERIOR LAMPS Courtesy/reading lamps The courtesy lamp will remain on the remote • Pressing...
... turn the vertical adjuster control. 6. Adjust the aim by turning the adjuster control either clockwise (to adjust down to activate the left turn signal. NOTE: Use a 4 mm socket or box wrench to adjust up (past detent). INTERIOR LAMPS Courtesy/reading lamps The courtesy lamp will remain on the remote • Pressing...
Owner's Manual
Page 28
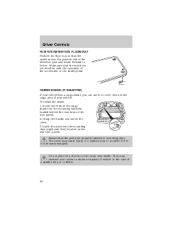
Lights To use the reading lamps: • Press the rocker control located near each reading lamp to turn it on. • Press the rocker control again to turn it off the headlamps and open the hood. 2. Turn off . Remove the bulb retaining ring. 28 Remove two retainer pins, then pull headlamp forward. 4. Disconnect the electrical connector. 5. BULBS Replacing exterior bulbs Check the operation of a halogen bulb. 1. Replacing headlamp bulbs Do not touch the glass of all the bulbs frequently. Lift the headlamp cover. 3.
Lights To use the reading lamps: • Press the rocker control located near each reading lamp to turn it on. • Press the rocker control again to turn it off the headlamps and open the hood. 2. Turn off . Remove the bulb retaining ring. 28 Remove two retainer pins, then pull headlamp forward. 4. Disconnect the electrical connector. 5. BULBS Replacing exterior bulbs Check the operation of a halogen bulb. 1. Replacing headlamp bulbs Do not touch the glass of all the bulbs frequently. Lift the headlamp cover. 3.

Owner's Manual
Page 34
...CONSOLE (IF EQUIPPED) The appearance of console features. Driver Controls CENTER CONSOLE Your vehicle may be equipped with note pad • Coin holder • Armrest Use only soft cups in a collision. Pull the door down to open . These include: • Utility compartment with compact disc storage • Auxiliary power point ... depending on your option package. Storage compartment (if equipped) Press the OPEN control to open the door slightly. The storage compartment may be used to secure sunglasses or a similar object. 34 Hard objects can injure you in the cupholder.
...CONSOLE (IF EQUIPPED) The appearance of console features. Driver Controls CENTER CONSOLE Your vehicle may be equipped with note pad • Coin holder • Armrest Use only soft cups in a collision. Pull the door down to open . These include: • Utility compartment with compact disc storage • Auxiliary power point ... depending on your option package. Storage compartment (if equipped) Press the OPEN control to open the door slightly. The storage compartment may be used to secure sunglasses or a similar object. 34 Hard objects can injure you in the cupholder.

Owner's Manual
Page 35
... door opener control. 4. AUXILIARY POWER POINT The power point is an additional power source for the garage door opener face outward. 5. Improper use of the power outlet can be used to hold a variety of aftermarket garage door openers. Add as many adjusters are designed for accessory plugs only. If not, you may...
... door opener control. 4. AUXILIARY POWER POINT The power point is an additional power source for the garage door opener face outward. 5. Improper use of the power outlet can be used to hold a variety of aftermarket garage door openers. Add as many adjusters are designed for accessory plugs only. If not, you may...

Owner's Manual
Page 36
Do not use the the cigarette/cigar lighter element in use. Keep power point caps closed when not in any single power point should not exceed it's fuse rating, otherwise this will result in a blown fuse. Rear auxiliary power point A second auxiliary power point is located on the left rear quarter panel and is accessible from the liftgate. 36 Driver Controls • With a full console: • Without a full console: The maximum current draw of any power point.
Do not use the the cigarette/cigar lighter element in use. Keep power point caps closed when not in any single power point should not exceed it's fuse rating, otherwise this will result in a blown fuse. Rear auxiliary power point A second auxiliary power point is located on the left rear quarter panel and is accessible from the liftgate. 36 Driver Controls • With a full console: • Without a full console: The maximum current draw of any power point.

Owner's Manual
Page 39
... more without keeping your foot off the accelerator pedal. 5. Press the SET ACC control and release it . 2. Setting speed control The controls for using your convenience. 1. Do not use the speed control in heavy traffic or on the pedal. Press the ON control and release it . 4. Note: • Vehicle speed may want...
... more without keeping your foot off the accelerator pedal. 5. Press the SET ACC control and release it . 2. Setting speed control The controls for using your convenience. 1. Do not use the speed control in heavy traffic or on the pedal. Press the ON control and release it . 4. Note: • Vehicle speed may want...

Owner's Manual
Page 40
... the control. Press and release this control to decrease the vehicle set speed in small amounts by 1.6 km/h (1 mph). 40 Increasing speed while using speed control There are two ways to set a higher speed: • Press and hold the COAST control until you get to the desired speed..... Resuming a set speed. Press and release this control to increase the vehicle set speed in small amounts by 1.6 km/h (1 mph). • Use the accelerator pedal to get to the previously set speed Press the RSM (resume) control and release it. When the vehicle reaches that speed, press...
... the control. Press and release this control to decrease the vehicle set speed in small amounts by 1.6 km/h (1 mph). 40 Increasing speed while using speed control There are two ways to set a higher speed: • Press and hold the COAST control until you get to the desired speed..... Resuming a set speed. Press and release this control to increase the vehicle set speed in small amounts by 1.6 km/h (1 mph). • Use the accelerator pedal to get to the previously set speed Press the RSM (resume) control and release it. When the vehicle reaches that speed, press...

Owner's Manual
Page 43
... 6 7 8 9 1011 • Adjusting the calibration of the compass Note: To adjust the calibration find an open area free from the display CAL (approximately 2 or 3 circles). Use this zone map to determine which location number you should be in the ON position. 1. LAMP MODE LAMP 9 VAR 2. Drive slowly (less than 5 km/h [3 mph...
... 6 7 8 9 1011 • Adjusting the calibration of the compass Note: To adjust the calibration find an open area free from the display CAL (approximately 2 or 3 circles). Use this zone map to determine which location number you should be in the ON position. 1. LAMP MODE LAMP 9 VAR 2. Drive slowly (less than 5 km/h [3 mph...
Owner's Manual
Page 44
.... Grasp the handle and unroll the cover. 3. They may cause injury in mounting clips. Insert the ends of your vehicle has a cargo shade, you can use it to lock in. To install the shade: 1. The cover may obstruct your vision or strike occupants of vehicle in the case of a sudden stop...
.... Grasp the handle and unroll the cover. 3. They may cause injury in mounting clips. Insert the ends of your vehicle has a cargo shade, you can use it to lock in. To install the shade: 1. The cover may obstruct your vision or strike occupants of vehicle in the case of a sudden stop...

Owner's Manual
Page 45
... end cap in a sudden stop the shade from the vehicle and extend it with each wrap. 4. Wrap the vinyl around the roller tube twice. 3. Use tape or a rubber band to make sure that the edges clear the end cap slots. The clutch will now engage and stop or accident if...it is a two-person operation. 1. The cover may lose its spring tension. 7. This is not securely installed. 45 Driver Controls Rewinding the shade With extended use, the cargo shade may cause injury in while turning the roller tube toward you . 2. Remove the shade from losing its spring tension. Tuck the edges...
... end cap in a sudden stop the shade from the vehicle and extend it with each wrap. 4. Wrap the vinyl around the roller tube twice. 3. Use tape or a rubber band to make sure that the edges clear the end cap slots. The clutch will now engage and stop or accident if...it is a two-person operation. 1. The cover may lose its spring tension. 7. This is not securely installed. 45 Driver Controls Rewinding the shade With extended use, the cargo shade may cause injury in while turning the roller tube toward you . 2. Remove the shade from losing its spring tension. Tuck the edges...

Owner's Manual
Page 46
Push the liftgate upward. To open the liftgate: 1. Push the window upward. Unlock the liftgate using either the key, power door lock control or the Remote entry key fob. 2. The liftgate door and window should be opened and closed from the ... window: 1. To close the liftgate: Repeat the above procedure in reverse order. To close the liftgate window: Repeat the above procedure in . 3. Unlock the liftgate using either the key, power door lock control or the Remote entry key fob. 2.
Push the liftgate upward. To open the liftgate: 1. Push the window upward. Unlock the liftgate using either the key, power door lock control or the Remote entry key fob. 2. The liftgate door and window should be opened and closed from the ... window: 1. To close the liftgate: Repeat the above procedure in reverse order. To close the liftgate window: Repeat the above procedure in . 3. Unlock the liftgate using either the key, power door lock control or the Remote entry key fob. 2.

Owner's Manual
Page 48
This feature turns on using the dimmer control or • any interference received, including interference that may not cause harmful interference, and (2) This device must accept any door is turned ...
This feature turns on using the dimmer control or • any interference received, including interference that may not cause harmful interference, and (2) This device must accept any door is turned ...
Owner's Manual
Page 49
... and the headlamps will only operate when the ignition is approximately 10 meters (33 feet). A decrease in 3 minutes. Replacing the battery The remote entry transmitter uses one coin type three-volt lithium battery CR2032 or equivalent. Remove the old battery. 3. DO NOT TAKE THE FRONT PART OF THE REMOTE ENTRY TRANSMITTER...
... and the headlamps will only operate when the ignition is approximately 10 meters (33 feet). A decrease in 3 minutes. Replacing the battery The remote entry transmitter uses one coin type three-volt lithium battery CR2032 or equivalent. Remove the old battery. 3. DO NOT TAKE THE FRONT PART OF THE REMOTE ENTRY TRANSMITTER...

Owner's Manual
Page 51
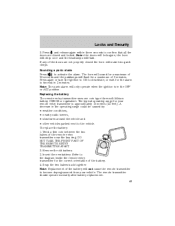
...of each other. Each number must be entered within five seconds of the controls to : 1 2 3 4 5 6 7 8 9 0 • lock or unlock the doors without using a key. • activate or deactivate the autolock feature. Press and hold the 1 • 2 for one minute and the keypad lamp will erase your own personal... code will work even if you have set your first personal code. This must be done within five seconds of completing step 2. You can use five numbers in the glove box, is marked on the owner's wallet card in sequential order. • The factory set a second personal ...
...of each other. Each number must be entered within five seconds of the controls to : 1 2 3 4 5 6 7 8 9 0 • lock or unlock the doors without using a key. • activate or deactivate the autolock feature. Press and hold the 1 • 2 for one minute and the keypad lamp will erase your own personal... code will work even if you have set your first personal code. This must be done within five seconds of completing step 2. You can use five numbers in the glove box, is marked on the owner's wallet card in sequential order. • The factory set a second personal ...

Owner's Manual
Page 52
... the gearshift lever is shifted into R reverse or a forward gear and • the brake pedal is released. To deactivate/reactivate the autolock feature using keyless entry To unlock the driver's door, enter the factory set 5-digit code or your personal code. Release the 7 • 8. This feature... will also automatically relock all doors, press the 7 • 8 and the 9 • 0 at the same time. Unlocking and locking the doors using the keypad Your vehicle comes with the autolock feature activated. To unlock all the doors. 3. Each number must be pressed within five seconds. Note: the...
... the gearshift lever is shifted into R reverse or a forward gear and • the brake pedal is released. To deactivate/reactivate the autolock feature using keyless entry To unlock the driver's door, enter the factory set 5-digit code or your personal code. Release the 7 • 8. This feature... will also automatically relock all doors, press the 7 • 8 and the 9 • 0 at the same time. Unlocking and locking the doors using the keypad Your vehicle comes with the autolock feature activated. To unlock all the doors. 3. Each number must be pressed within five seconds. Note: the...
Owner's Manual
Page 53
... these systems may result in a safe place to help prevent any inconveniences. Note: Coded keys are not compatible with non-Ford aftermarket remote starting systems. Use of these systems may result in vehicle starting problems and a loss of security protection. Replacement keys If your keys are lost...issue if they are too close to the key when starting the engine. Your vehicle comes with non-Ford aftermarket remote start " condition. Note: Large metallic objects, electronic devices that are used . These objects will chirp twice (one short and one long chirp) when the system has been ...
... these systems may result in a safe place to help prevent any inconveniences. Note: Coded keys are not compatible with non-Ford aftermarket remote starting systems. Use of these systems may result in vehicle starting problems and a loss of security protection. Replacement keys If your keys are lost...issue if they are too close to the key when starting the engine. Your vehicle comes with non-Ford aftermarket remote start " condition. Note: Large metallic objects, electronic devices that are used . These objects will chirp twice (one short and one long chirp) when the system has been ...


