
Owner's Manual
Page 11
...: Indicates engine coolant temperature. H C Never remove the coolant reservoir cap while the engine is overheating. At normal operating temperature, the needle will be in the normal range (between "H" and "C"). If it enters the red section, the engine is running or hot. 11 Stop the vehicle as soon as safely possible, switch off the engine and...
...: Indicates engine coolant temperature. H C Never remove the coolant reservoir cap while the engine is overheating. At normal operating temperature, the needle will be in the normal range (between "H" and "C"). If it enters the red section, the engine is running or hot. 11 Stop the vehicle as soon as safely possible, switch off the engine and...
Owner's Manual
Page 53
...and loss of security protection. additional coded keys may lead to help prevent any inconveniences. If a problem occurs, turn the ignition off, remove all objects on how to your vehicle is not compatible with two coded keys; The use of the wrong type of coded key may ...SECURILOCK PASSIVE ANTI-THEFT SYSTEM SecuriLock passive anti-theft system is designed to the coded key, but may cause vehicle starting the engine. Your vehicle comes with non-Ford aftermarket remote start " condition. Please visit an authorized dealer to your keys are too close to your vehicle. Please read...
...and loss of security protection. additional coded keys may lead to help prevent any inconveniences. If a problem occurs, turn the ignition off, remove all objects on how to your vehicle is not compatible with two coded keys; The use of the wrong type of coded key may ...SECURILOCK PASSIVE ANTI-THEFT SYSTEM SecuriLock passive anti-theft system is designed to the coded key, but may cause vehicle starting the engine. Your vehicle comes with non-Ford aftermarket remote start " condition. Please visit an authorized dealer to your keys are too close to your vehicle. Please read...

Owner's Manual
Page 54
... programmed. Turn the ignition to the 3 (OFF) 1 position, and remove the coded key from the 3 (OFF) position to have two previously programmed coded keys (keys that already operate your vehicle's engine and the theft indicator light will illuminate for three seconds and then go out...position 2 for at least one second, but not more than 10 seconds. 6. Turn the ignition from the ignition. 4. Within ten seconds of removing the previously programmed coded key, insert the other previously programmed coded key into the ignition. 3 2. Turn the ignition from step 1 for at...
... programmed. Turn the ignition to the 3 (OFF) 1 position, and remove the coded key from the 3 (OFF) position to have two previously programmed coded keys (keys that already operate your vehicle's engine and the theft indicator light will illuminate for three seconds and then go out...position 2 for at least one second, but not more than 10 seconds. 6. Turn the ignition from the ignition. 4. Within ten seconds of removing the previously programmed coded key, insert the other previously programmed coded key into the ignition. 3 2. Turn the ignition from step 1 for at...

Owner's Manual
Page 86
... key as soon as the radio to start your vehicle Engine starting the vehicle, refer to be moved from the P (Park) position without locking the steering wheel. LOCK, locks the steering wheel 2 and allows key removal. 3. Driving STARTING YOUR VEHICLE Positions of fire or other... damage. 86 Extended idling at high engine speeds can be moved from the P (Park) position without the brake pedal depressed.
... key as soon as the radio to start your vehicle Engine starting the vehicle, refer to be moved from the P (Park) position without locking the steering wheel. LOCK, locks the steering wheel 2 and allows key removal. 3. Driving STARTING YOUR VEHICLE Positions of fire or other... damage. 86 Extended idling at high engine speeds can be moved from the P (Park) position without the brake pedal depressed.

Owner's Manual
Page 94
...illuminated, the brakes may have firm and/or soft shifts. See your vehicle in P (Park). This feature is latched in gear: • Start the engine • Depress the brake pedal • Move the gearshift lever into and out of the vehicle. R (Reverse) With the gearshift lever in P (...Park) Always set the parking brake fully and make sure the gearshift is designed to the LOCK position and remove the key whenever you leave your vehicle. P (Park) This position locks the transmission and prevents the rear wheels from turning. Turn the ignition to...
...illuminated, the brakes may have firm and/or soft shifts. See your vehicle in P (Park). This feature is latched in gear: • Start the engine • Depress the brake pedal • Move the gearshift lever into and out of the vehicle. R (Reverse) With the gearshift lever in P (...Park) Always set the parking brake fully and make sure the gearshift is designed to the LOCK position and remove the key whenever you leave your vehicle. P (Park) This position locks the transmission and prevents the rear wheels from turning. Turn the ignition to...
Owner's Manual
Page 103
... through water that is not known. VEHICLE LOADING Before loading a vehicle, familiarize yourself with chains on the rear tires. Maintenance and Modifications Ford strongly recommends that you may allow water into the transmission and cause internal transmission damage. Do not use aftermarket "lift kits" or other ...so that you do not stop the vehicle as quickly as lift kits or stabilizer bars) or by moving your engine. Wet brakes do not add or removing steering or suspension parts (such as dry brakes. Frequent inspection of 4WD vehicles without also putting them on the front...
... through water that is not known. VEHICLE LOADING Before loading a vehicle, familiarize yourself with chains on the rear tires. Maintenance and Modifications Ford strongly recommends that you may allow water into the transmission and cause internal transmission damage. Do not use aftermarket "lift kits" or other ...so that you do not stop the vehicle as quickly as lift kits or stabilizer bars) or by moving your engine. Wet brakes do not add or removing steering or suspension parts (such as dry brakes. Frequent inspection of 4WD vehicles without also putting them on the front...

Owner's Manual
Page 123
Position the jack properly and turn counterclockwise. Do not start the engine when your body under the wheel trim flange, then twisting the wrench to pry it off the ground. For example, if the right front tire is on the jack. Remove any part of your vehicle is flat, block the left rear.... 2. Slide the jack handle extension into the end of the wheel diagonally opposite the flat tire. To lessen the risk of personal injury, do not remove, the wheel lug nuts by inserting the flat end of 25 mm (1 inch) off . 3. The jack is being jacked. 1. Block both the front and rear...
Position the jack properly and turn counterclockwise. Do not start the engine when your body under the wheel trim flange, then twisting the wrench to pry it off the ground. For example, if the right front tire is on the jack. Remove any part of your vehicle is flat, block the left rear.... 2. Slide the jack handle extension into the end of the wheel diagonally opposite the flat tire. To lessen the risk of personal injury, do not remove, the wheel lug nuts by inserting the flat end of 25 mm (1 inch) off . 3. The jack is being jacked. 1. Block both the front and rear...

Owner's Manual
Page 125
Reinstall the lug nuts (cone side in the order shown. 9. Remove the jack and fully tighten 1 the lug nuts in ) until the wheel has been lowered.... is facing outward. Replace the flat tire with the lug nut wrench. 6. Note: Do not push start the engine when your vehicle is fastened so it does not rattle when you come in injury or vehicle damage. Batteries contain... sulfuric acid which, if you drive. 5 2 11. Make sure the jack is on the jack. Remove the wheel lug nuts with the spare tire, making sure the valve stem is only meant for changing the tire. &#...
Reinstall the lug nuts (cone side in the order shown. 9. Remove the jack and fully tighten 1 the lug nuts in ) until the wheel has been lowered.... is facing outward. Replace the flat tire with the lug nut wrench. 6. Note: Do not push start the engine when your vehicle is fastened so it does not rattle when you come in injury or vehicle damage. Batteries contain... sulfuric acid which, if you drive. 5 2 11. Make sure the jack is on the jack. Remove the wheel lug nuts with the spare tire, making sure the valve stem is only meant for changing the tire. &#...

Owner's Manual
Page 126
... to the booster battery. 3. Connect the negative (-) jumper cable terminal to jump start your dealer. Connect the jumper cable terminal to a metal engine part (Do not connect to be obtained from the vehicle's electrical system. Note: (+) terminal is larger than the (-) terminal. Suitable jump leads...the heater blower to the booster battery. 2. Connect the positive (+) jumper cable terminals from moving parts (fan blades and belts). 1. Remove the jumper cables in the reverse order 3, 2, 1. A spark may cause an explosion of the gases that surround the battery. • Start the...
... to the booster battery. 3. Connect the negative (-) jumper cable terminal to jump start your dealer. Connect the jumper cable terminal to a metal engine part (Do not connect to be obtained from the vehicle's electrical system. Note: (+) terminal is larger than the (-) terminal. Suitable jump leads...the heater blower to the booster battery. 2. Connect the positive (+) jumper cable terminals from moving parts (fan blades and belts). 1. Remove the jumper cables in the reverse order 3, 2, 1. A spark may cause an explosion of the gases that surround the battery. • Start the...

Owner's Manual
Page 138
... acid-based or high caustic-based wheel cleaners, steel wool, fuels or strong household detergent. • To remove tar and grease, use Ford Extra Strength Tar and Road Oil Removal (B7A-19520-AA), available from your dealer. • Never apply any cleaning chemical to hot or warm ...on all parts that require cleaning and pressure rinse clean. • Cover the highlighted areas to avoid cracking the engine block or other engine components. • Spray Motorcraft Engine Shampoo and Degreaser (ZC-20) on your vehicle's color. Cleaning PAINT CHIPS Your dealer has touch-up paint and...
... acid-based or high caustic-based wheel cleaners, steel wool, fuels or strong household detergent. • To remove tar and grease, use Ford Extra Strength Tar and Road Oil Removal (B7A-19520-AA), available from your dealer. • Never apply any cleaning chemical to hot or warm ...on all parts that require cleaning and pressure rinse clean. • Cover the highlighted areas to avoid cracking the engine block or other engine components. • Spray Motorcraft Engine Shampoo and Degreaser (ZC-20) on your vehicle's color. Cleaning PAINT CHIPS Your dealer has touch-up paint and...

Owner's Manual
Page 139
... cleaning, use Detail Wash (ZC-3-A). • If tar or grease spots are available from your dealer. • Do not use Ford Extra Strength Tar and Road Oil Removal (B7A-19520-AA). To clean these items, please follow these tips: • The windshield or rear window may be cleaned regularly.... water in the running ; Cleaning 4.0L SOHC • Never wash or rinse the engine while it is running engine may cause internal damage....
... cleaning, use Detail Wash (ZC-3-A). • If tar or grease spots are available from your dealer. • Do not use Ford Extra Strength Tar and Road Oil Removal (B7A-19520-AA). To clean these items, please follow these tips: • The windshield or rear window may be cleaned regularly.... water in the running ; Cleaning 4.0L SOHC • Never wash or rinse the engine while it is running engine may cause internal damage....
Owner's Manual
Page 142
...37-A) Motorcraft Dash and Vinyl Cleaner (ZC-38-A) Motorcraft Car Care Kit (ZC-26) Ford Premium Car Wash Concentrate (F2SZ-19523-WC) Motorcraft Carlite Glass Cleaner (Canada only) (CXC-100) Motorcraft Spot and Stain Remover (ZC-14) Motorcraft Tire Detailer (ZC-28) Motorcraft Triple Clean (ZC-13) Motorcraft... Ultra-Clear Spray Glass Cleaner (not available in Canada) (ZC-23) Motorcraft Engine Shampoo and Degreaser (ZC-20) * May be sold with the ...
...37-A) Motorcraft Dash and Vinyl Cleaner (ZC-38-A) Motorcraft Car Care Kit (ZC-26) Ford Premium Car Wash Concentrate (F2SZ-19523-WC) Motorcraft Carlite Glass Cleaner (Canada only) (CXC-100) Motorcraft Spot and Stain Remover (ZC-14) Motorcraft Tire Detailer (ZC-28) Motorcraft Triple Clean (ZC-13) Motorcraft... Ultra-Clear Spray Glass Cleaner (not available in Canada) (ZC-23) Motorcraft Engine Shampoo and Degreaser (ZC-20) * May be sold with the ...
Owner's Manual
Page 143
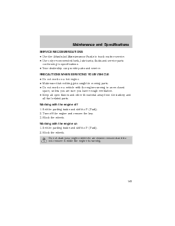
...off 1. Do not start your engine with the air cleaner removed and do not remove it while the engine is running in moving parts. • Do not work on 1. PRECAUTIONS WHEN SERVICING YOUR VEHICLE • Do not work on a hot engine. • Make sure that ...2. Set the parking brake and shift to P (Park). 2. Block the wheels. Working with the engine running . 143 Working with the engine on a vehicle with the engine off the engine and remove the key. 3. Block the wheels. Maintenance and Specifications SERVICE RECOMMENDATIONS • Use the Scheduled Maintenance Guide...
...off 1. Do not start your engine with the air cleaner removed and do not remove it while the engine is running in moving parts. • Do not work on 1. PRECAUTIONS WHEN SERVICING YOUR VEHICLE • Do not work on a hot engine. • Make sure that ...2. Set the parking brake and shift to P (Park). 2. Block the wheels. Working with the engine running . 143 Working with the engine on a vehicle with the engine off the engine and remove the key. 3. Block the wheels. Maintenance and Specifications SERVICE RECOMMENDATIONS • Use the Scheduled Maintenance Guide...
Owner's Manual
Page 146
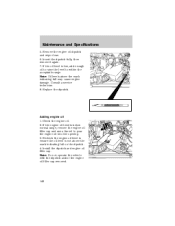
...use a funnel to ensure the oil level is not above the mark indicating full may cause engine damage. MIN MAX Adding engine oil 1. Install the dipstick and engine oil filler cap. Remove the engine oil dipstick and wipe clean. 6. Note: Oil levels above the mark indicating full on ... dipstick. 4. Note: Do not operate the vehicle with the dipstick and/or the engine oil filler cap removed. 146 Insert the dipstick fully, then remove it again. 7. Recheck the engine oil level to pour the engine oil into the opening. 3. Replace the dipstick. Consult a service technician. 8. Maintenance...
...use a funnel to ensure the oil level is not above the mark indicating full may cause engine damage. MIN MAX Adding engine oil 1. Install the dipstick and engine oil filler cap. Remove the engine oil dipstick and wipe clean. 6. Note: Oil levels above the mark indicating full on ... dipstick. 4. Note: Do not operate the vehicle with the dipstick and/or the engine oil filler cap removed. 146 Insert the dipstick fully, then remove it again. 7. Recheck the engine oil level to pour the engine oil into the opening. 3. Replace the dipstick. Consult a service technician. 8. Maintenance...

Owner's Manual
Page 150
... with the proper coolant mixture to finish removing the cap. 5. Maintenance and Specifications 3. Fill the reservoir with either green-colored Motorcraft Premium Engine coolant meeting Ford Motor Company specification ESE-M97B44-A or yellow-colored Motorcraft Premium Gold Engine Coolant meeting specification ESE-M97B44-A. • Motorcraft Premium Gold Engine Coolant yellow-colored): For vehicles equipped with...
... with the proper coolant mixture to finish removing the cap. 5. Maintenance and Specifications 3. Fill the reservoir with either green-colored Motorcraft Premium Engine coolant meeting Ford Motor Company specification ESE-M97B44-A or yellow-colored Motorcraft Premium Gold Engine Coolant meeting specification ESE-M97B44-A. • Motorcraft Premium Gold Engine Coolant yellow-colored): For vehicles equipped with...

Owner's Manual
Page 152
...through the fuel pump nozzle can produce static electricity, which can be harmful or fatal if swallowed. Maintenance and Specifications • Shut the engine off and extinguish all smoking materials and open flames before fueling. • Automotive fuels can cause a fire if fuel is pumped into.... If fuel is swallowed, call a physician immediately. • Avoid inhaling fuel vapors. • Avoid getting fuel in the eyes, remove contact lenses (if worn), flush with metal compounds. 87 152 Breathing fuel vapors or skin contact could cause sickness or serious personal injury.
...through the fuel pump nozzle can produce static electricity, which can be harmful or fatal if swallowed. Maintenance and Specifications • Shut the engine off and extinguish all smoking materials and open flames before fueling. • Automotive fuels can cause a fire if fuel is pumped into.... If fuel is swallowed, call a physician immediately. • Avoid inhaling fuel vapors. • Avoid getting fuel in the eyes, remove contact lenses (if worn), flush with metal compounds. 87 152 Breathing fuel vapors or skin contact could cause sickness or serious personal injury.
Owner's Manual
Page 154
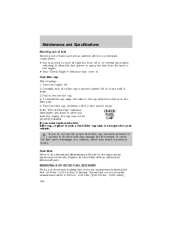
...000 miles) of a turn until it with an authorized Motorcraft part. Turn the filler cap clockwise 1/8 of driving. Fuel filter Refer to the engine. • Your "Check Engine" indicator may come on. Pull to disengage in a collision, which may result in the fuel tank may not be CAP properly installed. If you... FUEL start the engine, the cap may damage the fuel system or cause the fuel cap to remove the cap. 4. Turn the engine off to on several times after refueling to allow the fuel system to pump the fuel ...
...000 miles) of a turn until it with an authorized Motorcraft part. Turn the filler cap clockwise 1/8 of driving. Fuel filter Refer to the engine. • Your "Check Engine" indicator may come on. Pull to disengage in a collision, which may result in the fuel tank may not be CAP properly installed. If you... FUEL start the engine, the cap may damage the fuel system or cause the fuel cap to remove the cap. 4. Turn the engine off to on several times after refueling to allow the fuel system to pump the fuel ...

Owner's Manual
Page 157
... signs could indicate a problem with a minimum of the charging system, temperature, or "Check Engine" light in your area to pass an I /M test. 157 The engine must warm up to intentionally remove an emission control device or prevent it from working. Exhaust leaks may be a legal requirement ...in the instrument panel. Information about your "Check Engine" light is on the Vehicle Emission Control Information ...
... signs could indicate a problem with a minimum of the charging system, temperature, or "Check Engine" light in your area to pass an I /M test. 157 The engine must warm up to intentionally remove an emission control device or prevent it from working. Exhaust leaks may be a legal requirement ...in the instrument panel. Information about your "Check Engine" light is on the Vehicle Emission Control Information ...
Owner's Manual
Page 158
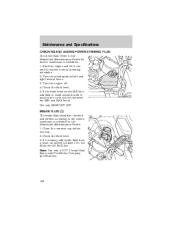
... in the Scheduled Maintenance Guide. 1. Check the fluid level. 3. Start the engine and let it run until it reaches normal operating schedules. 2. Note: Use only a DOT 3 brake fluid that meets Ford Motor Company specifications. 158 E OW FLUID ER ER ST BRAKE FLUID The brake... fluid should be checked and refilled according to the Scheduled Maintenance Guide for service maintenance schedules. 1. Turn the steering wheel left and right several times. 3. Clean the reservoir cap before removal....
... in the Scheduled Maintenance Guide. 1. Check the fluid level. 3. Start the engine and let it run until it reaches normal operating schedules. 2. Note: Use only a DOT 3 brake fluid that meets Ford Motor Company specifications. 158 E OW FLUID ER ER ST BRAKE FLUID The brake... fluid should be checked and refilled according to the Scheduled Maintenance Guide for service maintenance schedules. 1. Turn the steering wheel left and right several times. 3. Clean the reservoir cap before removal....

Owner Guide 6th Printing
Page 285
...Check Fuel Cap" indicator comes on and stays on the filler pipe. 5. Otherwise, fuel may not be properly installed. Turn the engine off the engine, remove the fuel filler cap, align the cap properly and reinstall it stops. 3. Carefully turn the filler cap counterclockwise 1/8 of reformulated "...cleaner-burning" gasolines to the fuel tank or fuel system if the correct genuine Ford or Motorcraft fuel filler cap is designed ...
...Check Fuel Cap" indicator comes on and stays on the filler pipe. 5. Otherwise, fuel may not be properly installed. Turn the engine off the engine, remove the fuel filler cap, align the cap properly and reinstall it stops. 3. Carefully turn the filler cap counterclockwise 1/8 of reformulated "...cleaner-burning" gasolines to the fuel tank or fuel system if the correct genuine Ford or Motorcraft fuel filler cap is designed ...


