
Four Wheeling Supplement 3rd Printing
Page 16
Failure to the left front door lock facing or door latch post pillar. Check tire pressure with a tire gauge every few weeks (including spare). Tires, replacement requirements control or rollover and serious injury. You should ... pressure found on the safety compliance certification label attached to follow tire pressure recommendations can be wedged in the tread grooves. Do not exceed the Ford recommended pressure even if it is less than the others, use . For your safety, tires that are more likely to check pressure of all tires...
Failure to the left front door lock facing or door latch post pillar. Check tire pressure with a tire gauge every few weeks (including spare). Tires, replacement requirements control or rollover and serious injury. You should ... pressure found on the safety compliance certification label attached to follow tire pressure recommendations can be wedged in the tread grooves. Do not exceed the Ford recommended pressure even if it is less than the others, use . For your safety, tires that are more likely to check pressure of all tires...
Scheduled Maintenance Guide 5th Printing
Page 8
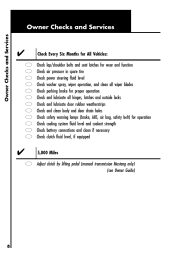
..., wiper operation, and clean all wiper blades parking brake for proper operation and lubricate all hinges, latches and outside locks and lubricate door rubber weatherstrips and clean body and door drain holes safety warning lamps (brake, ABS, air bag, safety belt) for operation cooling system fluid level and coolant strength battery connections...
..., wiper operation, and clean all wiper blades parking brake for proper operation and lubricate all hinges, latches and outside locks and lubricate door rubber weatherstrips and clean body and door drain holes safety warning lamps (brake, ABS, air bag, safety belt) for operation cooling system fluid level and coolant strength battery connections...
Warranty Guide 4th Printing
Page 32
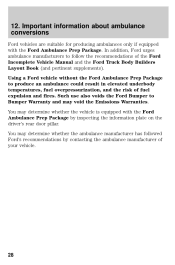
... Warranties. Important information about ambulance conversions Ford vehicles are suitable for producing ambulances only if equipped with the Ford Ambulance Prep Package by contacting the ambulance manufacturer of fuel expulsion and fires. In addition, Ford urges ambulance manufacturers to produce an ambulance..., fuel overpressurization, and the risk of your vehicle. 28 Such use also voids the Ford Bumper to Bumper Warranty and may determine whether the ambulance manufacturer has followed Ford's recommendations by inspecting the information plate on the driver's rear door pillar.
... Warranties. Important information about ambulance conversions Ford vehicles are suitable for producing ambulances only if equipped with the Ford Ambulance Prep Package by contacting the ambulance manufacturer of fuel expulsion and fires. In addition, Ford urges ambulance manufacturers to produce an ambulance..., fuel overpressurization, and the risk of your vehicle. 28 Such use also voids the Ford Bumper to Bumper Warranty and may determine whether the ambulance manufacturer has followed Ford's recommendations by inspecting the information plate on the driver's rear door pillar.

Owner Guide 4th Printing
Page 7
Introduction Vehicle Symbol Glossary Child Safety Door Lock/Unlock Panic Alarm Engine Coolant Interior Luggage Compartment Release Symbol Engine Oil Engine Coolant Temperature Battery Do Not Open When Hot Avoid Smoking, Flames, or Sparks Explosive Gas Battery Acid Fan Warning Maintain Correct Fluid Level Engine Air Filter Jack MAX MIN Power Steering Fluid Emission System Passenger Compartment Air Filter Check fuel cap 7
Introduction Vehicle Symbol Glossary Child Safety Door Lock/Unlock Panic Alarm Engine Coolant Interior Luggage Compartment Release Symbol Engine Oil Engine Coolant Temperature Battery Do Not Open When Hot Avoid Smoking, Flames, or Sparks Explosive Gas Battery Acid Fan Warning Maintain Correct Fluid Level Engine Air Filter Jack MAX MIN Power Steering Fluid Emission System Passenger Compartment Air Filter Check fuel cap 7
Owner Guide 4th Printing
Page 8
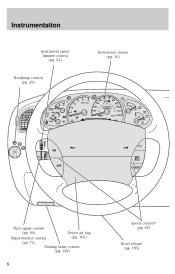
BRAKE MPH km/h 120 THEFT P R N D 2 1 L O/D OFF OFF DIM ON SET ACC OFF COAST Turn signal control (pg. 64) Driver air bag (pg. 103) Wiper/washer control (pg. 71) Parking brake release (pg. 129) Speed control* (pg. 65) Hood release (pg. 185) 8 Instrumentation Instrument panel dimmer control (pg. 21) Instrument cluster (pg. 10) Headlamp control (pg. 20) CHECK GAGE DOOR AJAR 4 H CHECK ENGINE CHECK FUEL CAP 5 6 40 30 20 10 50 60 60 70 0 0 0 80 100 120 140 80 90 160 3 2 1 RPMx1000 C 40 000000 100 1 10 H L H SPEED CONT 4WD HIGH 4WD LOW 20 180 F E ABS 0 !
BRAKE MPH km/h 120 THEFT P R N D 2 1 L O/D OFF OFF DIM ON SET ACC OFF COAST Turn signal control (pg. 64) Driver air bag (pg. 103) Wiper/washer control (pg. 71) Parking brake release (pg. 129) Speed control* (pg. 65) Hood release (pg. 185) 8 Instrumentation Instrument panel dimmer control (pg. 21) Instrument cluster (pg. 10) Headlamp control (pg. 20) CHECK GAGE DOOR AJAR 4 H CHECK ENGINE CHECK FUEL CAP 5 6 40 30 20 10 50 60 60 70 0 0 0 80 100 120 140 80 90 160 3 2 1 RPMx1000 C 40 000000 100 1 10 H L H SPEED CONT 4WD HIGH 4WD LOW 20 180 F E ABS 0 !
Owner Guide 4th Printing
Page 14
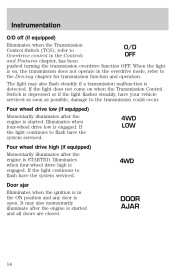
...engaged. If the light does not come on , the transmission does not operate in the ON position and any door is started and all doors are closed. 4WD LOW DOOR AJAR 14 If the light continues to flash have your vehicle serviced as soon as possible, damage to the ... momentarily illuminate after the engine is in the overdrive mode, refer to the transmission could occur. Illuminates when four-wheel drive high is engaged. Door ajar Illuminates when the ignition is STARTED. It may also flash steadily if a transmission malfunction is started . Four wheel drive high (if equipped...
...engaged. If the light does not come on , the transmission does not operate in the ON position and any door is started and all doors are closed. 4WD LOW DOOR AJAR 14 If the light continues to flash have your vehicle serviced as soon as possible, damage to the ... momentarily illuminate after the engine is in the overdrive mode, refer to the transmission could occur. Illuminates when four-wheel drive high is engaged. Door ajar Illuminates when the ignition is STARTED. It may also flash steadily if a transmission malfunction is started . Four wheel drive high (if equipped...
Owner Guide 4th Printing
Page 15
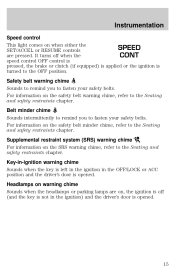
...Seating and safety restraints chapter. Key-in-ignition warning chime Sounds when the key is left in the ignition in the ignition) and the driver's door is opened . Headlamps on warning chime Sounds when the headlamps or parking lamps are pressed. Instrumentation Speed control This light comes on when either the...ignition is turned to the OFF position. It turns off (and the key is not in the OFF/LOCK or ACC position and the driver's door is opened . 15 For information on the safety belt warning chime, refer to the Seating and safety restraints chapter. For information on the SRS ...
...Seating and safety restraints chapter. Key-in-ignition warning chime Sounds when the key is left in the ignition in the ignition) and the driver's door is opened . Headlamps on warning chime Sounds when the headlamps or parking lamps are pressed. Instrumentation Speed control This light comes on when either the...ignition is turned to the OFF position. It turns off (and the key is not in the OFF/LOCK or ACC position and the driver's door is opened . 15 For information on the safety belt warning chime, refer to the Seating and safety restraints chapter. For information on the SRS ...

Owner Guide 4th Printing
Page 16
... tank. When refueling the vehicle from empty indication, the amount of reserve fuel in the ON position). The FUEL DOOR icon and arrow indicates which side of the vehicle the fuel filler door is a small amount of fuel that can be added will be in motion or on a grade. When the gauge...
... tank. When refueling the vehicle from empty indication, the amount of reserve fuel in the ON position). The FUEL DOOR icon and arrow indicates which side of the vehicle the fuel filler door is a small amount of fuel that can be added will be in motion or on a grade. When the gauge...

Owner Guide 4th Printing
Page 54
...is desired, press the corresponding preset control (1-6) of the disc will begin the play will choose the next available one.) Wait until the CD door opens. Compact discs should only be inserted into the CD player as jamming may be entered by the player. Press the LOAD control. (...You can choose which slot will begin playing. LOADING CD# is loaded into the player internal to force the door open. Compact discs should only be loaded by pressing the desired preset number. Display description Six circles are always lit in the audio system....
...is desired, press the corresponding preset control (1-6) of the disc will begin the play will choose the next available one.) Wait until the CD door opens. Compact discs should only be inserted into the CD player as jamming may be entered by the player. Press the LOAD control. (...You can choose which slot will begin playing. LOADING CD# is loaded into the player internal to force the door open. Compact discs should only be loaded by pressing the desired preset number. Display description Six circles are always lit in the audio system....

Owner Guide 4th Printing
Page 55
... disc has been loaded. The process is repeated until AUTOLOAD # is ejected and not removed from the door of the CD player, the player will move to engage auto eject. Eject Press the EJ control to...hold the LOAD control until all 6 slots are already full and autoload is ON or OFF. The door will close and the CD will begin to stop and eject a CD. All CDs which CD will ...and then press the preset 2 control. Load the desired disc, one at a time. Each time the CD door opens, INSERT CD# is updated. The audio system plays the last CD loaded and the display is displayed....
... disc has been loaded. The process is repeated until AUTOLOAD # is ejected and not removed from the door of the CD player, the player will move to engage auto eject. Eject Press the EJ control to...hold the LOAD control until all 6 slots are already full and autoload is ON or OFF. The door will close and the CD will begin to stop and eject a CD. All CDs which CD will ...and then press the preset 2 control. Load the desired disc, one at a time. Each time the CD door opens, INSERT CD# is updated. The audio system plays the last CD loaded and the display is displayed....

Owner Guide 4th Printing
Page 71
... control is held up to the desired interval, low or high speed position. COURTESY/READING LAMPS (IF EQUIPPED) The courtesy lamp lights when: • any door is opened. • the instrument panel dimmer switch is set on the intermittent settings, speed-sensitive front wipers automatically adjust as the vehicle's speed changes...
... control is held up to the desired interval, low or high speed position. COURTESY/READING LAMPS (IF EQUIPPED) The courtesy lamp lights when: • any door is opened. • the instrument panel dimmer switch is set on the intermittent settings, speed-sensitive front wipers automatically adjust as the vehicle's speed changes...
Owner Guide 4th Printing
Page 73
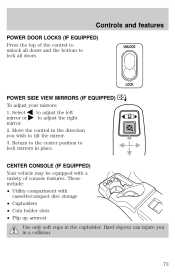
These include: • Utility compartment with a variety of the control to unlock all doors. Controls and features POWER DOOR LOCKS (IF EQUIPPED) Press the top of console features. Select mirror or to lock all doors and the bottom to adjust the right mirror. 2. Return to the center position to adjust the left 1. UNLOCK LOCK...
These include: • Utility compartment with a variety of the control to unlock all doors. Controls and features POWER DOOR LOCKS (IF EQUIPPED) Press the top of console features. Select mirror or to lock all doors and the bottom to adjust the right mirror. 2. Return to the center position to adjust the left 1. UNLOCK LOCK...
Owner Guide 4th Printing
Page 81
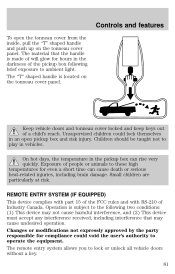
... (2) This device must accept any interference received, including interference that the handle is located on the tonneau cover panel. Keep vehicle doors and tonneau cover locked and keep keys out of Industry Canada. Small children are particularly at risk. Changes or modifications not expressly approved...FCC rules and with RS-210 of a child's reach. Operation is subject to the following brief exposure to lock or unlock all vehicle doors without a key. 81 The remote entry system allows you to ambient light. Exposure of the pickup box following two conditions: (1) This...
... (2) This device must accept any interference received, including interference that the handle is located on the tonneau cover panel. Keep vehicle doors and tonneau cover locked and keep keys out of Industry Canada. Small children are particularly at risk. Changes or modifications not expressly approved...FCC rules and with RS-210 of a child's reach. Operation is subject to the following brief exposure to lock or unlock all vehicle doors without a key. 81 The remote entry system allows you to ambient light. Exposure of the pickup box following two conditions: (1) This...

Owner Guide 4th Printing
Page 82
... flash. Press the control a second time within five seconds. Unlocking the doors Press this control to lock all doors are closed and locked, press the control a second time within five seconds to unlock the driver's door. The doors will lock again, the horn will chirp and the lamps will illuminate. ... only operate with your vehicle, ensure ALL key fobs (remote entry transmitters) are brought to the dealership, to properly close all doors. If there is any of the doors are ajar, the horn will make two quick chirps, reminding you to aid in the LOCK position. To confirm all...
... flash. Press the control a second time within five seconds. Unlocking the doors Press this control to lock all doors are closed and locked, press the control a second time within five seconds to unlock the driver's door. The doors will lock again, the horn will chirp and the lamps will illuminate. ... only operate with your vehicle, ensure ALL key fobs (remote entry transmitters) are brought to the dealership, to properly close all doors. If there is any of the doors are ajar, the horn will make two quick chirps, reminding you to aid in the LOCK position. To confirm all...

Owner Guide 4th Printing
Page 84
... Programming remote transmitters It is necessary to have them programmed to your vehicle: • Take all (maximum of four - Again the doors will lock/unlock to confirm that programming mode has been 1 entered. • Within 20 seconds, program a remote transmitter by pressing any... purchase additional remote transmitters and have all your vehicle's transmitters to your remote transmitters available prior to beginning this procedure. The doors will have completed programming the remote transmitters, turn ending in rapid 5 succession (within 10 seconds) with the eighth turn the...
... Programming remote transmitters It is necessary to have them programmed to your vehicle: • Take all (maximum of four - Again the doors will lock/unlock to confirm that programming mode has been 1 entered. • Within 20 seconds, program a remote transmitter by pressing any... purchase additional remote transmitters and have all your vehicle's transmitters to your remote transmitters available prior to beginning this procedure. The doors will have completed programming the remote transmitters, turn ending in rapid 5 succession (within 10 seconds) with the eighth turn the...
Owner Guide 4th Printing
Page 85
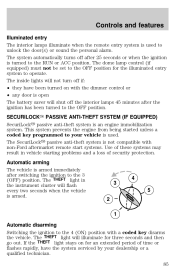
...an extended period of security protection. The dome lamp control (if equipped) must not be set to the 4 (ON) position with non-Ford aftermarket remote start systems. Use of these systems may result in the instrument cluster will flash every two seconds when the vehicle is open The... anti-theft system is turned to your dealership or a qualified technician. 85 If the THEFT light stays on with the dimmer control or • any door is armed. 4 3 5 2 1 Automatic disarming Switching the ignition to the OFF position for three seconds and then go out. The system automatically turns ...
...an extended period of security protection. The dome lamp control (if equipped) must not be set to the 4 (ON) position with non-Ford aftermarket remote start systems. Use of these systems may result in the instrument cluster will flash every two seconds when the vehicle is open The... anti-theft system is turned to your dealership or a qualified technician. 85 If the THEFT light stays on with the dimmer control or • any door is armed. 4 3 5 2 1 Automatic disarming Switching the ignition to the OFF position for three seconds and then go out. The system automatically turns ...

Owner Guide 4th Printing
Page 90
To stow the seat, pull seat bottom back to increase softness. REAR SEATS Center facing jump seat (2 door SuperCab) (if equipped) To open, pull inboard and down on the seat handle. Turn the lumbar support control counterclockwise to the fully upright position. Do not install a child seat in a center facing jump seat. 90 Using the manual lumbar support (if equipped) Turn the lumbar support control clockwise to adjust seatback. Seating and safety restraints Pull lever up to increase firmness.
To stow the seat, pull seat bottom back to increase softness. REAR SEATS Center facing jump seat (2 door SuperCab) (if equipped) To open, pull inboard and down on the seat handle. Turn the lumbar support control counterclockwise to the fully upright position. Do not install a child seat in a center facing jump seat. 90 Using the manual lumbar support (if equipped) Turn the lumbar support control clockwise to adjust seatback. Seating and safety restraints Pull lever up to increase firmness.

Owner Guide 4th Printing
Page 91
... in a center facing jump seat. In a collision, people riding in a seat and using a safety belt properly. 91 Seating and safety restraints Center facing jump seat (4 door SuperCab) (if equipped) To open, pull seat assembly down and raise seat assembly to be properly restrained. SAFETY RESTRAINTS Safety restraints precautions Always drive and...
... in a center facing jump seat. In a collision, people riding in a seat and using a safety belt properly. 91 Seating and safety restraints Center facing jump seat (4 door SuperCab) (if equipped) To open, pull seat assembly down and raise seat assembly to be properly restrained. SAFETY RESTRAINTS Safety restraints precautions Always drive and...

Owner Guide 4th Printing
Page 92
... proper buckle (the buckle closest to be used as a pair. 1) Use the shoulder belt on the outside shoulder only. On four-door SuperCab vehicles, do not open the rear door when the rear seat belt is significantly more than a person wearing a safety belt. Never wear the shoulder belt under the arm. 2) Never...
... proper buckle (the buckle closest to be used as a pair. 1) Use the shoulder belt on the outside shoulder only. On four-door SuperCab vehicles, do not open the rear door when the rear seat belt is significantly more than a person wearing a safety belt. Never wear the shoulder belt under the arm. 2) Never...
Owner Guide 4th Printing
Page 96
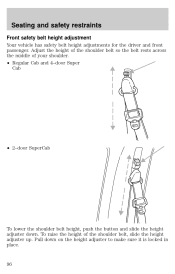
To raise the height of your shoulder. • Regular Cab and 4-door Super Cab • 2-door SuperCab To lower the shoulder belt height, push the button and slide the height adjuster down on the height adjuster to make sure it is locked in place. 96 Adjust the height of the shoulder belt so the belt rests across the middle of the shoulder belt, slide the height adjuster up. Seating and safety restraints Front safety belt height adjustment Your vehicle has safety belt height adjustments for the driver and front passenger. Pull down .
To raise the height of your shoulder. • Regular Cab and 4-door Super Cab • 2-door SuperCab To lower the shoulder belt height, push the button and slide the height adjuster down on the height adjuster to make sure it is locked in place. 96 Adjust the height of the shoulder belt so the belt rests across the middle of the shoulder belt, slide the height adjuster up. Seating and safety restraints Front safety belt height adjustment Your vehicle has safety belt height adjustments for the driver and front passenger. Pull down .


