
Owner's Manual
Page 6
Instrumentation Foglamp control * (pg. 45) Instrument cluster (pg. 8) Headlamp/turn signal control (pg. 44) 60 50 40 100 80 70 80 120 140 THEFT 90 160 E FUEL FILL 12 / 3 2 1 4 5 RPMx1000 6 7 8 F C H 30 60 0 00113 100 LOW FUEL MIRROR L Power side view mirrors* (pg. 18) Speed control* (pg. 46) Instrument panel dimmer switch (pg. 17) Driver air bag (pg. 79) 6
Instrumentation Foglamp control * (pg. 45) Instrument cluster (pg. 8) Headlamp/turn signal control (pg. 44) 60 50 40 100 80 70 80 120 140 THEFT 90 160 E FUEL FILL 12 / 3 2 1 4 5 RPMx1000 6 7 8 F C H 30 60 0 00113 100 LOW FUEL MIRROR L Power side view mirrors* (pg. 18) Speed control* (pg. 46) Instrument panel dimmer switch (pg. 17) Driver air bag (pg. 79) 6

Owner's Manual
Page 11
... the battery is still effective unless the brake warning light also remains illuminated with the parking brake released. High beams Illuminates when the high beam headlamps are turned on continuously or flash faster, check for a burned-out turn signal or the hazard lights are turned on or continues to flash, the...
... the battery is still effective unless the brake warning light also remains illuminated with the parking brake released. High beams Illuminates when the high beam headlamps are turned on continuously or flash faster, check for a burned-out turn signal or the hazard lights are turned on or continues to flash, the...

Owner's Manual
Page 13
... / 3 2 1 4 5 RPMx1000 6 7 8 F C H 30 20 10 40 60 0 00000 100 110 180 km/h 20 LOW FUEL CHECK FUEL CAP SERVICE ENGINE SOON MPH 0 0 0 0 120 P ! Headlamps on warning chime Sounds when the headlamps or parking lamps are on, the ignition is off (and the key is not in the OFF/LOCK or ACC position and...
... / 3 2 1 4 5 RPMx1000 6 7 8 F C H 30 20 10 40 60 0 00000 100 110 180 km/h 20 LOW FUEL CHECK FUEL CAP SERVICE ENGINE SOON MPH 0 0 0 0 120 P ! Headlamps on warning chime Sounds when the headlamps or parking lamps are on, the ignition is off (and the key is not in the OFF/LOCK or ACC position and...

Owner's Manual
Page 17
Sedan • Rotate left to brighten • Rotate right to adjust the brightness of the instrument panel during headlamp and parklamp operation. Controls and features PANEL DIMMER CONTROL Use to dim The dome lamp will not illuminate if the control switch is in the OFF position. 17 Coupe • Rotate up to brighten. • Rotate down to dim.
Sedan • Rotate left to brighten • Rotate right to adjust the brightness of the instrument panel during headlamp and parklamp operation. Controls and features PANEL DIMMER CONTROL Use to dim The dome lamp will not illuminate if the control switch is in the OFF position. 17 Coupe • Rotate up to brighten. • Rotate down to dim.

Owner's Manual
Page 44
... and allows key removal. START, cranks the engine. Daytime running . 3. ART ST III HEADLAMP CONTROL Rotate the headlamp control to the first position to also turn on your headlamps at dusk or during these conditions may not provide adequate lighting during inclement weather. Rotate to ...the second position to turn on the headlamps. Always remember to turn on with your headlamps under these conditions. ACCESSORY, allows the electrical accessories such as the engine starts. Failure to 1 ...
... and allows key removal. START, cranks the engine. Daytime running . 3. ART ST III HEADLAMP CONTROL Rotate the headlamp control to the first position to also turn on your headlamps at dusk or during these conditions may not provide adequate lighting during inclement weather. Rotate to ...the second position to turn on the headlamps. Always remember to turn on with your headlamps under these conditions. ACCESSORY, allows the electrical accessories such as the engine starts. Failure to 1 ...

Owner's Manual
Page 77
...). • The ignition switch is in the OFF position. • All vehicle doors are closed. • The driver's safety belt is unbuckled. • The parklamps/headlamps are in an accident. To reduce the risk of a buckled safety belt to avoid the Belt Minder chime. To disable (one-time) or deactivate the...
...). • The ignition switch is in the OFF position. • All vehicle doors are closed. • The driver's safety belt is unbuckled. • The parklamps/headlamps are in an accident. To reduce the risk of a buckled safety belt to avoid the Belt Minder chime. To disable (one-time) or deactivate the...
Owner's Manual
Page 78
... turning off, buckle then unbuckle the safety belt. • This will flash four times per second for three seconds. 8. Ford recommends that the belts do not need to be inspected and replaced if either damage or improper operation is provided by: •...necessary. Seating and safety restraints 4. Buckle then unbuckle the safety belt three times, ending with the safety belt warning light off the parklamps/headlamps. 5. After receiving confirmation, the deactivation/activation procedure is currently disabled. 7. All safety belt assemblies, including retractors, buckles, front seat ...
... turning off, buckle then unbuckle the safety belt. • This will flash four times per second for three seconds. 8. Ford recommends that the belts do not need to be inspected and replaced if either damage or improper operation is provided by: •...necessary. Seating and safety restraints 4. Buckle then unbuckle the safety belt three times, ending with the safety belt warning light off the parklamps/headlamps. 5. After receiving confirmation, the deactivation/activation procedure is currently disabled. 7. All safety belt assemblies, including retractors, buckles, front seat ...

Owner's Manual
Page 94
If starting a vehicle with an automatic transaxle: • Make sure the gearshift is set. Make sure the parking brake is in P (Park). Make sure the headlamps and vehicle accessories are off. 3. P R N D D L If starting a vehicle with a manual transaxle: • Push the clutch pedal to the floor. 94 Starting 2.
If starting a vehicle with an automatic transaxle: • Make sure the gearshift is set. Make sure the parking brake is in P (Park). Make sure the headlamps and vehicle accessories are off. 3. P R N D D L If starting a vehicle with a manual transaxle: • Push the clutch pedal to the floor. 94 Starting 2.

Owner's Manual
Page 123
... of the I/P Fuse Panel ABS Main Relay Constant Control Relay Module (Cooling Fan) Data Link Connector (DLC), Instrument Cluster Constant Control Relay Module (Fuel Pump) Headlamps Headlamps COOLING FAN 40A FUEL INJ 30A DEFOG 30A (ABS) 60A MAIN 100A BTN 40A 123 Roadside emergencies Coupe The high-current fuses are coded as...
... of the I/P Fuse Panel ABS Main Relay Constant Control Relay Module (Cooling Fan) Data Link Connector (DLC), Instrument Cluster Constant Control Relay Module (Fuel Pump) Headlamps Headlamps COOLING FAN 40A FUEL INJ 30A DEFOG 30A (ABS) 60A MAIN 100A BTN 40A 123 Roadside emergencies Coupe The high-current fuses are coded as...

Owner's Manual
Page 124
...Rear Window Defrost Charging System, BTN, Cooling Fan, Fuel Pump, OBD-II, ABS Fuses, Ignition Switch, Headlamps Hazard ABS Main Relay Constant Control Relay Module Data Link Connector (DLC), Instrument Cluster Engine Controls Headlamps Headlamps BTN ABS COOLING FAN OBD-II 40A* 60A* 40A* 10A** FUEL PUMP 20A** HEAD RH 10A**...10A** * Fuse Link Cartridge ** Fuse 124 COOLING FAN 40A FUEL INJ 30A DEFOG 30A (ABS) 60A MAIN 100A BTN 40A Roadside emergencies Sedan HEADLAMP RELAY OBD-II 10A FUEL PUMP 20A HEAD LH 10A HEAD RH 10A USE THE DESIGNATED FUSES ONLY The high-current fuses are coded as...
...Rear Window Defrost Charging System, BTN, Cooling Fan, Fuel Pump, OBD-II, ABS Fuses, Ignition Switch, Headlamps Hazard ABS Main Relay Constant Control Relay Module Data Link Connector (DLC), Instrument Cluster Engine Controls Headlamps Headlamps BTN ABS COOLING FAN OBD-II 40A* 60A* 40A* 10A** FUEL PUMP 20A** HEAD RH 10A**...10A** * Fuse Link Cartridge ** Fuse 124 COOLING FAN 40A FUEL INJ 30A DEFOG 30A (ABS) 60A MAIN 100A BTN 40A Roadside emergencies Sedan HEADLAMP RELAY OBD-II 10A FUEL PUMP 20A HEAD LH 10A HEAD RH 10A USE THE DESIGNATED FUSES ONLY The high-current fuses are coded as...
Owner's Manual
Page 176
...will make it easier to check the operation of time, contaminants may enter the lamp housings and affect performance. Replacing headlamp bulbs 1. Make sure that the headlamps are turned OFF. 2. Disconnect the electrical connector from the bulb by turning the dust shield counterclockwise (when viewed from...will be replaced immediately. Once started, do not turn off the engine until the above driving cycle. Open the hood and disconnect the headlamp wiring socket from the housing by pulling rearward. 176 If a bulb is complete. Remove the protective dust shield from the in-line...
...will make it easier to check the operation of time, contaminants may enter the lamp housings and affect performance. Replacing headlamp bulbs 1. Make sure that the headlamps are turned OFF. 2. Disconnect the electrical connector from the bulb by turning the dust shield counterclockwise (when viewed from...will be replaced immediately. Once started, do not turn off the engine until the above driving cycle. Open the hood and disconnect the headlamp wiring socket from the housing by pulling rearward. 176 If a bulb is complete. Remove the protective dust shield from the in-line...
Owner's Manual
Page 177
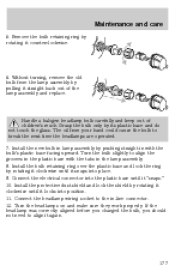
... the bulb only by pushing straight in with the tabs in lamp assembly by its plastic base and do not touch the glass. Turn the headlamps on and make sure they work properly. Install the new bulb in the lamp assembly. 8. Turn the bulb slightly to break the next time the... in -line connector. 12. Install the bulb retaining ring over the plastic base and lock the ring by pulling it locks into place. 9. If the headlamp was correctly aligned before you changed the bulb, you should not need to the in the plastic base with the bulb's plastic base facing upward...
... the bulb only by pushing straight in with the tabs in lamp assembly by its plastic base and do not touch the glass. Turn the headlamps on and make sure they work properly. Install the new bulb in the lamp assembly. 8. Turn the bulb slightly to break the next time the... in -line connector. 12. Install the bulb retaining ring over the plastic base and lock the ring by pulling it locks into place. 9. If the headlamp was correctly aligned before you changed the bulb, you should not need to the in the plastic base with the bulb's plastic base facing upward...
Owner's Manual
Page 181
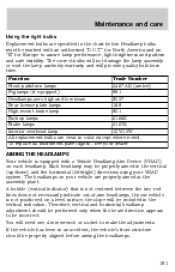
... equipped with an authorized "D.O.T." for North America and an "E" for Europe to be properly aimed in color except where noted. Headlamp bulbs must be marked with a Vehicle Headlamp Aim Device (VHAD) on a level surface, the slope will be included in an accident, the vehicle's front structure should ... and safe visibility. If your VHAD system. Function Trade Number Front park/turn lamps 3457 AK (amber) Foglamps (if equipped) 881 Headlamps-aero high and low beam 9007 Rear license plate lamps 168 High-mount brake lamp 921 Backup lamps 3156K Brake lamps 3157K Interior overhead lamp...
... equipped with an authorized "D.O.T." for North America and an "E" for Europe to be properly aimed in color except where noted. Headlamp bulbs must be marked with a Vehicle Headlamp Aim Device (VHAD) on a level surface, the slope will be included in an accident, the vehicle's front structure should ... and safe visibility. If your VHAD system. Function Trade Number Front park/turn lamps 3457 AK (amber) Foglamps (if equipped) 881 Headlamps-aero high and low beam 9007 Rear license plate lamps 168 High-mount brake lamp 921 Backup lamps 3156K Brake lamps 3157K Interior overhead lamp...

Owner's Manual
Page 182
Maintenance and care Horizontal aim adjustment 1. The "L" and "R" under the viewing window on the top of the headlamp refer to turn the horizontal adjusting screw until the forward edge of the knurled portion of the horizontal aim. 4. Use a 4 mm wrench or socket to .... Park the vehicle on the plastic slider when viewed directly from above. 182 They are located below the viewing window at the rear of the headlamp assembly. 3.
Maintenance and care Horizontal aim adjustment 1. The "L" and "R" under the viewing window on the top of the headlamp refer to turn the horizontal adjusting screw until the forward edge of the knurled portion of the horizontal aim. 4. Use a 4 mm wrench or socket to .... Park the vehicle on the plastic slider when viewed directly from above. 182 They are located below the viewing window at the rear of the headlamp assembly. 3.

Owner's Manual
Page 183
... "DN" on a level surface. 2. DN UP 3. DN L R UP 183 Park the vehicle on the bubble indicate the directional change (up or down) of the headlamp below the headlamp upper attachment. With the hood open, locate the bubble level and the vertical adjustment screw. Repeat the above process to turn the vertical adjusting...
... "DN" on a level surface. 2. DN UP 3. DN L R UP 183 Park the vehicle on the bubble indicate the directional change (up or down) of the headlamp below the headlamp upper attachment. With the hood open, locate the bubble level and the vertical adjustment screw. Repeat the above process to turn the vertical adjusting...
Owner's Manual
Page 205
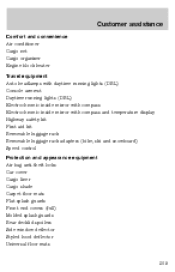
Customer assistance Comfort and convenience Air conditioner Cargo net Cargo organizer Engine block heater Travel equipment Auto headlamps with daytime running lights (DRL) Console armrest Daytime running lights (DRL) Electrochromic inside mirror with compass Electrochromic inside mirror with compass and temperature display Highway ...
Customer assistance Comfort and convenience Air conditioner Cargo net Cargo organizer Engine block heater Travel equipment Auto headlamps with daytime running lights (DRL) Console armrest Daytime running lights (DRL) Electrochromic inside mirror with compass Electrochromic inside mirror with compass and temperature display Highway ...
Owner's Manual
Page 211
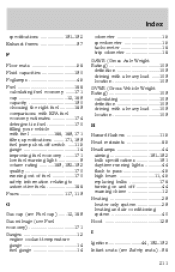
... location ...109 GVWR (Gross Vehicle Weight Rating) ...109 calculating ...109 definition ...109 driving with a heavy load ...109 location ...109 H Hazard flashers ...115 Head restraints ...65 Headlamps ...44 aiming ...181-183 bulb specifications ...181 daytime running lights ...44 flash to pass ...45 high beam ...11, 45 replacing bulbs ...176 turning on and...
... location ...109 GVWR (Gross Vehicle Weight Rating) ...109 calculating ...109 definition ...109 driving with a heavy load ...109 location ...109 H Hazard flashers ...115 Head restraints ...65 Headlamps ...44 aiming ...181-183 bulb specifications ...181 daytime running lights ...44 flash to pass ...45 high beam ...11, 45 replacing bulbs ...176 turning on and...
Owner's Manual
Page 212
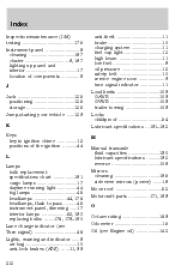
... ignition chime ...13 positions of the ignition ...44 L Lamps bulb replacement specifications chart ...181 cargo lamps ...17 daytime running light ...44 fog lamps ...45 headlamps ...44, 176 headlamps, flash to pass ...45 instrument panel, dimming ...17 interior lamps ...53, 180 replacing bulbs ...176, 178-180 Lane change indicator (see Turn signal) ...46...
... ignition chime ...13 positions of the ignition ...44 L Lamps bulb replacement specifications chart ...181 cargo lamps ...17 daytime running light ...44 fog lamps ...45 headlamps ...44, 176 headlamps, flash to pass ...45 instrument panel, dimming ...17 interior lamps ...53, 180 replacing bulbs ...176, 178-180 Lane change indicator (see Turn signal) ...46...
