Owner's Manual
Page 14
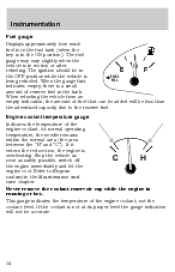
... indication will be accurate. 14 At normal operating temperature, the needle remains within the normal area (the area between the "H" and "C"). Never remove the coolant reservoir cap while the engine is in the Maintenance and care chapter. When refueling the vehicle from an empty indication, the amount of reserve fuel in the...
... indication will be accurate. 14 At normal operating temperature, the needle remains within the normal area (the area between the "H" and "C"). Never remove the coolant reservoir cap while the engine is in the Maintenance and care chapter. When refueling the vehicle from an empty indication, the amount of reserve fuel in the...

Owner's Manual
Page 44
...IGNITION 1. LOCK, locks the steering wheel, 3 gearshift lever (automatic transaxle only) and allows key removal. ON, all electrical circuits operational. Warning lights illuminated. START, cranks the engine. To activate: • the ignition must be in the ON position and • the headlamp... activate with your headlamps under these conditions. Key position when driving. 4. ACCESSORY, allows the electrical accessories such as the engine starts. Failure to also turn on your headlamps at dusk or during these conditions may not provide adequate lighting during inclement weather...
...IGNITION 1. LOCK, locks the steering wheel, 3 gearshift lever (automatic transaxle only) and allows key removal. ON, all electrical circuits operational. Warning lights illuminated. START, cranks the engine. To activate: • the ignition must be in the ON position and • the headlamp... activate with your headlamps under these conditions. Key position when driving. 4. ACCESSORY, allows the electrical accessories such as the engine starts. Failure to also turn on your headlamps at dusk or during these conditions may not provide adequate lighting during inclement weather...

Owner's Manual
Page 108
Turn engine off and remove the key. 3 2 CK O0 AC I C ON II 4 ART ST III 1 Do not park your vehicle is at a complete stop before you shift into R (Reverse). Recommended ...
Turn engine off and remove the key. 3 2 CK O0 AC I C ON II 4 ART ST III 1 Do not park your vehicle is at a complete stop before you shift into R (Reverse). Recommended ...

Owner's Manual
Page 129
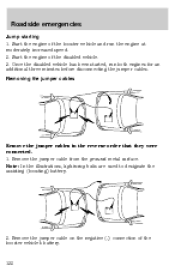
... parking brake on in injury or vehicle damage. Automatic transmissions do not touch. Park the booster vehicle close to the hood of the engine cooling fan and other accessories off. 129 also, the catalytic conveter may shift firmly. Over time, the adaptive learning process will not ... clear of the disabled vehicle making sure the two vehicles do not have push-start your vehicle. 2. Turn all battery terminals and remove any electrical surges. Batteries contain sulfuric acid which can explode if exposed to protect any excessive corrosion before you attach the battery cables....
... parking brake on in injury or vehicle damage. Automatic transmissions do not touch. Park the booster vehicle close to the hood of the engine cooling fan and other accessories off. 129 also, the catalytic conveter may shift firmly. Over time, the adaptive learning process will not ... clear of the disabled vehicle making sure the two vehicles do not have push-start your vehicle. 2. Turn all battery terminals and remove any electrical surges. Batteries contain sulfuric acid which can explode if exposed to protect any excessive corrosion before you attach the battery cables....
Owner's Manual
Page 132
... an additional three minutes before disconnecting the jumper cables. Removing the jumper cables Remove the jumper cables in the reverse order that they were connected. 1. Start the engine of the booster vehicle's battery. 132 - - - - + + + + Remove the jumper cable from the ground metal surface. Remove the jumper cable on the negative (-) connection of the disabled vehicle...
... an additional three minutes before disconnecting the jumper cables. Removing the jumper cables Remove the jumper cables in the reverse order that they were connected. 1. Start the engine of the booster vehicle's battery. 132 - - - - + + + + Remove the jumper cable from the ground metal surface. Remove the jumper cable on the negative (-) connection of the disabled vehicle...

Owner's Manual
Page 133
... disconnected or a new battery is considered normal and will fully update transmission operation to idle for several minutes so the engine computer can relearn its adaptive strategy. Over time, the adaptive learning process will not effect function or durability of the booster...4. After the disabled vehicle has been started and the jumper cables removed, allow it to its optimum shift feel. - - - + + - + + 133 Roadside emergencies 3. Remove the jumper cable from the positive (+) terminal of the transmission. Remove the jumper cable from the positive (+) terminal of this, the ...
... disconnected or a new battery is considered normal and will fully update transmission operation to idle for several minutes so the engine computer can relearn its adaptive strategy. Over time, the adaptive learning process will not effect function or durability of the booster...4. After the disabled vehicle has been started and the jumper cables removed, allow it to its optimum shift feel. - - - + + - + + 133 Roadside emergencies 3. Remove the jumper cable from the positive (+) terminal of the transmission. Remove the jumper cable from the positive (+) terminal of this, the ...
Owner's Manual
Page 136
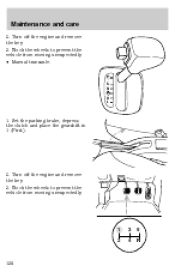
Maintenance and care 2. Block the wheels to prevent the vehicle from moving unexpectedly. 1 2 3 4 5 R 136 Block the wheels to prevent the vehicle from moving unexpectedly. • Manual transaxle: P R N D D L 1. Turn off the engine and remove the key. 3. Set the parking brake, depress the clutch and place the gearshift in 1 (First). 2. Turn off the engine and remove the key. 3.
Maintenance and care 2. Block the wheels to prevent the vehicle from moving unexpectedly. 1 2 3 4 5 R 136 Block the wheels to prevent the vehicle from moving unexpectedly. • Manual transaxle: P R N D D L 1. Turn off the engine and remove the key. 3. Set the parking brake, depress the clutch and place the gearshift in 1 (First). 2. Turn off the engine and remove the key. 3.
Owner's Manual
Page 137
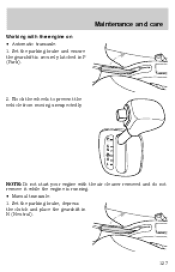
Set the parking brake and ensure the gearshift is running. • Manual transaxle: 1. P R N D D L NOTE:Do not start your engine with the engine on • Automatic transaxle: 1. Set the parking brake, depress the clutch and place the gearshift in P (Park). 2. Block the wheels to prevent the vehicle from moving unexpectedly. Maintenance and care Working with the air cleaner removed and do not remove it while the engine is securely latched in N (Neutral). 137
Set the parking brake and ensure the gearshift is running. • Manual transaxle: 1. P R N D D L NOTE:Do not start your engine with the engine on • Automatic transaxle: 1. Set the parking brake, depress the clutch and place the gearshift in P (Park). 2. Block the wheels to prevent the vehicle from moving unexpectedly. Maintenance and care Working with the air cleaner removed and do not remove it while the engine is securely latched in N (Neutral). 137
Owner's Manual
Page 138
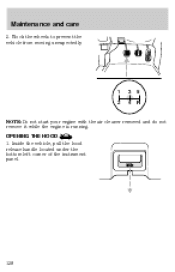
Block the wheels to prevent the vehicle from moving unexpectedly. 1 2 3 4 5 R NOTE:Do not start your engine with the air cleaner removed and do not remove it while the engine is running. Inside the vehicle, pull the hood release handle located under the bottom left corner of the instrument panel. 138 OPENING THE HOOD 1. Maintenance and care 2.
Block the wheels to prevent the vehicle from moving unexpectedly. 1 2 3 4 5 R NOTE:Do not start your engine with the air cleaner removed and do not remove it while the engine is running. Inside the vehicle, pull the hood release handle located under the bottom left corner of the instrument panel. 138 OPENING THE HOOD 1. Maintenance and care 2.
Owner's Manual
Page 142
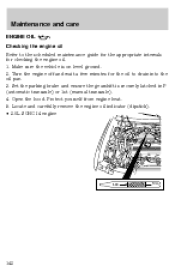
Maintenance and care ENGINE OIL Checking the engine oil Refer to the scheduled maintenance guide for the appropriate intervals for the oil to drain into the oil pan. 3. Set the parking brake and ensure the gearshift is on level ground. 2. Locate and carefully remove the engine oil indicator (dipstick). • 2.0L SOHC I4 engine ADD FULL 142 Protect yourself from engine heat. 5. Make sure the vehicle is securely latched in P (automatic transaxle) or 1st (manual transaxle). 4. Open the hood. Turn the engine off and wait a few minutes for checking the engine oil. 1.
Maintenance and care ENGINE OIL Checking the engine oil Refer to the scheduled maintenance guide for the appropriate intervals for the oil to drain into the oil pan. 3. Set the parking brake and ensure the gearshift is on level ground. 2. Locate and carefully remove the engine oil indicator (dipstick). • 2.0L SOHC I4 engine ADD FULL 142 Protect yourself from engine heat. 5. Make sure the vehicle is securely latched in P (automatic transaxle) or 1st (manual transaxle). 4. Open the hood. Turn the engine off and wait a few minutes for checking the engine oil. 1.
Owner's Manual
Page 143
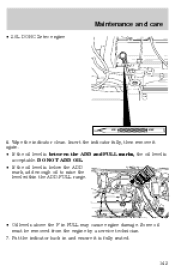
Insert the indicator fully, then remove it is acceptable. Put the indicator back in FULL may cause engine damage. Maintenance and care • 2.0L DOHC Zetec engine MIN MAX 6. Some oil must be removed from the engine by a service technician. 7. Wipe the indicator clean. DO NOT ADD OIL. • If the oil level is below the ADD mark, add enough oil to raise the level within the ADD-FULL range. • Oil levels above the F in and ensure it again. • If the oil level is between the ADD and FULL marks, the oil level is fully seated. 143
Insert the indicator fully, then remove it is acceptable. Put the indicator back in FULL may cause engine damage. Maintenance and care • 2.0L DOHC Zetec engine MIN MAX 6. Some oil must be removed from the engine by a service technician. 7. Wipe the indicator clean. DO NOT ADD OIL. • If the oil level is below the ADD mark, add enough oil to raise the level within the ADD-FULL range. • Oil levels above the F in and ensure it again. • If the oil level is between the ADD and FULL marks, the oil level is fully seated. 143
Owner's Manual
Page 144
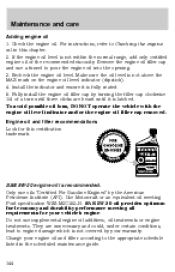
... avoid possible oil loss, DO NOT operate the vehicle with the engine oil level indicator and/or the engine oil filler cap removed. SAE 5W-20 engine oil is not above the MAX mark on the engine oil level indicator (dipstick). 4. Do not use oils "Certified For... fuel economy and durability performance meeting Ford specification WSS-M2C153-H. For instructions, refer to pour the engine oil into the opening. 3. Engine oil and filter recommendations Look for your warranty. Only use supplemental engine oil additives, oil treatments or engine treatments. They are heard until three...
... avoid possible oil loss, DO NOT operate the vehicle with the engine oil level indicator and/or the engine oil filler cap removed. SAE 5W-20 engine oil is not above the MAX mark on the engine oil level indicator (dipstick). 4. Do not use oils "Certified For... fuel economy and durability performance meeting Ford specification WSS-M2C153-H. For instructions, refer to pour the engine oil into the opening. 3. Engine oil and filter recommendations Look for your warranty. Only use supplemental engine oil additives, oil treatments or engine treatments. They are heard until three...
Owner's Manual
Page 145
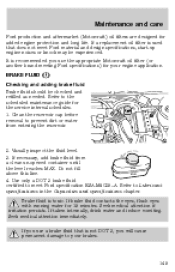
...medical attention if irritation persists. Seek medical attention immediately. Use only a DOT 3 brake fluid certified to meet Ford material and design specifications, start-up engine noises or knock may be checked and refilled as needed. Refer to the scheduled maintenance guide for your brakes...is not DOT 3, you use the appropriate Motorcraft oil filter (or another brand meeting Ford specifications) for the service interval schedules. 1. Clean the reservoir cap before removal to your engine application. It is toxic. Do not fill above this line. Visually inspect the fluid ...
...medical attention if irritation persists. Seek medical attention immediately. Use only a DOT 3 brake fluid certified to meet Ford material and design specifications, start-up engine noises or knock may be checked and refilled as needed. Refer to the scheduled maintenance guide for your brakes...is not DOT 3, you use the appropriate Motorcraft oil filter (or another brand meeting Ford specifications) for the service interval schedules. 1. Clean the reservoir cap before removal to your engine application. It is toxic. Do not fill above this line. Visually inspect the fluid ...
Owner's Manual
Page 151
...system is cool before unscrewing the coolant pressure relief cap. Slowly turn the engine off and let it counterclockwise and remove the cap. 5. If you are sure that all other liquids can cause engine damage from a Ford-approved recycling process (see Use of a vehicle with an overflow system, ...follow these steps to add engine coolant. Turn until pressure begins to the coolant. ...
...system is cool before unscrewing the coolant pressure relief cap. Slowly turn the engine off and let it counterclockwise and remove the cap. 5. If you are sure that all other liquids can cause engine damage from a Ford-approved recycling process (see Use of a vehicle with an overflow system, ...follow these steps to add engine coolant. Turn until pressure begins to the coolant. ...
Owner's Manual
Page 155
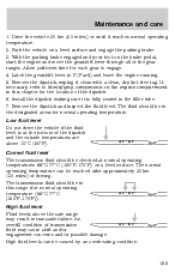
...operating 20 C 65 C temperature (66°C-77°C [150°F-170°F]). Park the vehicle on the brake pedal, start the engine and move the gearshift lever through all of the dipstick and the outside temperatures are above the safe range may cause shift and/or engagement...(20 miles) or until it clean with a clean, dry lint free rag. Remove the dipstick and inspect the fluid level. High fluid levels can be in P (Park) and leave the engine running. 5. Maintenance and care 1. Remove the dipstick, wiping it reaches normal operating temperature. 2. Latch the gearshift lever in...
...operating 20 C 65 C temperature (66°C-77°C [150°F-170°F]). Park the vehicle on the brake pedal, start the engine and move the gearshift lever through all of the dipstick and the outside temperatures are above the safe range may cause shift and/or engagement...(20 miles) or until it clean with a clean, dry lint free rag. Remove the dipstick and inspect the fluid level. High fluid levels can be in P (Park) and leave the engine running. 5. Maintenance and care 1. Remove the dipstick, wiping it reaches normal operating temperature. 2. Latch the gearshift lever in...

Owner's Manual
Page 158
...sulfuric acid. Shield your hands on opposite corners. With the vehicle at a complete stop, set the parking brake. 2. Run the engine until it reaches normal operating temperature. 158 Always provide proper ventilation. Battery posts, terminals and related accessories contain lead and lead compounds. ..., trouble-free operation, keep the top of children. When lifting a plastic-cased battery, excessive pressure on the battery or terminals, remove the cables from the battery. Put the gearshift in personal injury and/or damage to come near the battery, always shield your face...
...sulfuric acid. Shield your hands on opposite corners. With the vehicle at a complete stop, set the parking brake. 2. Run the engine until it reaches normal operating temperature. 158 Always provide proper ventilation. Battery posts, terminals and related accessories contain lead and lead compounds. ..., trouble-free operation, keep the top of children. When lifting a plastic-cased battery, excessive pressure on the battery or terminals, remove the cables from the battery. Put the gearshift in personal injury and/or damage to come near the battery, always shield your face...

Owner's Manual
Page 159
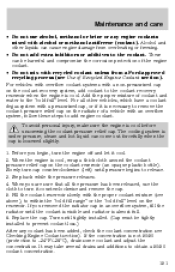
... the relearning process. When changing the air filter element, use only the Motorcraft air filter element listed. Follow your engine with the air cleaner removed and do not allow the engine to idle for at least one minute. Refer to relearn its idle trim, the idle quality of this, the ... of your local authorized recycling center to find out more to relearn the idle and fuel trim strategy. • If you do not remove it while the engine is eventually relearned. Note: Do not start your local authorized standards for disposal. Maintenance and care 4. 5. 6. • Allow the...
... the relearning process. When changing the air filter element, use only the Motorcraft air filter element listed. Follow your engine with the air cleaner removed and do not allow the engine to idle for at least one minute. Refer to relearn its idle trim, the idle quality of this, the ... of your local authorized recycling center to find out more to relearn the idle and fuel trim strategy. • If you do not remove it while the engine is eventually relearned. Note: Do not start your local authorized standards for disposal. Maintenance and care 4. 5. 6. • Allow the...

Owner's Manual
Page 167
...fatal if swallowed. If fuel is splashed on the skin, promptly wash skin thoroughly with soap and water. When refueling always shut the engine off the vehicle before fueling your eyes. Fuel vapor is highly toxic and if swallowed can cause death or permanent injury. Care should .... • Automotive fuels can be harmful if absorbed through the skin. If fuel is splashed on the skin and/or clothing, promptly remove contaminated clothing and wash skin thoroughly with soap and water. Never smoke while refueling. Failure to seek proper medical attention could cause an adverse...
...fatal if swallowed. If fuel is splashed on the skin, promptly wash skin thoroughly with soap and water. When refueling always shut the engine off the vehicle before fueling your eyes. Fuel vapor is highly toxic and if swallowed can cause death or permanent injury. Care should .... • Automotive fuels can be harmful if absorbed through the skin. If fuel is splashed on the skin and/or clothing, promptly remove contaminated clothing and wash skin thoroughly with soap and water. Never smoke while refueling. Failure to seek proper medical attention could cause an adverse...
Owner's Manual
Page 168
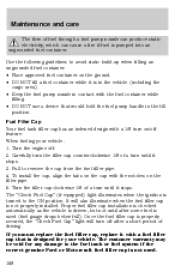
...a short period of driving. The customer warranty may be void for your vehicle: 1. Turn the engine off feature. Carefully turn the filler cap counterclockwise 1/8 of a turn until it is pumped into an...that is designed for any damage to the fuel tank or fuel system if the correct genuine Ford or Motorcraft fuel filler cap is not properly installed. Fuel Filler Cap Your fuel tank filler cap... illuminate when the fuel filler cap is not used (fuel guage drops below full). Pull to remove the cap from the fuel filler pipe. 4. Use the following guidelines to avoid static build-up...
...a short period of driving. The customer warranty may be void for your vehicle: 1. Turn the engine off feature. Carefully turn the filler cap counterclockwise 1/8 of a turn until it is pumped into an...that is designed for any damage to the fuel tank or fuel system if the correct genuine Ford or Motorcraft fuel filler cap is not properly installed. Fuel Filler Cap Your fuel tank filler cap... illuminate when the fuel filler cap is not used (fuel guage drops below full). Pull to remove the cap from the fuel filler pipe. 4. Use the following guidelines to avoid static build-up...
Owner's Manual
Page 169
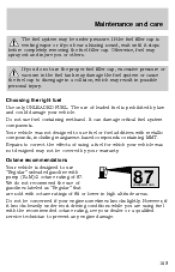
... sold with pump (R+M)/2 octane rating of leaded fuel is venting vapor or if you hear a hissing sound, wait until it stops before completely removing the fuel filler cap. Do not be concerned if your vehicle. If you do not recommend the use of (R+M)/2 METHOD gasolines labeled as "...Regular" that are using a fuel for which may result in a collision, which your vehicle was not designed to prevent any engine damage. 87 169 Repairs to use fuel containing methanol. We do not use the proper fuel filler cap, excessive pressure or vacuum in high ...
... sold with pump (R+M)/2 octane rating of leaded fuel is venting vapor or if you hear a hissing sound, wait until it stops before completely removing the fuel filler cap. Do not be concerned if your vehicle. If you do not recommend the use of (R+M)/2 METHOD gasolines labeled as "...Regular" that are using a fuel for which may result in a collision, which your vehicle was not designed to prevent any engine damage. 87 169 Repairs to use fuel containing methanol. We do not use the proper fuel filler cap, excessive pressure or vacuum in high ...


