Owner's Manual
Page 3
... and without incurring obligation. Your vehicle is not a passenger car. Your vehicle is not equipped with 4WD and utility type vehicles. Electric vehicles For information on operating your vehicle, please read Driving off road in the Driving chapter as well as the "Four Wheeling"...Do not use this vehicle for snowplowing. Before you drive your Electric Vehicle, also refer to read this Owner's Guide carefully. Be sure to the Electric Vehicle Owner's Guide Supplement. 3 As with other types of vehicles. Ford may result in effect at the time of printing. Introduction ...
... and without incurring obligation. Your vehicle is not a passenger car. Your vehicle is not equipped with 4WD and utility type vehicles. Electric vehicles For information on operating your vehicle, please read Driving off road in the Driving chapter as well as the "Four Wheeling"...Do not use this vehicle for snowplowing. Before you drive your Electric Vehicle, also refer to read this Owner's Guide carefully. Be sure to the Electric Vehicle Owner's Guide Supplement. 3 As with other types of vehicles. Ford may result in effect at the time of printing. Introduction ...
Owner's Manual
Page 11
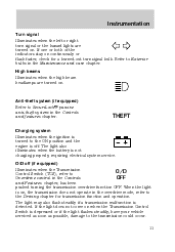
... . High beams Illuminates when the high beam headlamps are turned on . The light may also flash steadily if a transmission malfunction is not charging properly, requiring electrical system service.
... . High beams Illuminates when the high beam headlamps are turned on . The light may also flash steadily if a transmission malfunction is not charging properly, requiring electrical system service.
Owner's Manual
Page 17
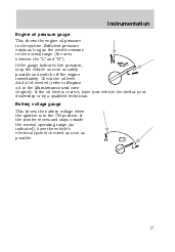
... low pressure, stop the vehicle as soon as possible. Battery voltage gauge This shows the battery voltage when the ignition is correct, have the vehicle's electrical system checked as soon as safely L possible and switch off the engine immediately.
... low pressure, stop the vehicle as soon as possible. Battery voltage gauge This shows the battery voltage when the ignition is correct, have the vehicle's electrical system checked as soon as safely L possible and switch off the engine immediately.
Owner's Manual
Page 25
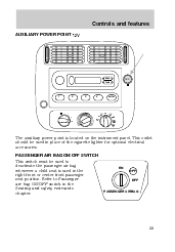
This outlet should be used to Passenger air bag ON/OFF switch in the Seating and safety restraints chapter. PASSENGER AIR BAG ON/OFF SWITCH This switch must be used in place of the cigarette lighter for optional electrical accessories. Controls and features AUXILIARY POWER POINT SEEK TUNE 12V 1 2 3 4 AM-FM OFF A/C MAX A/C The auxiliary power point is used in the right front or center front passenger seat position. Refer to deactivate the passenger air bag whenever a child seat is located on the instrument panel. ON OFF OFF PASSENGER AIRBAG 25
This outlet should be used to Passenger air bag ON/OFF switch in the Seating and safety restraints chapter. PASSENGER AIR BAG ON/OFF SWITCH This switch must be used in place of the cigarette lighter for optional electrical accessories. Controls and features AUXILIARY POWER POINT SEEK TUNE 12V 1 2 3 4 AM-FM OFF A/C MAX A/C The auxiliary power point is used in the right front or center front passenger seat position. Refer to deactivate the passenger air bag whenever a child seat is located on the instrument panel. ON OFF OFF PASSENGER AIRBAG 25

Owner's Manual
Page 53
... Not all frequencies are sometimes captured by stronger signals when you pass a broadcast tower. Radio reception factors Three factors can be affected by power lines, electric fences, traffic lights and thunderstorms. Moving away from an interfering structure (out of the average FM station is . The listenable range of its "shadow") returns...
... Not all frequencies are sometimes captured by stronger signals when you pass a broadcast tower. Radio reception factors Three factors can be affected by power lines, electric fences, traffic lights and thunderstorms. Moving away from an interfering structure (out of the average FM station is . The listenable range of its "shadow") returns...
Owner's Manual
Page 54
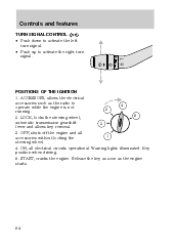
... and features TURN SIGNAL CONTROL • Push down to activate the left turn signal. POSITIONS OF THE IGNITION 1. START, cranks the engine. ACCESSORY, allows the electrical accessories such as the engine starts. 54 OFF, shuts off the engine and all...
... and features TURN SIGNAL CONTROL • Push down to activate the left turn signal. POSITIONS OF THE IGNITION 1. START, cranks the engine. ACCESSORY, allows the electrical accessories such as the engine starts. 54 OFF, shuts off the engine and all...

Owner's Manual
Page 87
... the condition of injury in this chapter. The RCM (restraints control module) monitors its own internal circuits and the supplemental air bag electrical system warning (including the passenger air bag deactivation switch, the impact sensors, the system wiring, the air bag system readiness light, the...impact and safing sensors, passenger air bag deactivation switch and diagnostic monitor (RCM) • a readiness light and tone, • and the electrical wiring which include the inflators and air bags), • one or more of the following: • The readiness lights will either flash or...
... the condition of injury in this chapter. The RCM (restraints control module) monitors its own internal circuits and the supplemental air bag electrical system warning (including the passenger air bag deactivation switch, the impact sensors, the system wiring, the air bag system readiness light, the...impact and safing sensors, passenger air bag deactivation switch and diagnostic monitor (RCM) • a readiness light and tone, • and the electrical wiring which include the inflators and air bags), • one or more of the following: • The readiness lights will either flash or...
Owner's Manual
Page 100
... vehicle immediately. Exhaust fumes can start the engine. If you smell exhaust fumes. Make sure all Canadian Interference-Causing Equipment standard requirements regulating the impulse electrical field strength of fire or other damage. Always open the garage door before or during starting. Extended idling at high engine RPM. If the engine...
... vehicle immediately. Exhaust fumes can start the engine. If you smell exhaust fumes. Make sure all Canadian Interference-Causing Equipment standard requirements regulating the impulse electrical field strength of fire or other damage. Always open the garage door before or during starting. Extended idling at high engine RPM. If the engine...
Owner's Manual
Page 104
...if equipped) An engine block heater warms the engine coolant, which improves starting, warms up . 4. Your engine block heater also comes with ungrounded electrical systems or two-pronged (cheater) adapters. 104 When the engine starts, release the key, then release the accelerator pedal gradually as the engine speeds ... is plugged in gear and release the parking brake. Starting If the engine fails to start , repeat steps one through three. 5. To prevent electrical shock, do not use your foot on the brake pedal, put the gearshift lever in . Turn the key to START position. 3. The battery...
...if equipped) An engine block heater warms the engine coolant, which improves starting, warms up . 4. Your engine block heater also comes with ungrounded electrical systems or two-pronged (cheater) adapters. 104 When the engine starts, release the key, then release the accelerator pedal gradually as the engine speeds ... is plugged in gear and release the parking brake. Starting If the engine fails to start , repeat steps one through three. 5. To prevent electrical shock, do not use your foot on the brake pedal, put the gearshift lever in . Turn the key to START position. 3. The battery...

Owner's Manual
Page 132
... in engine damage, transmission/axle damage, structural damage, loss of control, and personal injury. Do not attach safety chains to the manufacturer's specifications. Trailer brakes Electric brakes and manual, automatic or surge-type trailer brakes are installed properly. See your vehicle. Use a frame-mounted weight distrubuting hitch for turning corners. Whenever...
... in engine damage, transmission/axle damage, structural damage, loss of control, and personal injury. Do not attach safety chains to the manufacturer's specifications. Trailer brakes Electric brakes and manual, automatic or surge-type trailer brakes are installed properly. See your vehicle. Use a frame-mounted weight distrubuting hitch for turning corners. Whenever...
Owner's Manual
Page 135
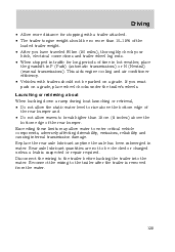
... hot weather, place the gearshift in P (Park) (automatic transmissions) or N (Neutral) (manual transmissions). If you have traveled 80 km (50 miles), thoroughly check your hitch, electrical connections and trailer wheel lug nuts. • When stopped in water. Launching or retrieving a boat When backing down a ramp during boat launching or retrieval, •...
... hot weather, place the gearshift in P (Park) (automatic transmissions) or N (Neutral) (manual transmissions). If you have traveled 80 km (50 miles), thoroughly check your hitch, electrical connections and trailer wheel lug nuts. • When stopped in water. Launching or retrieving a boat When backing down a ramp during boat launching or retrieval, •...
Owner's Manual
Page 138
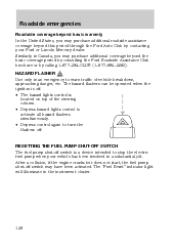
...a substantial jolt. Roadside emergencies Roadside coverage beyond basic warranty In the United States, you may purchase additional coverage beyond this period through the Ford Auto Club by calling 1-877-294-CLUB (1-877-894-2582). HAZARD FLASHER Use only in an emergency to warn traffic of the steering ...column. • Depress hazard lights control to activate all hazard flashers simultaneously. • Depress control again to stop the electric fuel pump when your Ford or Lincoln Mercury dealer. RESETTING THE FUEL PUMP SHUT-OFF SWITCH The fuel pump shut-off switch is located on top of...
...a substantial jolt. Roadside emergencies Roadside coverage beyond basic warranty In the United States, you may purchase additional coverage beyond this period through the Ford Auto Club by calling 1-877-294-CLUB (1-877-894-2582). HAZARD FLASHER Use only in an emergency to warn traffic of the steering ...column. • Depress hazard lights control to activate all hazard flashers simultaneously. • Depress control again to stop the electric fuel pump when your Ford or Lincoln Mercury dealer. RESETTING THE FUEL PUMP SHUT-OFF SWITCH The fuel pump shut-off switch is located on top of...
Owner's Manual
Page 140
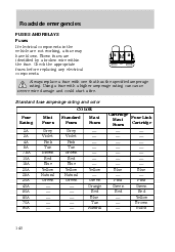
Check the appropriate fuses before replacing any electrical components. 15 Always replace a fuse with a higher amperage rating can cause severe wire damage and could start a fire. Standard fuse amperage rating and color COLOR ... a fuse with one that has the specified amperage rating. Blown fuses are not working, a fuse may have blown. Roadside emergencies FUSES AND RELAYS Fuses If electrical components in the vehicle are identified by a broken wire within the fuse.
Check the appropriate fuses before replacing any electrical components. 15 Always replace a fuse with a higher amperage rating can cause severe wire damage and could start a fire. Standard fuse amperage rating and color COLOR ... a fuse with one that has the specified amperage rating. Blown fuses are not working, a fuse may have blown. Roadside emergencies FUSES AND RELAYS Fuses If electrical components in the vehicle are identified by a broken wire within the fuse.
Owner's Manual
Page 144
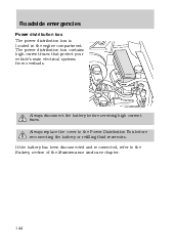
Always disconnect the battery before reconnecting the battery or refilling fluid reservoirs. The power distribution box contains high-current fuses that protect your vehicle's main electrical systems from overloads. If the battery has been disconnected and reconnected, refer to the Power Distribution Box before servicing high current fuses. Roadside emergencies Power distribution box The power distribution box is located in the engine compartment. Always replace the cover to the Battery section of the Maintenance and care chapter. 144
Always disconnect the battery before reconnecting the battery or refilling fluid reservoirs. The power distribution box contains high-current fuses that protect your vehicle's main electrical systems from overloads. If the battery has been disconnected and reconnected, refer to the Power Distribution Box before servicing high current fuses. Roadside emergencies Power distribution box The power distribution box is located in the engine compartment. Always replace the cover to the Battery section of the Maintenance and care chapter. 144
Owner's Manual
Page 153
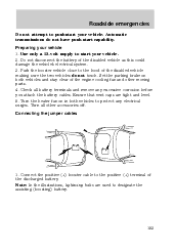
...to start your vehicle. 2. Turn the heater fan on both vehicles to the positive (+) terminal of the disabled vehicle as this could damage the vehicle's electrical system. 3. Connect the positive (+) booster cable to protect any excessive corrosion before you attach the battery cables. Check all other moving parts. 4. Ensure...of the disabled vehicle making sure the two vehicles do not have push-start your vehicle 1. Turn all battery terminals and remove any electrical surges. Roadside emergencies Do not attempt to designate the assisting (boosting) battery. - - + + 153
...to start your vehicle. 2. Turn the heater fan on both vehicles to the positive (+) terminal of the disabled vehicle as this could damage the vehicle's electrical system. 3. Connect the positive (+) booster cable to protect any excessive corrosion before you attach the battery cables. Check all other moving parts. 4. Ensure...of the disabled vehicle making sure the two vehicles do not have push-start your vehicle 1. Turn all battery terminals and remove any electrical surges. Roadside emergencies Do not attempt to designate the assisting (boosting) battery. - - + + 153
Owner's Manual
Page 188
... NOT fill a fuel container while it stops. 188 The flow of a turn the filler cap counterclockwise 1/8 of fuel through a fuel pump nozzle can produce static electricity, which can cause a fire if fuel is pumped into an ungrounded fuel container. If your vehicle is in the vehicle. • Keep the fuel pump...
... NOT fill a fuel container while it stops. 188 The flow of a turn the filler cap counterclockwise 1/8 of fuel through a fuel pump nozzle can produce static electricity, which can cause a fire if fuel is pumped into an ungrounded fuel container. If your vehicle is in the vehicle. • Keep the fuel pump...

Owner's Manual
Page 197
... warm up lamps Do not remove lamp bulbs unless they can be replaced immediately with at least eight hours without starting the engine. Disconnect the electrical connector from the bulb by pulling rearward. 197 Locate the headlamp bulb through the hole in OFF position. 2. Allow the vehicle to sit for an...
... warm up lamps Do not remove lamp bulbs unless they can be replaced immediately with at least eight hours without starting the engine. Disconnect the electrical connector from the bulb by pulling rearward. 197 Locate the headlamp bulb through the hole in OFF position. 2. Allow the vehicle to sit for an...

Owner's Manual
Page 198
.... 1. Remove the bulb retaining ring by rotating it counterclockwise (when viewed from your hand could cause the bulb to retain the new bulb. 6. Install the electrical connector into position. 4.
.... 1. Remove the bulb retaining ring by rotating it counterclockwise (when viewed from your hand could cause the bulb to retain the new bulb. 6. Install the electrical connector into position. 4.

Owner's Manual
Page 199
... from the bulb by pulling rearward. 5. Disengage lamp assembly (it "snaps." 9. Insert the bulb into the lamp assembly until it has a snap fit). 4. Disconnect the electrical connector from the lamp assembly. 3. Align the lamp studs with the plastic grommets on lamp assembly. 199 Connect the...
... from the bulb by pulling rearward. 5. Disengage lamp assembly (it "snaps." 9. Insert the bulb into the lamp assembly until it has a snap fit). 4. Disconnect the electrical connector from the lamp assembly. 3. Align the lamp studs with the plastic grommets on lamp assembly. 199 Connect the...

Owner's Manual
Page 200
...socket counterclockwise turn /backup lamp bulbs are located in the same portion of the socket and push in the new bulb. 5. Disconnect the electrical connector from the foglamp by turning clockwise. 6. Install the bulb socket in lamp assembly by turning counterclockwise. 2. Follow the same steps to.... 4. Replacing foglamp bulbs 1. Carefully pull the bulb straight out of the tail lamp assembly, one just below the other. Connect the electrical connector to replace either bulb: 1. Remove the bulb socket from the foglamp bulb. 3. Install the lamp assembly and secure with four screws...
...socket counterclockwise turn /backup lamp bulbs are located in the same portion of the socket and push in the new bulb. 5. Disconnect the electrical connector from the foglamp by turning clockwise. 6. Install the bulb socket in lamp assembly by turning counterclockwise. 2. Follow the same steps to.... 4. Replacing foglamp bulbs 1. Carefully pull the bulb straight out of the tail lamp assembly, one just below the other. Connect the electrical connector to replace either bulb: 1. Remove the bulb socket from the foglamp bulb. 3. Install the lamp assembly and secure with four screws...
