

Owner Guide 1st Printing
Page 74
... four times per second for three seconds. 6. Turn on the parklamps/headlamps, turn off , buckle then unbuckle the safety belt. • This will be turned on for three seconds again. 9. All safety belt assemblies, including retractors, buckles, 74 This can be repeated. 3. Buckle then... unbuckle the safety belt three times, ending with the safety belt unbuckled. Within seven seconds of the safety belt warning light turning off the parklamps/headlamps. 5. Safety belt maintenance ...
... four times per second for three seconds. 6. Turn on the parklamps/headlamps, turn off , buckle then unbuckle the safety belt. • This will be turned on for three seconds again. 9. All safety belt assemblies, including retractors, buckles, 74 This can be repeated. 3. Buckle then... unbuckle the safety belt three times, ending with the safety belt unbuckled. Within seven seconds of the safety belt warning light turning off the parklamps/headlamps. 5. Safety belt maintenance ...

Owner Guide 1st Printing
Page 178
... Disconnect the electrical connector from the bulb socket, and slide the ring off the plastic base. Make sure headlamp switch is removed for an extended period of the headlamp, pull two retainer pins up to free it from the bulb by pulling rearward. 5. Keep the ring ..., then open the hood. 2. Remove the bulb retaining ring by rotating it counterclockwise (when viewed from the rear) to release the headlamp assembly. 3. Pull headlamp assembly forward disengaging the lamp from the rear hidden snap retainers to retain the new bulb. 178 Maintenance and care • Turn signals &#...
... Disconnect the electrical connector from the bulb socket, and slide the ring off the plastic base. Make sure headlamp switch is removed for an extended period of the headlamp, pull two retainer pins up to free it from the bulb by pulling rearward. 5. Keep the ring ..., then open the hood. 2. Remove the bulb retaining ring by rotating it counterclockwise (when viewed from the rear) to release the headlamp assembly. 3. Pull headlamp assembly forward disengaging the lamp from the rear hidden snap retainers to retain the new bulb. 178 Maintenance and care • Turn signals &#...

Owner Guide 1st Printing
Page 179
... only by aligning the lamp with the rear snap retainers, push to turn signal bulbs 1. Connect the electrical connector into the lamp assembly. Install the headlamp on and make sure they work properly. Install the bulb retaining ring over the plastic base until it snaps, locking it again. ...Maintenance and care 6. To install the new bulb: Handle a halogen headlamp bulb carefully and keep out of the lamp assembly. Without turning, remove the old bulb from your hand could cause the bulb to align the grooves in the OFF ...
... only by aligning the lamp with the rear snap retainers, push to turn signal bulbs 1. Connect the electrical connector into the lamp assembly. Install the headlamp on and make sure they work properly. Install the bulb retaining ring over the plastic base until it snaps, locking it again. ...Maintenance and care 6. To install the new bulb: Handle a halogen headlamp bulb carefully and keep out of the lamp assembly. Without turning, remove the old bulb from your hand could cause the bulb to align the grooves in the OFF ...

Owner Guide 1st Printing
Page 180
... trunk. 2. To complete installation, follow the removal procedure in reverse order. 180 At the back of the lamp assembly. 4. Pull headlamp assembly forward disengaging the lamp from lamp assembly. 6. Replacing high-mount brakelamp bulbs 1. Carefully pull bulb straight out of the bulb. 5. Rotate the bulb socket... counterclockwise and remove from the rear snap retainers to release the headlamp assembly. 4. Remove the bulb socket by rotating it 45 degrees and pulling it out of the headlamp, pull two retainer pins up to expose the back of socket and push in...
... trunk. 2. To complete installation, follow the removal procedure in reverse order. 180 At the back of the lamp assembly. 4. Pull headlamp assembly forward disengaging the lamp from lamp assembly. 6. Replacing high-mount brakelamp bulbs 1. Carefully pull bulb straight out of the bulb. 5. Rotate the bulb socket... counterclockwise and remove from the rear snap retainers to release the headlamp assembly. 4. Remove the bulb socket by rotating it 45 degrees and pulling it out of the headlamp, pull two retainer pins up to expose the back of socket and push in...
Owner Guide 1st Printing
Page 182
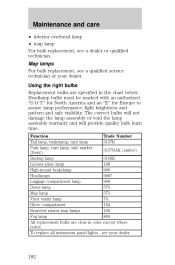
Headlamp bulbs must be marked with an authorized "D.O.T." The correct bulbs will not damage the lamp assembly or void the lamp assembly warranty and will provide quality bulb burn time. see your dealer. for North America and an "E" for Europe to assure lamp performance, light brightness ..., brakelamp, turn lamp 3157K Park lamp, turn lamp, side marker 3157NAK (amber) (front) Backup lamp 3156K License plate lamp 168 High-mount brakelamp 906 Headlamps 9007 Luggage compartment lamp 906 Dome lamp 575 Map lamp 575 Visor vanity lamp 74 Glove compartment 194 Rearview mirror map lamps 192 Fog lamp...
Headlamp bulbs must be marked with an authorized "D.O.T." The correct bulbs will not damage the lamp assembly or void the lamp assembly warranty and will provide quality bulb burn time. see your dealer. for North America and an "E" for Europe to assure lamp performance, light brightness ..., brakelamp, turn lamp 3157K Park lamp, turn lamp, side marker 3157NAK (amber) (front) Backup lamp 3156K License plate lamp 168 High-mount brakelamp 906 Headlamps 9007 Luggage compartment lamp 906 Dome lamp 575 Map lamp 575 Visor vanity lamp 74 Glove compartment 194 Rearview mirror map lamps 192 Fog lamp...

Owner Guide 1st Printing
Page 183
... 3.0 mm circle on the headlamp lens. 2. Vertical aim adjustment 1. Measure the height from a vertical wall or screen directly in an accident the alignment of your headlamp to the ground and mark an 2.4 meters (8 foot) horizontal reference line on the vertical wall or screen at the assembly plant. Turn on the low... beam headlamps to illuminate the wall or screen and open the hood. 183 If your vehicle are properly aimed at this height (a piece of ...
... 3.0 mm circle on the headlamp lens. 2. Vertical aim adjustment 1. Measure the height from a vertical wall or screen directly in an accident the alignment of your headlamp to the ground and mark an 2.4 meters (8 foot) horizontal reference line on the vertical wall or screen at the assembly plant. Turn on the low... beam headlamps to illuminate the wall or screen and open the hood. 183 If your vehicle are properly aimed at this height (a piece of ...
