
Owner's Manual
Page 8
DOOR AJAR P PANEL DIM O RES ON SET ACCEL OFF COAST Headlamp control (pg. 25) Instrument panel dimmer switch (pg. 26) Driver air bag (pg. 88) * if equipped 8 Instrumentation Instrument cluster (pg. 10) Turn signal and wiper/washer control (pg. 61) Speed control* (pg. 56) FUEL FILL LOW FUEL 40 30 20 40 20 60 50 80 60 70 100 120 3 2 4 5 ABS F H E L 80 90 1 RPM X1000 LOW RANGE 4X4 000000 140 160 - + H 18 C 8 10 0 CRUISE MPH 0 0 0 0 km/h 100 0 SERVICE ENGINE SOON 6 BRAKE P RN D 21 !
DOOR AJAR P PANEL DIM O RES ON SET ACCEL OFF COAST Headlamp control (pg. 25) Instrument panel dimmer switch (pg. 26) Driver air bag (pg. 88) * if equipped 8 Instrumentation Instrument cluster (pg. 10) Turn signal and wiper/washer control (pg. 61) Speed control* (pg. 56) FUEL FILL LOW FUEL 40 30 20 40 20 60 50 80 60 70 100 120 3 2 4 5 ABS F H E L 80 90 1 RPM X1000 LOW RANGE 4X4 000000 140 160 - + H 18 C 8 10 0 CRUISE MPH 0 0 0 0 km/h 100 0 SERVICE ENGINE SOON 6 BRAKE P RN D 21 !

Owner's Manual
Page 14
... system (ABS) Momentarily illuminates when the ignition is turned to the ON position and the engine is off. High beams Illuminates when the high beam headlamps are turned on , the anti-lock brake system is disabled and normal braking is still effective unless the brake warning light also remains illuminated with...
... system (ABS) Momentarily illuminates when the ignition is turned to the ON position and the engine is off. High beams Illuminates when the high beam headlamps are turned on , the anti-lock brake system is disabled and normal braking is still effective unless the brake warning light also remains illuminated with...

Owner's Manual
Page 16
... pressed or the brake is opened . DOOR AJAR 16 Safety belt warning chime Sounds to remind you to fasten your safety belts. Headlamps on warning chime Sounds when the headlamps or parking lamps are pressed. For information on , the ignition in the OFF position (and the key is not in the OFF...
... pressed or the brake is opened . DOOR AJAR 16 Safety belt warning chime Sounds to remind you to fasten your safety belts. Headlamps on warning chime Sounds when the headlamps or parking lamps are pressed. For information on , the ignition in the OFF position (and the key is not in the OFF...

Owner's Manual
Page 25
... the OFF or Parking lamps position. Pull toward you to also turn on the parking lamps. P Daytime running lamps (DRL) (if equipped) Turns the headlamps on your headlamps under these conditions. To activate: • the ignition must be in the ON position and • the... to the second position to deactivate. 25 High beams Push forward to turn on with a reduced output. Controls and features HEADLAMP CONTROL Rotate the headlamp control to the first position to activate. The Daytime Running Light (DRL) System does not activate your tail lamps and generally may not provide ...
... the OFF or Parking lamps position. Pull toward you to also turn on the parking lamps. P Daytime running lamps (DRL) (if equipped) Turns the headlamps on your headlamps under these conditions. To activate: • the ignition must be in the ON position and • the... to the second position to deactivate. 25 High beams Push forward to turn on with a reduced output. Controls and features HEADLAMP CONTROL Rotate the headlamp control to the first position to activate. The Daytime Running Light (DRL) System does not activate your tail lamps and generally may not provide ...

Owner's Manual
Page 26
Refer to turn on interior lamps. 4WD CONTROL (IF EQUIPPED) This control operates the 4WD. PANEL DIM 2WD 4X4 HIGH 4X4 LOW 26 PANEL DIMMER CONTROL Use to adjust the brightness of the instrument panel during headlamp and parklamp operation. • Rotate up to brighten. • Rotate down to dim. • Rotate to full up position (past detent) to the Driving chapter for more information. Controls and features Flash to pass Pull toward you to activate and release to deactivate.
Refer to turn on interior lamps. 4WD CONTROL (IF EQUIPPED) This control operates the 4WD. PANEL DIM 2WD 4X4 HIGH 4X4 LOW 26 PANEL DIMMER CONTROL Use to adjust the brightness of the instrument panel during headlamp and parklamp operation. • Rotate up to brighten. • Rotate down to dim. • Rotate to full up position (past detent) to the Driving chapter for more information. Controls and features Flash to pass Pull toward you to activate and release to deactivate.

Owner's Manual
Page 86
...of injury, do not deactivate/activate the Belt Minder feature while driving the vehicle. 1. Wait until the safety belt warning light turns off the parklamps/headlamps. 5. Turn on for that : • the parking brake is set • the gearshift is in P (Park) (automatic transmission) or ...unbuckled during an ignition ON cycle, Belt Minder will be done before or during Belt Minder warning activation. 4. This can be turned on the parklamps/headlamps, turn off . (Approximately 1-2 minutes) • Steps 3-5 must be repeated. 3. Buckle then unbuckle the safety belt three times, ending with...
...of injury, do not deactivate/activate the Belt Minder feature while driving the vehicle. 1. Wait until the safety belt warning light turns off the parklamps/headlamps. 5. Turn on for that : • the parking brake is set • the gearshift is in P (Park) (automatic transmission) or ...unbuckled during an ignition ON cycle, Belt Minder will be done before or during Belt Minder warning activation. 4. This can be turned on the parklamps/headlamps, turn off . (Approximately 1-2 minutes) • Steps 3-5 must be repeated. 3. Buckle then unbuckle the safety belt three times, ending with...
Owner's Manual
Page 105
starting a vehicle with a manual transmission: Make sure the parking brake is difficulty in P (Park). Starting 2. Make sure the headlamps and vehicle accessories are turned • front wheel is against the curb • steering wheel is in turning the key, firmly rotate the steering wheel ...
starting a vehicle with a manual transmission: Make sure the parking brake is difficulty in P (Park). Starting 2. Make sure the headlamps and vehicle accessories are turned • front wheel is against the curb • steering wheel is in turning the key, firmly rotate the steering wheel ...

Owner's Manual
Page 150
... Module Cigar Lighter, Data Link Connector Glove Box Lamp, Map Lamps, Power Mirrors, Underhood Lamp Not Used Not Used Power Window/Lock Switch Illumination Radio, Headlamp Switch Illumination Not Used Dual Fuel Tanks Wiper Motor, Wiper Run/Park Relay Coil, Wiper Hi/LO Relay Coil, Washer Pump Relay Coil Horn Stop...), Powertrain Control Module (PCM), Four Wheel Anti-lock Brake System (4WABS) Module, Brake Shift Interlock, Cluster and PCM Keep Alive Memory Instrument Cluster, Hi-beam Headlamps Not Used Not Used 16 17 18 15A - - 150
... Module Cigar Lighter, Data Link Connector Glove Box Lamp, Map Lamps, Power Mirrors, Underhood Lamp Not Used Not Used Power Window/Lock Switch Illumination Radio, Headlamp Switch Illumination Not Used Dual Fuel Tanks Wiper Motor, Wiper Run/Park Relay Coil, Wiper Hi/LO Relay Coil, Washer Pump Relay Coil Horn Stop...), Powertrain Control Module (PCM), Four Wheel Anti-lock Brake System (4WABS) Module, Brake Shift Interlock, Cluster and PCM Keep Alive Memory Instrument Cluster, Hi-beam Headlamps Not Used Not Used 16 17 18 15A - - 150

Owner's Manual
Page 153
... 15A* Trailer Tow Electronic Brake Illumination, Park Lamps, Trailer Tow Park Lamp Relay Coil 10A* Left Headlamp (Low Beam) 20A* Power Point 10A* Right Headlamp (Low Beam) 15A* Daytime Running Lamps (DRL) Resistor 30A** Multi-function Switch, Headlamps 60A** Anti-Lock Brake System - Not Used 30A** Trailer Tow Battery Charge 30A** Electronic Shift...
... 15A* Trailer Tow Electronic Brake Illumination, Park Lamps, Trailer Tow Park Lamp Relay Coil 10A* Left Headlamp (Low Beam) 20A* Power Point 10A* Right Headlamp (Low Beam) 15A* Daytime Running Lamps (DRL) Resistor 30A** Multi-function Switch, Headlamps 60A** Anti-Lock Brake System - Not Used 30A** Trailer Tow Battery Charge 30A** Electronic Shift...

Owner's Manual
Page 212
.... The oil from the bulb by pulling rearward. 4. Without turning, carefully pull bulb out of children's reach. Replacing headlamp bulbs (aerodynamic) 1. Open the hood. 3. If a bulb is in the OFF position. 2. Remove bulb retainer ring by its plastic base and... Check the operation of time, contaminants may enter the lamp housings and affect lamp performance. Make sure that the headlamp control is removed for an extended period of the following lamps frequently: • Headlamps • High-mount brakelamp • Brakelamps • Turn signals • License plate lamp • Tail...
.... The oil from the bulb by pulling rearward. 4. Without turning, carefully pull bulb out of children's reach. Replacing headlamp bulbs (aerodynamic) 1. Open the hood. 3. If a bulb is in the OFF position. 2. Remove bulb retainer ring by its plastic base and... Check the operation of time, contaminants may enter the lamp housings and affect lamp performance. Make sure that the headlamp control is removed for an extended period of the following lamps frequently: • Headlamps • High-mount brakelamp • Brakelamps • Turn signals • License plate lamp • Tail...

Owner's Manual
Page 213
.../side marker assembly and remove. 5. Remove the two screws and parking lamp/side marker assembly by turning it "snaps." Replacing headlamp bulbs (sealed beam) To remove the headlamp bulb: 1. Insert the glass end of the lamp assembly. 7. Install bulb retaining ring over the plastic base and lock the... until the plastic base contacts the rear of the new bulb into the headlamp assembly. Remove the four bolts and headlamp bezel. 213 Connect the electrical connector into the socket by pulling gently 4. Make sure headlamp switch is in the plastic base are aligned, push the bulb into the...
.../side marker assembly and remove. 5. Remove the two screws and parking lamp/side marker assembly by turning it "snaps." Replacing headlamp bulbs (sealed beam) To remove the headlamp bulb: 1. Insert the glass end of the lamp assembly. 7. Install bulb retaining ring over the plastic base and lock the... until the plastic base contacts the rear of the new bulb into the headlamp assembly. Remove the four bolts and headlamp bezel. 213 Connect the electrical connector into the socket by pulling gently 4. Make sure headlamp switch is in the plastic base are aligned, push the bulb into the...

Owner's Manual
Page 214
Disconnect the electrical connector and remove headlamp. Follow the same steps to expose the lamp assemblies. 2. Twist the bulb socket 1⁄4 turn /backup lamp bulbs - F250/F350 only The tail lamp/backup lamp bulbs are located in the same portion of the socket and push in lamp assembly by ...releasing the two retaining tabs. 4. Pull the bulb straight out of the tail lamp assembly, one just below the other. Remove the two bolts from headlamp. 7....
Disconnect the electrical connector and remove headlamp. Follow the same steps to expose the lamp assemblies. 2. Twist the bulb socket 1⁄4 turn /backup lamp bulbs - F250/F350 only The tail lamp/backup lamp bulbs are located in the same portion of the socket and push in lamp assembly by ...releasing the two retaining tabs. 4. Pull the bulb straight out of the tail lamp assembly, one just below the other. Remove the two bolts from headlamp. 7....

Owner's Manual
Page 216
Reach behind the rear bumper. Headlamp bulbs must be marked with screw. Carefully pull the bulb straight out of the socket and push in lamp assembly by turning it from the ...
Reach behind the rear bumper. Headlamp bulbs must be marked with screw. Carefully pull the bulb straight out of the socket and push in lamp assembly by turning it from the ...

Owner's Manual
Page 217
...to the Customer Assistance chapter for a list of your dealer (a) Replace entire lamp assembly; Maintenance and care Number of Trade number bulbs Headlamps (aerodynamic) 2 9007 Headlamps (sealed beam) 2 H6054 Park/turn 2 3157 Sidemarker 2 194 Tail/stop/turn/sidemarker 2 3157 K Backup 2 3156K High-mount... vehicle has been in color except where noted. see your headlamps should be checked by a qualified service technician. AIMING THE HEADLAMPS The headlamps on your vehicle are clear in an accident the alignment of Ford-approved cleaners, polishes and waxes. To replace all instrument panel...
...to the Customer Assistance chapter for a list of your dealer (a) Replace entire lamp assembly; Maintenance and care Number of Trade number bulbs Headlamps (aerodynamic) 2 9007 Headlamps (sealed beam) 2 H6054 Park/turn 2 3157 Sidemarker 2 194 Tail/stop/turn/sidemarker 2 3157 K Backup 2 3156K High-mount... vehicle has been in color except where noted. see your headlamps should be checked by a qualified service technician. AIMING THE HEADLAMPS The headlamps on your vehicle are clear in an accident the alignment of Ford-approved cleaners, polishes and waxes. To replace all instrument panel...

Owner's Manual
Page 243
... conditioner Bed web net Cargo nets Cargo organizers Cargo storage bin Cargo trays Engine block heaters Power sliding rear window Tire step Travel equipment Auto headlamp system with Daytime Running Lights (DRL) Bumper mounted bike courier Daytime running lights (DRL) Electrochromic inside mirror with compass Electrochromic inside mirror with compass and...
... conditioner Bed web net Cargo nets Cargo organizers Cargo storage bin Cargo trays Engine block heaters Power sliding rear window Tire step Travel equipment Auto headlamp system with Daytime Running Lights (DRL) Bumper mounted bike courier Daytime running lights (DRL) Electrochromic inside mirror with compass Electrochromic inside mirror with compass and...
Owner's Manual
Page 249
... load ...132 location ...132 GVWR (Gross Vehicle Weight Rating) ...132 calculating ...132,134 definition ...132 driving with a heavy load ...132 location ...132 Hazard flashers ...146 Headlamps ...25 aiming ...217 daytime running lights ...25 flash to pass ...26 high beam ...14,25 replacing bulbs ...212,213 turning on and off ...25 warning... of the ignition ...55 removing from the ignition ...122 Lamps autolamp system ...212 bulb replacement specifications chart ...216 cargo lamps ...26 daytime running light ...25 headlamps ...25 headlamps, flash to pass ...26 instrument panel, dimming ...26 249
... load ...132 location ...132 GVWR (Gross Vehicle Weight Rating) ...132 calculating ...132,134 definition ...132 driving with a heavy load ...132 location ...132 Hazard flashers ...146 Headlamps ...25 aiming ...217 daytime running lights ...25 flash to pass ...26 high beam ...14,25 replacing bulbs ...212,213 turning on and off ...25 warning... of the ignition ...55 removing from the ignition ...122 Lamps autolamp system ...212 bulb replacement specifications chart ...216 cargo lamps ...26 daytime running light ...25 headlamps ...25 headlamps, flash to pass ...26 instrument panel, dimming ...26 249
7.3L Diesel Supplement 2nd Printing
Page 9
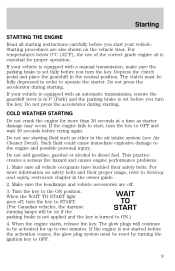
... off , turn the key to ON.) 4. Starting STARTING THE ENGINE Read all vehicle occupants have buckled their proper usage, refer to OFF. 9 Make sure the headlamps and vehicle accessories are also shown on if the parking brake is not applied and the key is set fully before you start , turn the...
... off , turn the key to ON.) 4. Starting STARTING THE ENGINE Read all vehicle occupants have buckled their proper usage, refer to OFF. 9 Make sure the headlamps and vehicle accessories are also shown on if the parking brake is not applied and the key is set fully before you start , turn the...