
Four Wheeling Supplement 1st Printing
Page 9
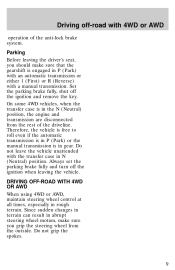
... WITH 4WD OR AWD When using 4WD or AWD, maintain steering wheel control at all times, especially in N (Neutral) position. Parking Before leaving the driver's seat, you should make sure you grip the steering wheel from the rest of the anti-lock brake system. On some 4WD vehicles, when the transfer...
... WITH 4WD OR AWD When using 4WD or AWD, maintain steering wheel control at all times, especially in N (Neutral) position. Parking Before leaving the driver's seat, you should make sure you grip the steering wheel from the rest of the anti-lock brake system. On some 4WD vehicles, when the transfer...
Scheduled Maintenance Guide 3rd Printing
Page 9
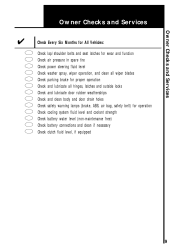
... Services Check Every Six Months for All Vehicles: Check Check Check Check Check Check Check Check Check Check Check Check Check lap/shoulder belts and seat latches for wear and function air pressure in spare tire power steering fluid level washer spray, wiper operation, and clean all wiper blades parking brake...
... Services Check Every Six Months for All Vehicles: Check Check Check Check Check Check Check Check Check Check Check Check Check lap/shoulder belts and seat latches for wear and function air pressure in spare tire power steering fluid level washer spray, wiper operation, and clean all wiper blades parking brake...

7.3L Diesel Supplement 1st Printing
Page 3
... or special break-in the General Maintenance Information chapter for the first 1 600 km (1 000 miles) of operation, since these additives may prevent piston ring seating. See "Engine oil" in oils during the first few thousand kilometers (miles) of new vehicle operation. Introduction NEW VEHICLE BREAK-IN Your vehicle does not...
... or special break-in the General Maintenance Information chapter for the first 1 600 km (1 000 miles) of operation, since these additives may prevent piston ring seating. See "Engine oil" in oils during the first few thousand kilometers (miles) of new vehicle operation. Introduction NEW VEHICLE BREAK-IN Your vehicle does not...
7.3L Diesel Supplement 1st Printing
Page 9
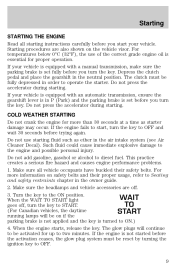
... not applied and the key is set before trying again. Starting STARTING THE ENGINE Read all vehicle occupants have buckled their proper usage, refer to Seating and safety restraints chapter in the owner guide. 2. Do not press the accelerator during starting . Such fluid could cause immediate explosive damage to the ON...
... not applied and the key is set before trying again. Starting STARTING THE ENGINE Read all vehicle occupants have buckled their proper usage, refer to Seating and safety restraints chapter in the owner guide. 2. Do not press the accelerator during starting . Such fluid could cause immediate explosive damage to the ON...
7.3L Diesel Supplement 1st Printing
Page 27
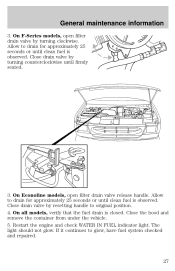
... all models, verify that the fuel drain is observed. If it continues to original position. 4. Allow to drain for approximately 25 seconds or until firmly seated. 3.
... all models, verify that the fuel drain is observed. If it continues to original position. 4. Allow to drain for approximately 25 seconds or until firmly seated. 3.
Owner Guide 4th Printing
Page 1
Contents Before driving Introduction Instrumentation Controls and features Seating and safety restraints Starting and driving Starting Driving Roadside emergencies Servicing Maintenance and care Capacities and specifications Customer assistance Reporting safety defects Index 169 212 223 235 236 107 112 144 2 5 22 82 All rights reserved. Copyright Reproduction by any means, electronic or mechanical including photocopying, recording or by any information storage and retrieval system or translation in whole or part is not permitted without written authorization from Ford Motor Company.
Contents Before driving Introduction Instrumentation Controls and features Seating and safety restraints Starting and driving Starting Driving Roadside emergencies Servicing Maintenance and care Capacities and specifications Customer assistance Reporting safety defects Index 169 212 223 235 236 107 112 144 2 5 22 82 All rights reserved. Copyright Reproduction by any means, electronic or mechanical including photocopying, recording or by any information storage and retrieval system or translation in whole or part is not permitted without written authorization from Ford Motor Company.

Owner Guide 4th Printing
Page 2
...vehicle information related to break in. Correct vehicle usage and the authorized disposal of personal injury and prevent possible damage to Seating and safety restraints for your vehicle and its equipment. During the first 1 600 km (1 000 miles) of printing. ... incurring obligation. 2 WARNINGS Warnings provide information which will follow. Indicates a message regarding child safety restraints. Indicates that this subject. Ford may reduce the risk of waste cleaning and lubrication materials are no particular breaking-in effect at the time of driving, vary speeds...
...vehicle information related to break in. Correct vehicle usage and the authorized disposal of personal injury and prevent possible damage to Seating and safety restraints for your vehicle and its equipment. During the first 1 600 km (1 000 miles) of printing. ... incurring obligation. 2 WARNINGS Warnings provide information which will follow. Indicates a message regarding child safety restraints. Indicates that this subject. Ford may reduce the risk of waste cleaning and lubrication materials are no particular breaking-in effect at the time of driving, vary speeds...

Owner Guide 4th Printing
Page 11
...warning light also remains illuminated with parking brake released. 11 If the light remains on, continues to flash or fails to fasten your Ford dealer as soon as possible. The TCIL may flash steadily if a malfunction is the OVERDRIVE transmission control indicator light (TCIL). Illumination ...occur. If this time, seek service immediately. If the brake warning lamp does not illuminate at this condition persists, damage to the Seating and safety restraints chapter. Brake system warning Momentarily illuminates when the ignition is turned to the ON position ABS and the engine is...
...warning light also remains illuminated with parking brake released. 11 If the light remains on, continues to flash or fails to fasten your Ford dealer as soon as possible. The TCIL may flash steadily if a malfunction is the OVERDRIVE transmission control indicator light (TCIL). Illumination ...occur. If this time, seek service immediately. If the brake warning lamp does not illuminate at this condition persists, damage to the Seating and safety restraints chapter. Brake system warning Momentarily illuminates when the ignition is turned to the ON position ABS and the engine is...

Owner Guide 4th Printing
Page 13
... gauge and the engine oil pressure gauge. Supplemental restraint system (SRS) warning chime For information on the safety belt warning chime, refer to the Seating and safety restraints chapter. Key-in-ignition warning chime Sounds when the ignition key is left in the ignition in the OFF/LOCK or ACC... position and the driver's door is opened . 13 For information on the SRS warning chime, refer to the Seating and safety restraints chapter. DOOR AJAR Oil pressure/Engine coolant This light will illuminate when the ignition is in the ignition) and the driver's door...
... gauge and the engine oil pressure gauge. Supplemental restraint system (SRS) warning chime For information on the safety belt warning chime, refer to the Seating and safety restraints chapter. Key-in-ignition warning chime Sounds when the ignition key is left in the ignition in the OFF/LOCK or ACC... position and the driver's door is opened . 13 For information on the SRS warning chime, refer to the Seating and safety restraints chapter. DOOR AJAR Oil pressure/Engine coolant This light will illuminate when the ignition is in the ignition) and the driver's door...

Owner Guide 4th Printing
Page 25
...-Outside air is shut out and the fan will help to reduce • In humid weather, select your instrument panel, be used to the back seats (if equipped). • Remove any snow, ice or leaves from the air intake area (at the bottom of the windshield under the hood). • When...; To prevent humidity buildup inside the vehicle, don't drive with the climate control system in the OFF position. • Don't put objects under the front seat that will interfere with the airflow to clear ice or fog from fogging. Also, avoid placing small objects on top of your windshield. This will...
...-Outside air is shut out and the fan will help to reduce • In humid weather, select your instrument panel, be used to the back seats (if equipped). • Remove any snow, ice or leaves from the air intake area (at the bottom of the windshield under the hood). • When...; To prevent humidity buildup inside the vehicle, don't drive with the climate control system in the OFF position. • Don't put objects under the front seat that will interfere with the airflow to clear ice or fog from fogging. Also, avoid placing small objects on top of your windshield. This will...

Owner Guide 4th Printing
Page 28
Then operate your air conditioner as these objects may become projectiles in the OFF position. • Don't put objects under the front seat that will do a much faster job of cooling if you would normally. • When placing objects on top of the windshield under the hood). •... snow, ice or leaves from fogging. This will force most of the hot, stale air out of your instrument panel, be careful to the back seats (if equipped). • Remove any desired position. • To prevent humidity buildup inside the vehicle, don't drive with the windows open. These objects can...
Then operate your air conditioner as these objects may become projectiles in the OFF position. • Don't put objects under the front seat that will do a much faster job of cooling if you would normally. • When placing objects on top of the windshield under the hood). •... snow, ice or leaves from fogging. This will force most of the hot, stale air out of your instrument panel, be careful to the back seats (if equipped). • Remove any desired position. • To prevent humidity buildup inside the vehicle, don't drive with the windows open. These objects can...

Owner Guide 4th Printing
Page 62
SEL EJ MUTE CD changer (if equipped) The CD changer is turned to scroll through the text messages. Mute mode Press the control to the playing media. When your radio is located behind the driver's seat in order to a RDS station, RDS station TYPE, station NAME, or TEXT message will be displayed along with the frequency. Press the control again to return to mute the playing media. Controls and features • Use the SEL control to access the CD changer magazine. 62 Slide the door to select TYPE, NAME, TEXT or NONE. Press SEL in your vehicle.
SEL EJ MUTE CD changer (if equipped) The CD changer is turned to scroll through the text messages. Mute mode Press the control to the playing media. When your radio is located behind the driver's seat in order to a RDS station, RDS station TYPE, station NAME, or TEXT message will be displayed along with the frequency. Press the control again to return to mute the playing media. Controls and features • Use the SEL control to access the CD changer magazine. 62 Slide the door to select TYPE, NAME, TEXT or NONE. Press SEL in your vehicle.

Owner Guide 4th Printing
Page 82
Seating and safety restraints SEATING Full bench seat (if equipped) • Lift the release bar to move the seat forward or backward. Ensure that the seat is relatched into place. • Pull up to recline the seat. • Push down the release lever located on the release lever to quickly fold the seatback forward. 60/40 split bench seat (if equipped) • Lift the release bar to move the seat forward or backward. Ensure the seat is relatched into place. • Pull the seatback handle up on the back of the seat to quickly fold the seatback forward. 82
Seating and safety restraints SEATING Full bench seat (if equipped) • Lift the release bar to move the seat forward or backward. Ensure that the seat is relatched into place. • Pull up to recline the seat. • Push down the release lever located on the release lever to quickly fold the seatback forward. 60/40 split bench seat (if equipped) • Lift the release bar to move the seat forward or backward. Ensure the seat is relatched into place. • Pull the seatback handle up on the back of the seat to quickly fold the seatback forward. 82

Owner Guide 4th Printing
Page 83
... Do not pile cargo higher than the seatbacks to move the seat forward or rearward. Press to quickly fold the seatback forward. Make sure that the seat is moving. Adjusting the front power seat (if equipped) Never adjust the driver's seat or seatback when the vehicle is relatched into place. •...; Pull the seatback handle up to recline the seat. • Push the release lever down to ...
... Do not pile cargo higher than the seatbacks to move the seat forward or rearward. Press to quickly fold the seatback forward. Make sure that the seat is moving. Adjusting the front power seat (if equipped) Never adjust the driver's seat or seatback when the vehicle is relatched into place. •...; Pull the seatback handle up to recline the seat. • Push the release lever down to ...

Owner Guide 4th Printing
Page 84
Using the manual lumbar support Turn the lumbar support control toward the rear of vehicle to increase firmness. Press the control to raise or lower the rear portion of vehicle to increase softness. 84 Seating and safety restraints Press to move the seat forward, backward, up or down. Turn the lumbar support control toward the front of the seat cushion.
Using the manual lumbar support Turn the lumbar support control toward the rear of vehicle to increase firmness. Press the control to raise or lower the rear portion of vehicle to increase softness. 84 Seating and safety restraints Press to move the seat forward, backward, up or down. Turn the lumbar support control toward the front of the seat cushion.

Owner Guide 4th Printing
Page 85
... the floor, whether the seat is occupied or empty. Returning the seat to upright Always latch the vehicle seat to release the seatback. 5. Pull downward on the floor in the seat pockets before folding them down the rear seat. Locate the strap below the seatback. 4. Seating and safety restraints Rear folding bench seat (if equipped) Folding down...
... the floor, whether the seat is occupied or empty. Returning the seat to upright Always latch the vehicle seat to release the seatback. 5. Pull downward on the floor in the seat pockets before folding them down the rear seat. Locate the strap below the seatback. 4. Seating and safety restraints Rear folding bench seat (if equipped) Folding down...

Owner Guide 4th Printing
Page 86
... injured or killed. In a collision, people riding in a cargo area, inside shoulder. 3) Never use a single belt for more likely to its seating position. Be sure everyone in a collision. The passenger cannot protect the child from injury in your vehicle that are designed to ride in these areas... are more than one tongue that is provided. Seating and safety restraints 1. Lift/rotate the seatback toward the rear of one buckle and one person. 86 All occupants of a vehicle. Lift...
... injured or killed. In a collision, people riding in a cargo area, inside shoulder. 3) Never use a single belt for more likely to its seating position. Be sure everyone in a collision. The passenger cannot protect the child from injury in your vehicle that are designed to ride in these areas... are more than one tongue that is provided. Seating and safety restraints 1. Lift/rotate the seatback toward the rear of one buckle and one person. 86 All occupants of a vehicle. Lift...

Owner Guide 4th Printing
Page 87
...push the release button and remove the tongue from ) until you hear a snap and feel it latch. On SuperCab and CrewCab models, the front seat belt system can also be made to vehicle movement. For example, if the driver brakes suddenly or turns a corner sharply, or the vehicle receives ... The vehicle sensitive mode is securely fastened in response to lock manually by pulling quickly on the shoulder belt. The front passenger and rear seat outboard safety belts have two types of the driver and passengers. Make sure the tongue is the normal retractor mode, allowing free shoulder belt...
...push the release button and remove the tongue from ) until you hear a snap and feel it latch. On SuperCab and CrewCab models, the front seat belt system can also be made to vehicle movement. For example, if the driver brakes suddenly or turns a corner sharply, or the vehicle receives ... The vehicle sensitive mode is securely fastened in response to lock manually by pulling quickly on the shoulder belt. The front passenger and rear seat outboard safety belts have two types of the driver and passengers. Make sure the tongue is the normal retractor mode, allowing free shoulder belt...

Owner Guide 4th Printing
Page 88
When to Safety Restraints for Children or Safety Seats for Children later in this mode, the shoulder belt is extracted. 88 Refer to use the automatic locking mode • Buckle the combination lap and ... is automatically pre-locked. The automatic locking mode is installed in the shoulder belt. How to remove any slack in a passenger front or outboard rear seating position (if equipped). The belt will still retract to use the automatic locking mode • When a tight lap/shoulder fit is desired. • Anytime a child...
When to Safety Restraints for Children or Safety Seats for Children later in this mode, the shoulder belt is extracted. 88 Refer to use the automatic locking mode • Buckle the combination lap and ... is automatically pre-locked. The automatic locking mode is installed in the shoulder belt. How to remove any slack in a passenger front or outboard rear seating position (if equipped). The belt will still retract to use the automatic locking mode • When a tight lap/shoulder fit is desired. • Anytime a child...

Owner Guide 4th Printing
Page 89
... the height of the shoulder belt so the belt rests across the middle of your shoulder. This indicates the safety belt is locked in place. Seating and safety restraints • Allow the belt to adjust the safety belt properly could reduce the effectiveness of the safety belt and increase the risk...
... the height of the shoulder belt so the belt rests across the middle of your shoulder. This indicates the safety belt is locked in place. Seating and safety restraints • Allow the belt to adjust the safety belt properly could reduce the effectiveness of the safety belt and increase the risk...


