Four Wheeling Supplement 1st Printing
Page 16
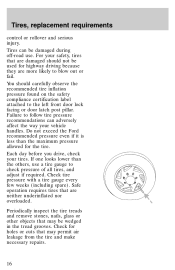
You should not be used for highway driving because they are neither underinflated nor overloaded. Failure to the left front door lock facing or door latch post pillar. If one looks lower than the maximum pressure allowed for holes or cuts that are more likely to check ...pressure found on the safety compliance certification label attached to follow tire pressure recommendations can be wedged in the tread grooves. Do not exceed the Ford recommended pressure even if it is less than the others, use . Check for the tire. Tires can adversely affect the way your tires....
You should not be used for highway driving because they are neither underinflated nor overloaded. Failure to the left front door lock facing or door latch post pillar. If one looks lower than the maximum pressure allowed for holes or cuts that are more likely to check ...pressure found on the safety compliance certification label attached to follow tire pressure recommendations can be wedged in the tread grooves. Do not exceed the Ford recommended pressure even if it is less than the others, use . Check for the tire. Tires can adversely affect the way your tires....
Owner Guide 1st Printing
Page 4
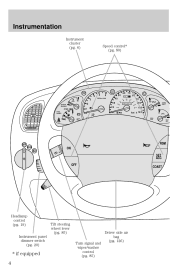
Instrumentation Instrument cluster (pg. 6) Speed control* (pg. 80) CHECK GAGE DOOR AJAR 4 H CHECK ENGINE 5 6 40 30 20 10 50 60 60 70 0 0 0 80 100 120 140 80 90 160 3 2 1 RPMx1000 C 40 000000 100 1 10 H L H CHECK SUSP SPEED CONT 20 180 FUEL RESET F E ABS 0 ! MPH km/h 120 L O/D OFF OFF RSM ON SET ACC OFF COAST Headlamp control (pg. 19) Instrument panel dimmer switch (pg. 20) Tilt steering wheel lever (pg. 85) Turn signal and wiper/washer control (pg. 85) Driver side air bag (pg. 126) * if equipped 4
Instrumentation Instrument cluster (pg. 6) Speed control* (pg. 80) CHECK GAGE DOOR AJAR 4 H CHECK ENGINE 5 6 40 30 20 10 50 60 60 70 0 0 0 80 100 120 140 80 90 160 3 2 1 RPMx1000 C 40 000000 100 1 10 H L H CHECK SUSP SPEED CONT 20 180 FUEL RESET F E ABS 0 ! MPH km/h 120 L O/D OFF OFF RSM ON SET ACC OFF COAST Headlamp control (pg. 19) Instrument panel dimmer switch (pg. 20) Tilt steering wheel lever (pg. 85) Turn signal and wiper/washer control (pg. 85) Driver side air bag (pg. 126) * if equipped 4

Owner Guide 1st Printing
Page 6
Instrumentation WARNING LIGHTS AND CHIMES CHECK GAGE DOOR AJAR 4 H CHECK ENGINE 5 6 40 30 20 10 50 60 60 70 0 0 0 80 100 120 140 80 90 160 3 2 1 RPMx1000 C 40 000000 100 1 10 H L H CHECK SUSP ...
Instrumentation WARNING LIGHTS AND CHIMES CHECK GAGE DOOR AJAR 4 H CHECK ENGINE 5 6 40 30 20 10 50 60 60 70 0 0 0 80 100 120 140 80 90 160 3 2 1 RPMx1000 C 40 000000 100 1 10 H L H CHECK SUSP ...

Owner Guide 1st Printing
Page 10
...wheel drive high (if equipped) This light momentarily illuminates when the ignition is OFF. Door ajar Illuminates when the ignition is on when either the SPEED SET/ACCEL or RESUME controls... ON position and the engine is turned to Air suspension system in the ON or START position and any door is depressed or if the light flashes when you are pressed. It turns off (if equipped) Illuminates when...the light does not come on when the transmission control switch is open. 4WD HIGH DOOR AJAR O/D off when the CONT speed control OFF control is pressed, the brake is applied or the ignition is...
...wheel drive high (if equipped) This light momentarily illuminates when the ignition is OFF. Door ajar Illuminates when the ignition is on when either the SPEED SET/ACCEL or RESUME controls... ON position and the engine is turned to Air suspension system in the ON or START position and any door is depressed or if the light flashes when you are pressed. It turns off (if equipped) Illuminates when...the light does not come on when the transmission control switch is open. 4WD HIGH DOOR AJAR O/D off when the CONT speed control OFF control is pressed, the brake is applied or the ignition is...

Owner Guide 1st Printing
Page 11
... THEFT P R N D 2 1 L O/D OFF 11 Key-in-ignition warning chime Sounds when the key is left in the ignition in the ignition) and the driver's door is opened . GAUGES CHECK GAGE DOOR AJAR 4 H CHECK ENGINE 5 6 40 30 20 10 50 60 60 70 0 0 0 80 100 120 140 80 90 160 3 2 1 RPMx1000 C 40 000000 100... (SRS) warning chime For information on , the ignition is off (and the key is not in the OFF/LOCK or ACC position and the driver's door is opened .
... THEFT P R N D 2 1 L O/D OFF 11 Key-in-ignition warning chime Sounds when the key is left in the ignition in the ignition) and the driver's door is opened . GAUGES CHECK GAGE DOOR AJAR 4 H CHECK ENGINE 5 6 40 30 20 10 50 60 60 70 0 0 0 80 100 120 140 80 90 160 3 2 1 RPMx1000 C 40 000000 100... (SRS) warning chime For information on , the ignition is off (and the key is not in the OFF/LOCK or ACC position and the driver's door is opened .
Owner Guide 1st Printing
Page 14
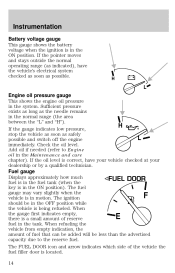
...if needed (refer to the reserve fuel. The ignition should be less than the advertised capacity due to Engine oil in the system. The FUEL DOOR icon and arrow indicates which side of reserve fuel in the normal range (the area between the "L" and "H"). The fuel gauge may vary ...slightly when the vehicle is located. When the gauge first indicates empty, there is a small amount of the vehicle the fuel filler door is in the OFF position while the vehicle is correct, have the vehicle's electrical system checked as soon as possible. H L Engine oil pressure gauge...
...if needed (refer to the reserve fuel. The ignition should be less than the advertised capacity due to Engine oil in the system. The FUEL DOOR icon and arrow indicates which side of reserve fuel in the normal range (the area between the "L" and "H"). The fuel gauge may vary ...slightly when the vehicle is located. When the gauge first indicates empty, there is a small amount of the vehicle the fuel filler door is in the OFF position while the vehicle is correct, have the vehicle's electrical system checked as soon as possible. H L Engine oil pressure gauge...

Owner Guide 1st Printing
Page 75
Press to access the CD changer magazine. 2. A B C 75 Slide the door to eject the magazine. 3. CD changer (if equipped) The CD changer is located in one of the magazine. Turn the magazine (A) over. 4. Using the disc holder release knob (C), pull the disc holder (B) out of the following locations: • in the trunk • in the center console • under the driver's seat 1. Controls and features • In CD mode (if equipped), use the SEEK function to access the next or previous selection.
Press to access the CD changer magazine. 2. A B C 75 Slide the door to eject the magazine. 3. CD changer (if equipped) The CD changer is located in one of the magazine. Turn the magazine (A) over. 4. Using the disc holder release knob (C), pull the disc holder (B) out of the following locations: • in the trunk • in the center console • under the driver's seat 1. Controls and features • In CD mode (if equipped), use the SEEK function to access the next or previous selection.

Owner Guide 1st Printing
Page 77
Keep the CD changer door closed. Coins and foreign objects will damage the CD player and void your changer does not work, it may be dirty. If your audio system ...
Keep the CD changer door closed. Coins and foreign objects will damage the CD player and void your changer does not work, it may be dirty. If your audio system ...

Owner Guide 1st Printing
Page 88
...LAM DE MO N OPE Installing a garage door opener (if equipped) The storage compartment can be converted to full open the storage compartment. P LAM 88 The door will open slightly and can be moved to accommodate a variety of aftermarket garage door openers: • Remove the storage clip from... the door. • Place Velcro hook onto side of aftermarket transmitter opposite...
...LAM DE MO N OPE Installing a garage door opener (if equipped) The storage compartment can be converted to full open the storage compartment. P LAM 88 The door will open slightly and can be moved to accommodate a variety of aftermarket garage door openers: • Remove the storage clip from... the door. • Place Velcro hook onto side of aftermarket transmitter opposite...

Owner Guide 1st Printing
Page 92
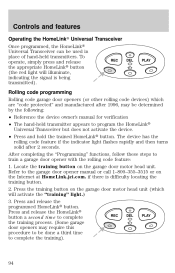
...will learn the radio frequency codes of the way to three hand-held transmitters with any garage door opener model manufactured before April 1, 1982). When programming your HomeLink Universal Transceiver, to a garage door or gate be sure that lacks safety stop and reverse, does not meet current U.S. For ...more information on this includes any garage door opener that people and objects are out of most current transmitters to stop and reverse features as required by U.S. LAMP MODE LAMP CAL...
...will learn the radio frequency codes of the way to three hand-held transmitters with any garage door opener model manufactured before April 1, 1982). When programming your HomeLink Universal Transceiver, to a garage door or gate be sure that lacks safety stop and reverse, does not meet current U.S. For ...more information on this includes any garage door opener that people and objects are out of most current transmitters to stop and reverse features as required by U.S. LAMP MODE LAMP CAL...
Owner Guide 1st Printing
Page 94
...held transmitters. Press and release the HomeLink REC DEL PLAY button a second time to complete the training process. (Some garage door openers may be used in place of hand-held transmitter appears to program the HomeLink Universal Transceiver but does not activate the .... • Press and hold the trained HomeLink button. After completing the "Programming" functions, follow these steps to train a garage door opener with the rolling code feature: 1. Press and release the programmed HomeLink button. To REC operate, simply press and release the ...
...held transmitters. Press and release the HomeLink REC DEL PLAY button a second time to complete the training process. (Some garage door openers may be used in place of hand-held transmitter appears to program the HomeLink Universal Transceiver but does not activate the .... • Press and hold the trained HomeLink button. After completing the "Programming" functions, follow these steps to train a garage door opener with the rolling code feature: 1. Press and release the programmed HomeLink button. To REC operate, simply press and release the ...

Owner Guide 1st Printing
Page 95
... simple controls. Press and hold the hand-held transmitter 5-14 cm (2 to flash slowly (after 20 seconds. 2. The HomeLink indicator light will activate the door. When the indicator light begins to 5 inches) away from step 3 will flash, first slowly and then rapidly. When the indicator light begins to do is...
... simple controls. Press and hold the hand-held transmitter 5-14 cm (2 to flash slowly (after 20 seconds. 2. The HomeLink indicator light will activate the door. When the indicator light begins to 5 inches) away from step 3 will flash, first slowly and then rapidly. When the indicator light begins to do is...

Owner Guide 1st Printing
Page 99
WINDOW LOCK To lock out all doors. POWER DOOR LOCKS (IF EQUIPPED) Press U to unlock all doors and L to operate the power windows. The driver's window will open fully. AUTO Window lock The window lock feature allows only the driver to lock all the window controls except for the driver's press the left side of the control. Depress again to restore the window controls. Press the right side to stop window operation. Controls and features One touch down • Press AUTO completely down and release quickly. U L 99
WINDOW LOCK To lock out all doors. POWER DOOR LOCKS (IF EQUIPPED) Press U to unlock all doors and L to operate the power windows. The driver's window will open fully. AUTO Window lock The window lock feature allows only the driver to lock all the window controls except for the driver's press the left side of the control. Depress again to restore the window controls. Press the right side to stop window operation. Controls and features One touch down • Press AUTO completely down and release quickly. U L 99

Owner Guide 1st Printing
Page 100
...down to adjust the right mirror. 3. to disengage childproof locks. Controls and features CHILDPROOF DOOR LOCKS When these locks are unlocked. The rear doors can be opened from the outside when the doors are set separately for both doors. Move lock control up to adjust the left mirror or 1. Return to the center... to lock mirrors in the direction you wish to tilt the mirror. The childproof locks are located on rear edge of each rear door and must be set , the rear doors cannot be opened from the inside. POWER SIDE VIEW MIRRORS To adjust your mirrors: to engage the lock.
...down to adjust the right mirror. 3. to disengage childproof locks. Controls and features CHILDPROOF DOOR LOCKS When these locks are unlocked. The rear doors can be opened from the outside when the doors are set separately for both doors. Move lock control up to adjust the left mirror or 1. Return to the center... to lock mirrors in the direction you wish to tilt the mirror. The childproof locks are located on rear edge of each rear door and must be set , the rear doors cannot be opened from the inside. POWER SIDE VIEW MIRRORS To adjust your mirrors: to engage the lock.
Owner Guide 1st Printing
Page 103
... the liftgate and the liftgate window, use the key or the power door locks, depress the key lock cylinder or press the door lock switch on the handle under the license plate lamp shield. Use only Ford original Equipment floor mats. It cannot be closed before driving your vehicle.... Use a screwdriver to the liftgate door lift cylinders and attaching hardware. 103 Exert pressure while turning to the most rearward position 2. The liftgate door and window should be opened from...
... the liftgate and the liftgate window, use the key or the power door locks, depress the key lock cylinder or press the door lock switch on the handle under the license plate lamp shield. Use only Ford original Equipment floor mats. It cannot be closed before driving your vehicle.... Use a screwdriver to the liftgate door lift cylinders and attaching hardware. 103 Exert pressure while turning to the most rearward position 2. The liftgate door and window should be opened from...

Owner Guide 1st Printing
Page 104
CARGO COVER (IF EQUIPPED) Your vehicle may be equipped with a cargo area shade that the liftgate door and/or window are closed to the mounting clips on the cargo area cover. To prevent the possibility of injuries, the fasteners for the cargo ... occupants of the vehicle in the rear trim panels. This will also prevent passengers and cargo from the vehicle and extend it with the liftgate door or window open, keep the vents open so outside air comes into the notches in the case of a sudden stop or collision. Do not place...
CARGO COVER (IF EQUIPPED) Your vehicle may be equipped with a cargo area shade that the liftgate door and/or window are closed to the mounting clips on the cargo area cover. To prevent the possibility of injuries, the fasteners for the cargo ... occupants of the vehicle in the rear trim panels. This will also prevent passengers and cargo from the vehicle and extend it with the liftgate door or window open, keep the vents open so outside air comes into the notches in the case of a sudden stop or collision. Do not place...

Owner Guide 1st Printing
Page 105
... of the right end cap. Push in the right end cap (marked RH) about 1⁄4 of the total length to lock or unlock all vehicle doors without a key. The clutch will now engage and stop or accident if it operates properly. Tuck the edges of the vinyl towards the center, making...
... of the right end cap. Push in the right end cap (marked RH) about 1⁄4 of the total length to lock or unlock all vehicle doors without a key. The clutch will now engage and stop or accident if it operates properly. Tuck the edges of the vinyl towards the center, making...

Owner Guide 1st Printing
Page 106
... control a second time within five seconds. To deactivate the alarm, press the control again or turn the ignition to unlock the driver's door. The doors will lock again, the horn will chirp and the lamps will illuminate. If any interference received, including interference that may not cause harmful ...(2) This device must accept any of Industry Canada. This device complies with part 15 of the FCC rules and with RS-210 of the doors are closed and locked, press the control a second time within five seconds to the following two conditions: (1) This device may cause undesired ...
... control a second time within five seconds. To deactivate the alarm, press the control again or turn the ignition to unlock the driver's door. The doors will lock again, the horn will chirp and the lamps will illuminate. If any interference received, including interference that may not cause harmful ...(2) This device must accept any of Industry Canada. This device complies with part 15 of the FCC rules and with RS-210 of the doors are closed and locked, press the control a second time within five seconds to the following two conditions: (1) This device may cause undesired ...

Owner Guide 1st Printing
Page 107
Memory positions can be deactivated or reactivated by performing the following: 1. Make sure the ignition is off and all doors and the liftgate window are closed. 2. Press the power door unlock control three times. 4. The horn will chirp once to confirm that you had pressed the memory control in the... vehicle. Press the control once to unlock the driver's door and move the memory seat feature to operate the equipment. Press the power door unlock control three times. 6. Press the unlock control two times, then press the lock control. The...
Memory positions can be deactivated or reactivated by performing the following: 1. Make sure the ignition is off and all doors and the liftgate window are closed. 2. Press the power door unlock control three times. 4. The horn will chirp once to confirm that you had pressed the memory control in the... vehicle. Press the control once to unlock the driver's door and move the memory seat feature to operate the equipment. Press the power door unlock control three times. 6. Press the unlock control two times, then press the lock control. The...

Owner Guide 1st Printing
Page 108
... orientation. Twist a thin coin between the two halves of new battery in operating range can be up to 10 meters (33 feet) away from the door control even when deactivated at the remote entry module. DO NOT TAKE THE FRONT PART OF THE TRANSMITTER APART. 2. Replacing the battery The transmitter is...
... orientation. Twist a thin coin between the two halves of new battery in operating range can be up to 10 meters (33 feet) away from the door control even when deactivated at the remote entry module. DO NOT TAKE THE FRONT PART OF THE TRANSMITTER APART. 2. Replacing the battery The transmitter is...


