Owner's Manual
Page 4
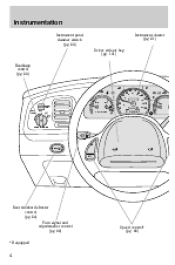
OFF Rear window defroster control (pg. 24) Turn signal and wiper/washer control (pg. 66) *If equipped Speed control* (pg. 68) 4 Instrumentation Instrument panel dimmer switch (pg. 23) Driver side air bag (pg. 101) Headlamp control (pg. 23) Instrument cluster (pg. 21) AIR SUSP CHECK ENGINE OD OFF 50 40 60 80 60 70 100 120 80 140 BRAKE 90 160 H VOLTS F FUEL 30 40 100 110 H TEMP C PANEL DIM AUTO LAMP 20 10 E 180 20 200 0FF L < FUEL FILL DOOR MPH km/h 120 P RND21 PUSH INTERIOR HI LO F ON R.DEF.
OFF Rear window defroster control (pg. 24) Turn signal and wiper/washer control (pg. 66) *If equipped Speed control* (pg. 68) 4 Instrumentation Instrument panel dimmer switch (pg. 23) Driver side air bag (pg. 101) Headlamp control (pg. 23) Instrument cluster (pg. 21) AIR SUSP CHECK ENGINE OD OFF 50 40 60 80 60 70 100 120 80 140 BRAKE 90 160 H VOLTS F FUEL 30 40 100 110 H TEMP C PANEL DIM AUTO LAMP 20 10 E 180 20 200 0FF L < FUEL FILL DOOR MPH km/h 120 P RND21 PUSH INTERIOR HI LO F ON R.DEF.
Owner's Manual
Page 9
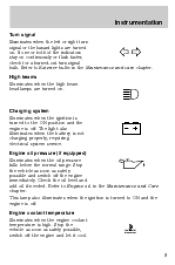
... level and add oil if needed. Instrumentation Turn signal Illuminates when the left or right turn signal bulb. High beams Illuminates when the high beam headlamps are turned on . Stop the vehicle as soon as safely possible and switch off . Engine oil pressure (if equipped) Illuminates when the oil pressure falls...
... level and add oil if needed. Instrumentation Turn signal Illuminates when the left or right turn signal bulb. High beams Illuminates when the high beam headlamps are turned on . Stop the vehicle as soon as safely possible and switch off . Engine oil pressure (if equipped) Illuminates when the oil pressure falls...
Owner's Manual
Page 11
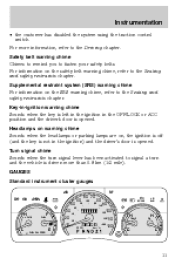
... remind you to the Driving chapter. For information on the SRS warning chime, refer to signal a turn and the vehicle is opened . Headlamps on warning chime Sounds when the headlamps or parking lamps are on, the ignition is off (and the key is not in the OFF/LOCK or ACC position and...
... remind you to the Driving chapter. For information on the SRS warning chime, refer to signal a turn and the vehicle is opened . Headlamps on warning chime Sounds when the headlamps or parking lamps are on, the ignition is off (and the key is not in the OFF/LOCK or ACC position and...

Owner's Manual
Page 23
HEADLAMP CONTROL Rotate the headlamp control to the first position to turn on the parking lamps. HI LO F S OFF Flash to pass Pull toward you to activate and release to activate. PANEL DIM OFF P High beams Push forward to deactivate. Rotate to the second position to dim. Controls and features PANEL DIMMER CONTROL Use to adjust the brightness of the instrument panel during headlight and parklamp operation. • Push up to brighten. • Push down to also turn on the headlamps. HI LO F S OFF 23
HEADLAMP CONTROL Rotate the headlamp control to the first position to turn on the parking lamps. HI LO F S OFF Flash to pass Pull toward you to activate and release to activate. PANEL DIM OFF P High beams Push forward to deactivate. Rotate to the second position to dim. Controls and features PANEL DIMMER CONTROL Use to adjust the brightness of the instrument panel during headlight and parklamp operation. • Push up to brighten. • Push down to also turn on the headlamps. HI LO F S OFF 23

Owner's Manual
Page 24
...) System does not activate your tail lamps and generally may not provide adequate lighting during inclement weather. Failure to activate your headlamps at dusk or during these conditions may result in the ON position to OFF. Controls and features Autolamp control (if equipped)... The autolamp system provides light OFF P sensitive automatic on with a reduced output. The preselected time lapse is located on your headlamps under these conditions. REAR WINDOW DEFROSTER The rear defroster control is adjustable up to approximately three minutes by continuing to rotate the control...
...) System does not activate your tail lamps and generally may not provide adequate lighting during inclement weather. Failure to activate your headlamps at dusk or during these conditions may result in the ON position to OFF. Controls and features Autolamp control (if equipped)... The autolamp system provides light OFF P sensitive automatic on with a reduced output. The preselected time lapse is located on your headlamps under these conditions. REAR WINDOW DEFROSTER The rear defroster control is adjustable up to approximately three minutes by continuing to rotate the control...
Owner's Manual
Page 51
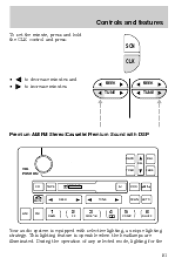
... TAPE DOLBY B NR EJ RDS DSP MUTE SEEK TUNE SCAN AUTO AM FM 1 REW 2 FF 3 SIDE 1-2 4 5 COMP 6 SHUFF Your audio system is operable when the headlamps are illuminated. Controls and features To set the minute, press and hold the CLK control and press: SCN CLK • • to decrease minutes and...
... TAPE DOLBY B NR EJ RDS DSP MUTE SEEK TUNE SCAN AUTO AM FM 1 REW 2 FF 3 SIDE 1-2 4 5 COMP 6 SHUFF Your audio system is operable when the headlamps are illuminated. Controls and features To set the minute, press and hold the CLK control and press: SCN CLK • • to decrease minutes and...
Owner's Manual
Page 113
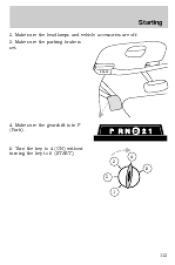
Make sure the gearshift is set. Turn the key to 4 (ON) without turning the key to 5 (START). 4 3 5 2 1 113 Make sure the parking brake is in P (Park). 5. HOOD BRAKE 4. Make sure the headlamps and vehicle accessories are off. 3. Starting 2.
Make sure the gearshift is set. Turn the key to 4 (ON) without turning the key to 5 (START). 4 3 5 2 1 113 Make sure the parking brake is in P (Park). 5. HOOD BRAKE 4. Make sure the headlamps and vehicle accessories are off. 3. Starting 2.
Owner's Manual
Page 178
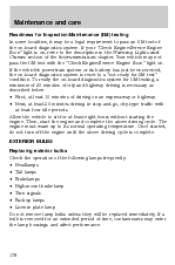
... below: • First, at least eight hours without starting the engine. EXTERIOR BULBS Replacing exterior bulbs Check the operation of the following lamps frequently: • Headlamps • Tail lamps • Brakelamps • High-mount brakelamp • Turn signals • Backup lamps • License plate lamp Do not remove lamp bulbs unless...
... below: • First, at least eight hours without starting the engine. EXTERIOR BULBS Replacing exterior bulbs Check the operation of the following lamps frequently: • Headlamps • Tail lamps • Brakelamps • High-mount brakelamp • Turn signals • Backup lamps • License plate lamp Do not remove lamp bulbs unless...
Owner's Manual
Page 179
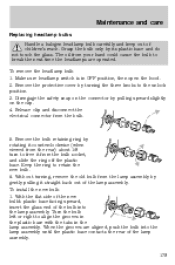
...into the lamp assembly until the plastic base contacts the rear of the lamp assembly. 179 When the grooves are operated. To remove the headlamp bulb: 1. To install the new bulb: 1. Release clip and disconnect the electrical connector from the lamp assembly by gently pulling it ...turn to free it straight back out of children's reach. Keep the ring to the unlock position. 3. Maintenance and care Replacing headlamp bulbs Handle a halogen headlamp bulb carefully and keep out of the lamp assembly. Grasp the bulb only by pulling upward slightly on the connector by its plastic...
...into the lamp assembly until the plastic base contacts the rear of the lamp assembly. 179 When the grooves are operated. To remove the headlamp bulb: 1. To install the new bulb: 1. Release clip and disconnect the electrical connector from the lamp assembly by gently pulling it ...turn to free it straight back out of children's reach. Keep the ring to the unlock position. 3. Maintenance and care Replacing headlamp bulbs Handle a halogen headlamp bulb carefully and keep out of the lamp assembly. Grasp the bulb only by pulling upward slightly on the connector by its plastic...

Owner's Manual
Page 180
...socket by rotating it clockwise until it snaps, locking it into the rear of the socket and push in reverse order. 180 If the headlamp was correctly aligned before you changed the bulb, you feel a "stop." 3. Disconnect the electrical connector from lamp assembly. 6. Remove the... position. 3. To complete installation, follow the removal procedure in the new bulb. 7. Connect the electrical connector into position. 4. Turn the headlamps on the connector by turning the three knobs to align it in OFF position, then open the hood. 2. Rotate the bulb socket counterclockwise about...
...socket by rotating it clockwise until it snaps, locking it into the rear of the socket and push in reverse order. 180 If the headlamp was correctly aligned before you changed the bulb, you feel a "stop." 3. Disconnect the electrical connector from lamp assembly. 6. Remove the... position. 3. To complete installation, follow the removal procedure in the new bulb. 7. Connect the electrical connector into position. 4. Turn the headlamps on the connector by turning the three knobs to align it in OFF position, then open the hood. 2. Rotate the bulb socket counterclockwise about...

Owner's Manual
Page 182
...the Customer Assistance chapter for clear night vision. • The headlamp beams are pointed substantially away from a slightly down and to deactivate your high beams, and your dealer. AIMING THE HEADLAMPS The alignment of Ford-approved cleaners, polishes and waxes. 182 see your high beams ...are not activated. • The headlamps do not seem to provide enough light for a list of your headlamps should be checked by a qualified service technician...
...the Customer Assistance chapter for clear night vision. • The headlamp beams are pointed substantially away from a slightly down and to deactivate your high beams, and your dealer. AIMING THE HEADLAMPS The alignment of Ford-approved cleaners, polishes and waxes. 182 see your high beams ...are not activated. • The headlamps do not seem to provide enough light for a list of your headlamps should be checked by a qualified service technician...
Owner's Manual
Page 206
...engine oil pressure gauge ...16 fuel gauge ...12 odometer ...14 speedometer ...13 trip odometer ...14 Hazard flashers ...132 Head restraints ...91,92 Headlamps aiming ...182 bulb specifications ...182 high beam ...9,23 Heating ...25 heating and air conditioning system ...25,27 Hood ...149 Ignition ...189 ...88 programming entry code ...88,89,90 Keys positions of the ignition ...67 Lamps autolamp system ...24 206 daytime running light ...24 headlamps ...23 headlamps, flash to pass ...23 instrument panel, dimming ...23 interior lamps ...181 replacing bulbs ..178,179,180,181 Lane change indicator (...
...engine oil pressure gauge ...16 fuel gauge ...12 odometer ...14 speedometer ...13 trip odometer ...14 Hazard flashers ...132 Head restraints ...91,92 Headlamps aiming ...182 bulb specifications ...182 high beam ...9,23 Heating ...25 heating and air conditioning system ...25,27 Hood ...149 Ignition ...189 ...88 programming entry code ...88,89,90 Keys positions of the ignition ...67 Lamps autolamp system ...24 206 daytime running light ...24 headlamps ...23 headlamps, flash to pass ...23 instrument panel, dimming ...23 interior lamps ...181 replacing bulbs ..178,179,180,181 Lane change indicator (...
