
Owner's Manual
Page 14
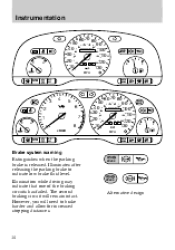
However, you will remain intact. The second braking circuit will need to indicate low brake fluid level. Illuminates after releasing the parking brake to brake harder and allow for increased stopping distances. Instrumentation 55 60 70 80 50 100 120 90 140 40 60 800 0 0 1 2 3 160100 30 40 10 180 1 ... TRACTION CONTROL 8 55 60 70 80 50 100 120 90 140 40 60 800 0 0 1 2 3 160100 30 40 10 180 1 20 20 0 0 0 0 200 120 10 130 BRAKE E F MPH CHECK ENGINE O/D OFF Brake system warning Extinguishes when the parking brake is released. Illumination while driving may indicate that one of the...
However, you will remain intact. The second braking circuit will need to indicate low brake fluid level. Illuminates after releasing the parking brake to brake harder and allow for increased stopping distances. Instrumentation 55 60 70 80 50 100 120 90 140 40 60 800 0 0 1 2 3 160100 30 40 10 180 1 ... TRACTION CONTROL 8 55 60 70 80 50 100 120 90 140 40 60 800 0 0 1 2 3 160100 30 40 10 180 1 20 20 0 0 0 0 200 120 10 130 BRAKE E F MPH CHECK ENGINE O/D OFF Brake system warning Extinguishes when the parking brake is released. Illumination while driving may indicate that one of the...
Owner's Manual
Page 64
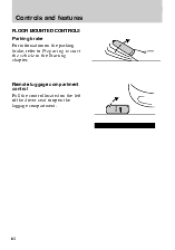
Controls and features FLOOR MOUNTED CONTROLS Parking brake For information on the parking brake, refer to Preparing to start the vehicle in the Starting chapter. 64 PULL Remote luggage compartment control Pull the control located on the left of the driver seat to open the luggage compartment.
Controls and features FLOOR MOUNTED CONTROLS Parking brake For information on the parking brake, refer to Preparing to start the vehicle in the Starting chapter. 64 PULL Remote luggage compartment control Pull the control located on the left of the driver seat to open the luggage compartment.
Owner's Manual
Page 108
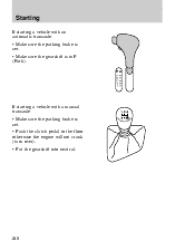
If starting a vehicle with a manual transaxle: • Make sure the parking brake is in P (Park). Starting If starting a vehicle with an automatic transaxle: • Make sure the parking brake is set. • Make sure the gearshift is set. • Push the clutch pedal to the floor otherwise the engine will not crank (turn over). • Put the gearshift into neutral. 108
If starting a vehicle with a manual transaxle: • Make sure the parking brake is in P (Park). Starting If starting a vehicle with an automatic transaxle: • Make sure the parking brake is set. • Make sure the gearshift is set. • Push the clutch pedal to the floor otherwise the engine will not crank (turn over). • Put the gearshift into neutral. 108

Owner's Manual
Page 110
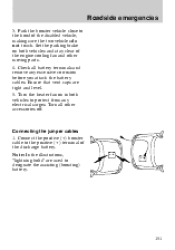
..., wait ten seconds and try again. 3. Vehicles equipped with the accelerator depressed about 1/4 of the way down . DO NOT crank for a few seconds, apply the brake pedal and release the parking brake. 110 Starting STARTING THE ENGINE 1. Turn the key to the start , continue to the on (3) position. 1 2 3 4 2.
..., wait ten seconds and try again. 3. Vehicles equipped with the accelerator depressed about 1/4 of the way down . DO NOT crank for a few seconds, apply the brake pedal and release the parking brake. 110 Starting STARTING THE ENGINE 1. Turn the key to the start , continue to the on (3) position. 1 2 3 4 2.

Owner's Manual
Page 114
Press and hold the release button. 2. Always set the parking brake fully and make sure that the gearshift is securely latched in P (Park) (automatic transaxle) or in 1 (first) (manual transaxle). To prevent personal injury, do not release the parking brake while outside the vehicle. 114 To release the parking brake: 1. Driving Parking brake To engage the parking brake: Pull the handle upward. Push handle downward to the off position.
Press and hold the release button. 2. Always set the parking brake fully and make sure that the gearshift is securely latched in P (Park) (automatic transaxle) or in 1 (first) (manual transaxle). To prevent personal injury, do not release the parking brake while outside the vehicle. 114 To release the parking brake: 1. Driving Parking brake To engage the parking brake: Pull the handle upward. Push handle downward to the off position.

Owner's Manual
Page 118
Apply the parking brake and the brake pedal. 3. Push and hold the thumb button and move the gearshift lever from the P (Park) position. 118 Driving Overriding the brake-shift interlock feature If it is necessary to use this procedure to Fuses and relays in the Roadside emergencies...key. 2. If you cannot move the gearshift. 6. Rotate the screwdriver point rearward. 5. Remove the screwdriver when the gearshift moves from P (Park) with the brake pedal depressed: 1. Refer to move the gearshift lever, it is possible that a fuse has blown and the vehicle's brakelamps may not be...
Apply the parking brake and the brake pedal. 3. Push and hold the thumb button and move the gearshift lever from the P (Park) position. 118 Driving Overriding the brake-shift interlock feature If it is necessary to use this procedure to Fuses and relays in the Roadside emergencies...key. 2. If you cannot move the gearshift. 6. Rotate the screwdriver point rearward. 5. Remove the screwdriver when the gearshift moves from P (Park) with the brake pedal depressed: 1. Refer to move the gearshift lever, it is possible that a fuse has blown and the vehicle's brakelamps may not be...

Owner's Manual
Page 120
... pressing the transaxle control switch (TCS) located on the gearshift handle. The O/D OFF indicator light will roll freely, even on the slightest incline, unless the parking brake or brakes are not locked. The transaxle operates in the instrument cluster. 120 The transaxle control switch (TCS) is located on the gearshift handle.
... pressing the transaxle control switch (TCS) located on the gearshift handle. The O/D OFF indicator light will roll freely, even on the slightest incline, unless the parking brake or brakes are not locked. The transaxle operates in the instrument cluster. 120 The transaxle control switch (TCS) is located on the gearshift handle.

Owner's Manual
Page 125
... shift into neutral. 2. Completely stop your vehicle in the neutral position. Do not park your vehicle. 2. Use 1 (first) gear and set the parking brake. If the following direction is not followed, a grinding noise may move unexpectedly and injure someone. Driving Parking 1. Shift into R (Reverse) gear. 1 2 125 Engage the parking brake. 3. Do not release the clutch pedal. 3.
... shift into neutral. 2. Completely stop your vehicle in the neutral position. Do not park your vehicle. 2. Use 1 (first) gear and set the parking brake. If the following direction is not followed, a grinding noise may move unexpectedly and injure someone. Driving Parking 1. Shift into R (Reverse) gear. 1 2 125 Engage the parking brake. 3. Do not release the clutch pedal. 3.

Owner's Manual
Page 146
...or endangered when changing the tire. The temporary spare tire The vehicle may have a high pressure temporary spare tire. If you use only. Apply the parking brake and engage first or reverse gear if the vehicle has a manual transaxle or, if the vehicle has an automatic transaxle, select the... P (Park) position. Ensure that neither the traffic nor you to lose control of the vehicle, possibly injuring yourself or others. 146 Activate the hazard lights. This...
...or endangered when changing the tire. The temporary spare tire The vehicle may have a high pressure temporary spare tire. If you use only. Apply the parking brake and engage first or reverse gear if the vehicle has a manual transaxle or, if the vehicle has an automatic transaxle, select the... P (Park) position. Ensure that neither the traffic nor you to lose control of the vehicle, possibly injuring yourself or others. 146 Activate the hazard lights. This...

Owner's Manual
Page 148
... of the jack handle between the rim and hub cover and push in. Roadside emergencies Tire changing procedure Removing a tire 1. Apply the parking brake and 1 (first) gear (manual transaxle) or the P (Park) position (automatic transaxle). 2. Insert the tapered end of the ground. The jack must leave the vehicle. 4. Activate the hazard flashers. 3. Unscrew...
... of the jack handle between the rim and hub cover and push in. Roadside emergencies Tire changing procedure Removing a tire 1. Apply the parking brake and 1 (first) gear (manual transaxle) or the P (Park) position (automatic transaxle). 2. Insert the tapered end of the ground. The jack must leave the vehicle. 4. Activate the hazard flashers. 3. Unscrew...
Owner's Manual
Page 151
Park the booster vehicle close to the positive (+) terminal of the discharge battery. Check all other moving parts. 4. Connect the positive (+) booster cable to the hood ... the illustrations, "lightning bolts" are tight and level. 5. Turn all battery terminals and remove any electrical surges. Connecting the jumper cables 1. Roadside emergencies 3. Set the parking brake on in both vehicles and stay clear of the disabled vehicle, making sure the two vehicles do not touch. Ensure that vent caps are used...
Park the booster vehicle close to the positive (+) terminal of the discharge battery. Check all other moving parts. 4. Connect the positive (+) booster cable to the hood ... the illustrations, "lightning bolts" are tight and level. 5. Turn all battery terminals and remove any electrical surges. Connecting the jumper cables 1. Roadside emergencies 3. Set the parking brake on in both vehicles and stay clear of the disabled vehicle, making sure the two vehicles do not touch. Ensure that vent caps are used...
Owner's Manual
Page 157
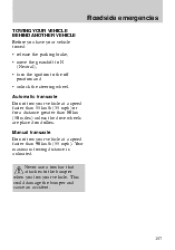
Roadside emergencies TOWING YOUR VEHICLE BEHIND ANOTHER VEHICLE Before you have your vehicle towed: • release the parking brake, • move the gearshift to N (Neutral), • turn the ignition to the bumper when you tow your vehicle. Automatic transaxle Do not tow your vehicle ...
Roadside emergencies TOWING YOUR VEHICLE BEHIND ANOTHER VEHICLE Before you have your vehicle towed: • release the parking brake, • move the gearshift to N (Neutral), • turn the ignition to the bumper when you tow your vehicle. Automatic transaxle Do not tow your vehicle ...

Owner's Manual
Page 160
Block the wheels to prevent the vehicle from moving unexpectedly. 160 Maintenance and care Working with engine off the engine and remove the key. 3. Block the wheels to prevent the vehicle from moving unexpectedly. Set the parking brake, depress the clutch and place the gearshift in P (Park). 2. Turn off (automatic transaxle) 1. Working with engine off the engine and remove the key. 3. Turn off (manual transaxle) 1. Set the parking brake fully and ensure the gearshift is securely latched in 1 (first) or R (Reverse). 2.
Block the wheels to prevent the vehicle from moving unexpectedly. 160 Maintenance and care Working with engine off the engine and remove the key. 3. Block the wheels to prevent the vehicle from moving unexpectedly. Set the parking brake, depress the clutch and place the gearshift in P (Park). 2. Turn off (automatic transaxle) 1. Working with engine off the engine and remove the key. 3. Turn off (manual transaxle) 1. Set the parking brake fully and ensure the gearshift is securely latched in 1 (first) or R (Reverse). 2.

Owner's Manual
Page 161
Set the parking brake, depress the clutch and place the gearshift in P (Park). 2. Block the wheels to prevent the vehicle from moving unexpectedly. Working with the air cleaner removed and do not remove it while the engine is securely latched in neutral. 2. Set the parking brake fully and ensure the gearshift is running. Block the wheels to prevent the vehicle from moving unexpectedly. 161 Do not start your engine with engine on (automatic transaxle) 1. Maintenance and care Working with engine on (manual transaxle) 1.
Set the parking brake, depress the clutch and place the gearshift in P (Park). 2. Block the wheels to prevent the vehicle from moving unexpectedly. Working with the air cleaner removed and do not remove it while the engine is securely latched in neutral. 2. Set the parking brake fully and ensure the gearshift is running. Block the wheels to prevent the vehicle from moving unexpectedly. 161 Do not start your engine with engine on (automatic transaxle) 1. Maintenance and care Working with engine on (manual transaxle) 1.
Owner's Manual
Page 165
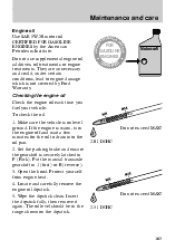
... oil each time you fuel your vehicle. If the engine is not covered by the American Petroleum Institute. To check the oil: 1. Set the parking brake and ensure the gearshift is on the dipstick. Protect yourself from engine heat. 4. Insert the dipstick fully, then remove it again. They are unnecessary...in 1 (first) or R (reverse). 3. Open the hood. Maintenance and care Engine oil Use SAE 5W-30 motor oil CERTIFIED FOR GASOLINE ENGINES by Ford Warranty. The oil level should be in the range shown on level ground. Wipe the dipstick clean. Do not exceed MAX! 2.5 l DOHC ADD FULL ROLEUM...
... oil each time you fuel your vehicle. If the engine is not covered by the American Petroleum Institute. To check the oil: 1. Set the parking brake and ensure the gearshift is on the dipstick. Protect yourself from engine heat. 4. Insert the dipstick fully, then remove it again. They are unnecessary...in 1 (first) or R (reverse). 3. Open the hood. Maintenance and care Engine oil Use SAE 5W-30 motor oil CERTIFIED FOR GASOLINE ENGINES by Ford Warranty. The oil level should be in the range shown on level ground. Wipe the dipstick clean. Do not exceed MAX! 2.5 l DOHC ADD FULL ROLEUM...
Owner's Manual
Page 175
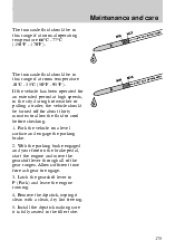
... be in this range if at room temperature 10°C - 35°C (50°F - 95°F). With the parking brake engaged and your foot on a level surface and engage the parking brake. 2. Maintenance and care The transaxle fluid should be in this range if at normal operating temperature 66°C - 77°...it is fully seated in the filler tube. 175 Allow sufficient time for about thirty minutes to allow the fluid to engage. 3. Park the vehicle on the brake pedal, start the engine and move the gearshift lever through all of the gear ranges. If the vehicle has been operated for an...
... be in this range if at room temperature 10°C - 35°C (50°F - 95°F). With the parking brake engaged and your foot on a level surface and engage the parking brake. 2. Maintenance and care The transaxle fluid should be in this range if at normal operating temperature 66°C - 77°...it is fully seated in the filler tube. 175 Allow sufficient time for about thirty minutes to allow the fluid to engage. 3. Park the vehicle on the brake pedal, start the engine and move the gearshift lever through all of the gear ranges. If the vehicle has been operated for an...
Owner's Manual
Page 237
... heavy load ...129 towing a trailer ...130 E Electrical system fuses ...139 Emergencies, roadside fuel pump shut-off switch ...137 jump starting ...150 towing ...156 Emergency brake (see Parking brake) Emission control system ...196 Engine check engine warning light ...10 fuel pump shut-off switch ...137 lubricant specifications ...219 preparing to start ...107 refill capacities...
... heavy load ...129 towing a trailer ...130 E Electrical system fuses ...139 Emergencies, roadside fuel pump shut-off switch ...137 jump starting ...150 towing ...156 Emergency brake (see Parking brake) Emission control system ...196 Engine check engine warning light ...10 fuel pump shut-off switch ...137 lubricant specifications ...219 preparing to start ...107 refill capacities...
Owner's Manual
Page 240
... filter ...165, 217 On-board diagnostic (OBD II) system ...198 Overdrive ...9, 120 Overhead controls ...61 P Panel dimmer control ...22 Panic alarm, remote entry sytem 67 Parking brake ...114 Parts (see Motorcraft parts) ...217 Passenger compartment air filter (see Cabin air filter) . .181 Passive Anti-Theft System (PATS) ...69 240 P Page Power distribution...
... filter ...165, 217 On-board diagnostic (OBD II) system ...198 Overdrive ...9, 120 Overhead controls ...61 P Panel dimmer control ...22 Panic alarm, remote entry sytem 67 Parking brake ...114 Parts (see Motorcraft parts) ...217 Passenger compartment air filter (see Cabin air filter) . .181 Passive Anti-Theft System (PATS) ...69 240 P Page Power distribution...
Scheduled Maintenance Guide 3rd Printing
Page 9
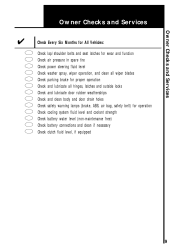
... for wear and function air pressure in spare tire power steering fluid level washer spray, wiper operation, and clean all wiper blades parking brake for proper operation and lubricate all hinges, latches and outside locks and lubricate door rubber weatherstrips and clean body and door drain holes... safety warning lamps (brake, ABS, air bag, safety belt) for operation cooling system fluid level and coolant strength battery water level (non-maintenance free) battery ...
... for wear and function air pressure in spare tire power steering fluid level washer spray, wiper operation, and clean all wiper blades parking brake for proper operation and lubricate all hinges, latches and outside locks and lubricate door rubber weatherstrips and clean body and door drain holes... safety warning lamps (brake, ABS, air bag, safety belt) for operation cooling system fluid level and coolant strength battery water level (non-maintenance free) battery ...
Scheduled Maintenance Guide 3rd Printing
Page 12
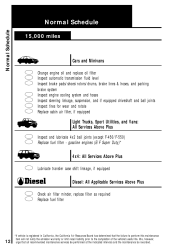
... Schedule Normal Schedule 15,000 miles Cars and Minivans Change engine oil and replace oil filter Inspect automatic transmission fluid level Inspect brake pads/shoes/rotors/drums, brake lines & hoses, and parking brake system Inspect engine cooling system and hoses Inspect steering linkage, suspension, and if equipped driveshaft and ball joints Inspect tires for...
... Schedule Normal Schedule 15,000 miles Cars and Minivans Change engine oil and replace oil filter Inspect automatic transmission fluid level Inspect brake pads/shoes/rotors/drums, brake lines & hoses, and parking brake system Inspect engine cooling system and hoses Inspect steering linkage, suspension, and if equipped driveshaft and ball joints Inspect tires for...


