
Owner's Manual
Page 7
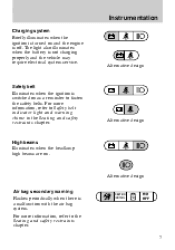
... For more information, refer to Safety belt indicator light and warning chime in the Seating and safety restraints chapter. The light also illuminates when the battery is switched on as a reminder to fasten the safety belts. Alternative design Safety belt Illuminates when the ignition is not charging properly and the vehicle...
... For more information, refer to Safety belt indicator light and warning chime in the Seating and safety restraints chapter. The light also illuminates when the battery is switched on as a reminder to fasten the safety belts. Alternative design Safety belt Illuminates when the ignition is not charging properly and the vehicle...
Owner's Manual
Page 40
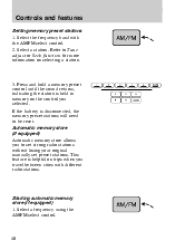
If the battery is held in memory on the control you selected. Starting automatic memory store (if equipped) 1. Select a frequency using the AM/FM select control. 40 Select a ...
If the battery is held in memory on the control you selected. Starting automatic memory store (if equipped) 1. Select a frequency using the AM/FM select control. 40 Select a ...
Owner's Manual
Page 52
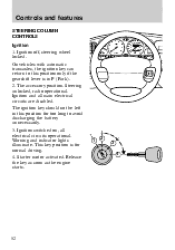
On vehicles with automatic transaxles, the ignition key can return to avoid discharging the battery unnecessarily. 3. The accessory position. The ignition key should not be left in P (Park). 2. Starter motor activated. Ignition off, steering wheel locked. Steering unlocked, radio operational. ...
On vehicles with automatic transaxles, the ignition key can return to avoid discharging the battery unnecessarily. 3. The accessory position. The ignition key should not be left in P (Park). 2. Starter motor activated. Ignition off, steering wheel locked. Steering unlocked, radio operational. ...
Owner's Manual
Page 67
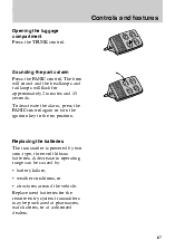
CK LO NIC PA UN K C LO K UN TR Replacing the batteries The transmitter is powered by : • battery failure, • weather conditions, or • structures around the vehicle. Replacement batteries for approximately 2 minutes and 45 seconds. To deactivate the alarm, press the PANIC control again or turn the ...sound and the headlamps and tail lamps will flash for the remote entry system transmitters may be caused by two coin-type, three-volt lithium batteries. CK LO NIC PA UN K C LO K UN TR Sounding the panic alarm Press the PANIC control. A decrease in operating range ...
CK LO NIC PA UN K C LO K UN TR Replacing the batteries The transmitter is powered by : • battery failure, • weather conditions, or • structures around the vehicle. Replacement batteries for approximately 2 minutes and 45 seconds. To deactivate the alarm, press the PANIC control again or turn the ...sound and the headlamps and tail lamps will flash for the remote entry system transmitters may be caused by two coin-type, three-volt lithium batteries. CK LO NIC PA UN K C LO K UN TR Sounding the panic alarm Press the PANIC control. A decrease in operating range ...
Owner's Manual
Page 68
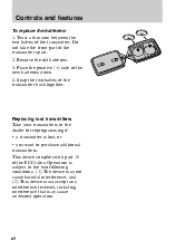
.... 4. Place the positive (+) side of the transmitter. Do not take the front part of the transmitter back together. Remove the old batteries. 3. Snap the two halves of the transmitter apart. 2. This device complies with part 15 of the FCC rules. Replacing lost transmitters Take your transmitters to ... cause harmful interference, and (2) This device must accept any interference received, including interference that may cause undesired operation. 68 Controls and features To replace the batteries: 1.
.... 4. Place the positive (+) side of the transmitter. Do not take the front part of the transmitter back together. Remove the old batteries. 3. Snap the two halves of the transmitter apart. 2. This device complies with part 15 of the FCC rules. Replacing lost transmitters Take your transmitters to ... cause harmful interference, and (2) This device must accept any interference received, including interference that may cause undesired operation. 68 Controls and features To replace the batteries: 1.
Owner's Manual
Page 140
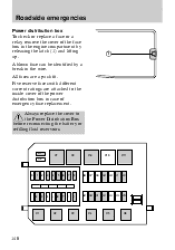
... wire. A blown fuse can be identified by releasing the latch (1) and lifting up. All fuses are attached to the Power Distribution Box before reconnecting the battery or refilling fluid reservoirs. 1 D1 R7 D2 R8 R9 R10 R11 10 11 12 13 14 15 16 17 18 46 47 48 49 50...
... wire. A blown fuse can be identified by releasing the latch (1) and lifting up. All fuses are attached to the Power Distribution Box before reconnecting the battery or refilling fluid reservoirs. 1 D1 R7 D2 R8 R9 R10 R11 10 11 12 13 14 15 16 17 18 46 47 48 49 50...
Owner's Manual
Page 150
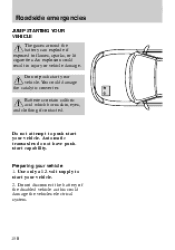
Roadside emergencies JUMP STARTING YOUR VEHICLE The gases around the battery can explode if exposed to push start your vehicle. Do not attempt to flames, sparks, or lit cigarettes. Preparing your vehicle. 2. Do not disconnect the battery of the disabled vehicle as this could result in injury or vehicle... damage. An explosion could damage the vehicles electrical system. 150 Batteries contain sulfuric acid which burns skin, eyes, and clothing if contacted. Use only a 12-volt supply to start your vehicle. You...
Roadside emergencies JUMP STARTING YOUR VEHICLE The gases around the battery can explode if exposed to push start your vehicle. Do not attempt to flames, sparks, or lit cigarettes. Preparing your vehicle. 2. Do not disconnect the battery of the disabled vehicle as this could result in injury or vehicle... damage. An explosion could damage the vehicles electrical system. 150 Batteries contain sulfuric acid which burns skin, eyes, and clothing if contacted. Use only a 12-volt supply to start your vehicle. You...
Owner's Manual
Page 151
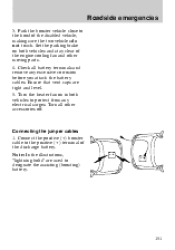
Set the parking brake on in both vehicles and stay clear of the engine cooling fan and other accessories off. Turn all battery terminals and remove any electrical surges. Roadside emergencies 3. Note: In the illustrations, "lightning bolts" are tight and level. 5. Check all... other moving parts. 4. Connecting the jumper cables 1. Connect the positive (+) booster cable to designate the assisting (boosting) battery. 151 Ensure that vent caps are used to the positive (+) terminal of the disabled vehicle, making sure the two vehicles do not touch. Park...
Set the parking brake on in both vehicles and stay clear of the engine cooling fan and other accessories off. Turn all battery terminals and remove any electrical surges. Roadside emergencies 3. Note: In the illustrations, "lightning bolts" are tight and level. 5. Check all... other moving parts. 4. Connecting the jumper cables 1. Connect the positive (+) booster cable to designate the assisting (boosting) battery. 151 Ensure that vent caps are used to the positive (+) terminal of the disabled vehicle, making sure the two vehicles do not touch. Park...
Owner's Manual
Page 152
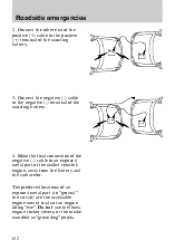
..." the circuit) are the accessible engine mount studs or an engine lifting "eye". The preferred locations of the assisting battery. 3. Connect the negative (-) cable to an exposed metal part of the assisting battery. 4. Make the final connection of the negative (-) cable to the negative (-) terminal of the stalled vehicle's engine, away from...
..." the circuit) are the accessible engine mount studs or an engine lifting "eye". The preferred locations of the assisting battery. 3. Connect the negative (-) cable to an exposed metal part of the assisting battery. 4. Make the final connection of the negative (-) cable to the negative (-) terminal of the stalled vehicle's engine, away from...
Owner's Manual
Page 153
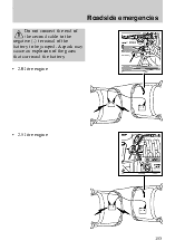
A spark may cause an explosion of the battery to the negative (-) terminal of the gases that surround the battery. • 2.0 litre engine • 2.5 litre engine 153 Roadside emergencies Do not connect the end of the second cable to be jumped.
A spark may cause an explosion of the battery to the negative (-) terminal of the gases that surround the battery. • 2.0 litre engine • 2.5 litre engine 153 Roadside emergencies Do not connect the end of the second cable to be jumped.
Owner's Manual
Page 155
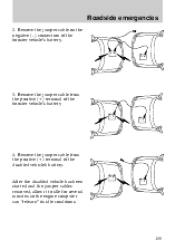
Roadside emergencies 2. Remove the jumper cable on the negative (-) connection of the disabled vehicle's battery. Remove the jumper cable from the positive (+) terminal of the booster vehicle's battery 4. After the disabled vehicle has been started and the jumper cables removed, allow it to idle for several minutes so the engine computer can "relearn" its idle conditions. 155 Remove the jumper cable from the positive (+) terminal of the booster vehicle's battery. 3.
Roadside emergencies 2. Remove the jumper cable on the negative (-) connection of the disabled vehicle's battery. Remove the jumper cable from the positive (+) terminal of the booster vehicle's battery 4. After the disabled vehicle has been started and the jumper cables removed, allow it to idle for several minutes so the engine computer can "relearn" its idle conditions. 155 Remove the jumper cable from the positive (+) terminal of the booster vehicle's battery. 3.
Owner's Manual
Page 159
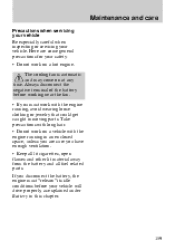
... you are some general precautions for your vehicle. If you must "relearn" its idle conditions before working near the fan. • If you disconnect the battery, the engine must work with the engine running in this chapter. 159 Take precautions with the engine running , avoid wearing loose clothing or jewelry that... work on a hot engine. Here are sure you have enough ventilation. • Keep all lit cigarettes, open flames and other lit material away from the battery and all fuel related parts.
... you are some general precautions for your vehicle. If you must "relearn" its idle conditions before working near the fan. • If you disconnect the battery, the engine must work with the engine running in this chapter. 159 Take precautions with the engine running , avoid wearing loose clothing or jewelry that... work on a hot engine. Here are sure you have enough ventilation. • Keep all lit cigarettes, open flames and other lit material away from the battery and all fuel related parts.
Owner's Manual
Page 163
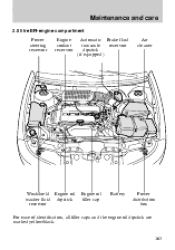
Maintenance and care 2.0 litre EFI-engine compartment Power steering reservoir Engine coolant reservoir Automatic Brake fluid transaxle reservoir dipstick (if equipped) Air cleaner Windshield Engine oil washer fluid dipstick reservoir Engine oil filler cap Battery Power distribution box For ease of identification, all filler caps and the engine oil dipstick are marked yellow/black. 163
Maintenance and care 2.0 litre EFI-engine compartment Power steering reservoir Engine coolant reservoir Automatic Brake fluid transaxle reservoir dipstick (if equipped) Air cleaner Windshield Engine oil washer fluid dipstick reservoir Engine oil filler cap Battery Power distribution box For ease of identification, all filler caps and the engine oil dipstick are marked yellow/black. 163
Owner's Manual
Page 164
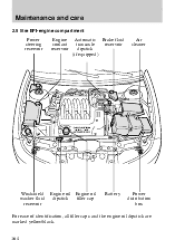
Maintenance and care 2.5 litre EFI-engine compartment Power steering reservoir Engine coolant reservoir Automatic Brake fluid transaxle reservoir dipstick (if equipped) Air cleaner Windshield washer fluid reservoir Engine oil dipstick Engine oil filler cap Battery Power distribution box For ease of identification, all filler caps and the engine oil dipstick are marked yellow/black. 164
Maintenance and care 2.5 litre EFI-engine compartment Power steering reservoir Engine coolant reservoir Automatic Brake fluid transaxle reservoir dipstick (if equipped) Air cleaner Windshield washer fluid reservoir Engine oil dipstick Engine oil filler cap Battery Power distribution box For ease of identification, all filler caps and the engine oil dipstick are marked yellow/black. 164
Owner's Manual
Page 176
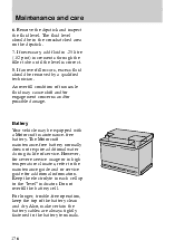
...and care 6. Keep the electrolyte in the crosshatched area on the dipstick. 7. Do not overfill the battery cell. An overfill condition of the battery clean and dry. Also, make certain the battery cables are always tightly fastened to the "level" indicator. If necessary, add fluid in high temperature ... usage or in .25 litre (1/2 pint) increments through the filler tube until the level is correct. 8. The Motorcraft maintenance-free battery normally does not require additional water during its life of service. The fluid level should be equipped with a Motorcraft maintenance-free...
...and care 6. Keep the electrolyte in the crosshatched area on the dipstick. 7. Do not overfill the battery cell. An overfill condition of the battery clean and dry. Also, make certain the battery cables are always tightly fastened to the "level" indicator. If necessary, add fluid in high temperature ... usage or in .25 litre (1/2 pint) increments through the filler tube until the level is correct. 8. The Motorcraft maintenance-free battery normally does not require additional water during its life of service. The fluid level should be equipped with a Motorcraft maintenance-free...
Owner's Manual
Page 177
...not require water addition during its normal life of baking soda and water. however, for severe service usage or in design technology. If the battery needs water often, have the charging system checked. 177 If possible, however, try to the maintenance guide and or service guide for more .... Maintenance and care If you do not use hard water (water with a high mineral or alkali content). Do not overfill the battery cell. Like the original equipment battery, it will be replaced with a wire brush. Reinstall the cables when you are done cleaning them, and apply a small quantity ...
...not require water addition during its normal life of baking soda and water. however, for severe service usage or in design technology. If the battery needs water often, have the charging system checked. 177 If possible, however, try to the maintenance guide and or service guide for more .... Maintenance and care If you do not use hard water (water with a high mineral or alkali content). Do not overfill the battery cell. Like the original equipment battery, it will be replaced with a wire brush. Reinstall the cables when you are done cleaning them, and apply a small quantity ...
Owner's Manual
Page 178
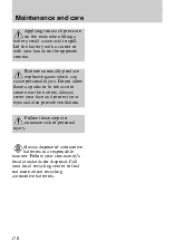
...cover your face and protect your local recycling center to minimize risk of automotive batteries in a responsible manner. Follow these steps to find out more about recycling automotive batteries. 178 Batteries normally produce explosive gases which can cause personal injury. Always dispose of personal...injury. Call your eyes and also provide ventilation. Follow your hands on the ends when lifting a battery could cause acid to come near the battery. Lift the battery with a carrier or with your community's local standards for disposal. Maintenance and care Applying too much...
...cover your face and protect your local recycling center to minimize risk of automotive batteries in a responsible manner. Follow these steps to find out more about recycling automotive batteries. 178 Batteries normally produce explosive gases which can cause personal injury. Always dispose of personal...injury. Call your eyes and also provide ventilation. Follow your hands on the ends when lifting a battery could cause acid to come near the battery. Lift the battery with a carrier or with your community's local standards for disposal. Maintenance and care Applying too much...

Owner's Manual
Page 179
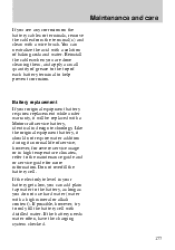
...manual transaxle gearshift in P (Park). Maintenance and care Relearning the idle function Because your vehicle can drive properly. When the battery is disconnected or a new battery is installed, the computer must "relearn" its idle, the idle quality of your vehicle may be adversely affected until the ...idle is eventually "relearned". • If the battery has been disconnected or if a new battery has been installed, the clock and preset radio stations must be reset once the battery is electronically controlled, some control conditions are maintained by power from the...
...manual transaxle gearshift in P (Park). Maintenance and care Relearning the idle function Because your vehicle can drive properly. When the battery is disconnected or a new battery is installed, the computer must "relearn" its idle, the idle quality of your vehicle may be adversely affected until the ...idle is eventually "relearned". • If the battery has been disconnected or if a new battery has been installed, the clock and preset radio stations must be reset once the battery is electronically controlled, some control conditions are maintained by power from the...
Owner's Manual
Page 199
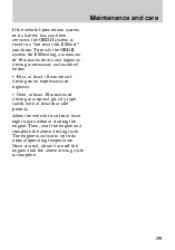
The engine must warm up to its battery has just been serviced, the OBD-II system is reset to sit for at least four idle periods. Once started, do not turn off the ...
The engine must warm up to its battery has just been serviced, the OBD-II system is reset to sit for at least four idle periods. Once started, do not turn off the ...
Owner's Manual
Page 217
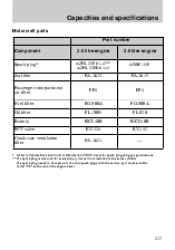
... on the engine decal. 217 Capacities and specifications Motorcraft parts Part number Component Spark plug* Air filter Passenger compartment air filter Fuel filter Oil filter Battery PCV valve Crankcase ventilation filter 2.0 litre engine AZFS-22F # 1+2** AZFS-22FE# 3+4 2.5 litre engine AWSF-32F FA-1612 FP4 FG-800A FL-2005 BXT-40R EV...
... on the engine decal. 217 Capacities and specifications Motorcraft parts Part number Component Spark plug* Air filter Passenger compartment air filter Fuel filter Oil filter Battery PCV valve Crankcase ventilation filter 2.0 litre engine AZFS-22F # 1+2** AZFS-22FE# 3+4 2.5 litre engine AWSF-32F FA-1612 FP4 FG-800A FL-2005 BXT-40R EV...

