
Owner's Manual
Page 65
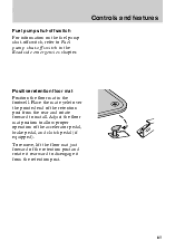
... mat Position the floor mat in the Roadside emergencies chapter. To remove, lift the floor mat just forward of the accelerator pedal, brake pedal, and clutch pedal (if equipped). Adjust the floor mat position to allow proper operation of the retention post and rotate it rearward to disengage it from the...
... mat Position the floor mat in the Roadside emergencies chapter. To remove, lift the floor mat just forward of the accelerator pedal, brake pedal, and clutch pedal (if equipped). Adjust the floor mat position to allow proper operation of the retention post and rotate it rearward to disengage it from the...
Owner's Manual
Page 108
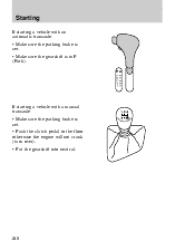
If starting a vehicle with a manual transaxle: • Make sure the parking brake is in P (Park). Starting If starting a vehicle with an automatic transaxle: • Make sure the parking brake is set. • Make sure the gearshift is set. • Push the clutch pedal to the floor otherwise the engine will not crank (turn over). • Put the gearshift into neutral. 108
If starting a vehicle with a manual transaxle: • Make sure the parking brake is in P (Park). Starting If starting a vehicle with an automatic transaxle: • Make sure the parking brake is set. • Make sure the gearshift is set. • Push the clutch pedal to the floor otherwise the engine will not crank (turn over). • Put the gearshift into neutral. 108

Owner's Manual
Page 113
... obstacle. Two important rules when braking in driving too close to avoid obstacles. • We recommend that you must also depress the clutch pedal. Apply full force on the road surface and conditions. In vehicles with ABS: 1. No matter how hard you , hydroplaning, excessive...taking any unnecessary risks. • Although the ABS ensures optimum braking efficiency, stopping distances can vary greatly, depending on both brake and clutch pedal (if equipped). 2. Driving Braking with this braking technique. The anti-lock braking system will enable you to the vehicle in front...
... obstacle. Two important rules when braking in driving too close to avoid obstacles. • We recommend that you must also depress the clutch pedal. Apply full force on the road surface and conditions. In vehicles with ABS: 1. No matter how hard you , hydroplaning, excessive...taking any unnecessary risks. • Although the ABS ensures optimum braking efficiency, stopping distances can vary greatly, depending on both brake and clutch pedal (if equipped). 2. Driving Braking with this braking technique. The anti-lock braking system will enable you to the vehicle in front...

Owner's Manual
Page 123
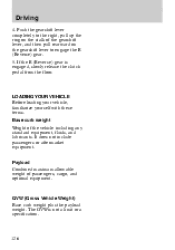
...Hold down on the accelerator pedal. Put the gearshift in neutral. 4. Do not use the clutch to hold your foot resting on a hill. These actions may reduce the clutch life. 123 Depress the clutch pedal. 3. Put the gearshift lever in 1 (First) or R (Reverse). 6. Start... the vehicle. 5. Do not drive with your vehicle at a standstill while waiting on the clutch pedal. Release the clutch slowly while pressing gradually down the...
...Hold down on the accelerator pedal. Put the gearshift in neutral. 4. Do not use the clutch to hold your foot resting on a hill. These actions may reduce the clutch life. 123 Depress the clutch pedal. 3. Put the gearshift lever in 1 (First) or R (Reverse). 6. Start... the vehicle. 5. Do not drive with your vehicle at a standstill while waiting on the clutch pedal. Release the clutch slowly while pressing gradually down the...

Owner's Manual
Page 125
Depress the clutch pedal to shift into neutral. 2. Engage the parking brake. 3. Use 1 (first) gear and set the parking brake. Turn the ignition off. Completely stop your vehicle ... seconds before attempting to the floor and place the gearshift lever in Neutral, it may occur. Do not park your vehicle. 2. Do not release the clutch pedal. 3. Shift into R (Reverse): 1. Apply the brake and the clutch and shift into R (Reverse) gear. 1 2 125 Driving Parking 1.
Depress the clutch pedal to shift into neutral. 2. Engage the parking brake. 3. Use 1 (first) gear and set the parking brake. Turn the ignition off. Completely stop your vehicle ... seconds before attempting to the floor and place the gearshift lever in Neutral, it may occur. Do not park your vehicle. 2. Do not release the clutch pedal. 3. Shift into R (Reverse): 1. Apply the brake and the clutch and shift into R (Reverse) gear. 1 2 125 Driving Parking 1.
Owner's Manual
Page 126
If the R (Reverse) gear is not a limit or a specification. 126 The GVW is engaged, slowly release the clutch pedal from the floor. Payload Combined maximum allowable weight of the gearshift lever, and then pull rearward on the gearshift lever to the right, pull ...
If the R (Reverse) gear is not a limit or a specification. 126 The GVW is engaged, slowly release the clutch pedal from the floor. Payload Combined maximum allowable weight of the gearshift lever, and then pull rearward on the gearshift lever to the right, pull ...

Owner's Manual
Page 160
Set the parking brake fully and ensure the gearshift is securely latched in 1 (first) or R (Reverse). 2. Block the wheels to prevent the vehicle from moving unexpectedly. 160 Working with engine off the engine and remove the key. 3. Set the parking brake, depress the clutch and place the gearshift in P (Park). 2. Turn off (manual transaxle) 1. Turn off (automatic transaxle) 1. Block the wheels to prevent the vehicle from moving unexpectedly. Maintenance and care Working with engine off the engine and remove the key. 3.
Set the parking brake fully and ensure the gearshift is securely latched in 1 (first) or R (Reverse). 2. Block the wheels to prevent the vehicle from moving unexpectedly. 160 Working with engine off the engine and remove the key. 3. Set the parking brake, depress the clutch and place the gearshift in P (Park). 2. Turn off (manual transaxle) 1. Turn off (automatic transaxle) 1. Block the wheels to prevent the vehicle from moving unexpectedly. Maintenance and care Working with engine off the engine and remove the key. 3.

Owner's Manual
Page 161
Working with engine on (manual transaxle) 1. Set the parking brake, depress the clutch and place the gearshift in P (Park). 2. Set the parking brake fully and ensure the gearshift is running. Block the wheels to prevent the vehicle from moving unexpectedly. Do not start your engine with the air cleaner removed and do not remove it while the engine is securely latched in neutral. 2. Block the wheels to prevent the vehicle from moving unexpectedly. 161 Maintenance and care Working with engine on (automatic transaxle) 1.
Working with engine on (manual transaxle) 1. Set the parking brake, depress the clutch and place the gearshift in P (Park). 2. Set the parking brake fully and ensure the gearshift is running. Block the wheels to prevent the vehicle from moving unexpectedly. Do not start your engine with the air cleaner removed and do not remove it while the engine is securely latched in neutral. 2. Block the wheels to prevent the vehicle from moving unexpectedly. 161 Maintenance and care Working with engine on (automatic transaxle) 1.
Owner's Manual
Page 168
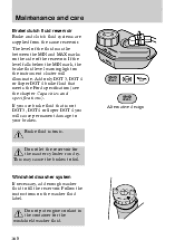
... will cause permanent damage to fill the reservoir. Brake fluid is not DOT 3, DOT 4 or Super DOT 4 you use brake fluid that meets the Ford specification (see the chapter Capacities and specifications). Windshield washer system If necessary, add enough washer fluid to your brakes. Do not put engine coolant in... the container for the master cylinder run dry. Add only DOT 3, DOT 4 or Super DOT 4 brake fluid that is toxic. Maintenance and care Brake/clutch fluid reservoir Brake and clutch fluid systems are supplied from the same reservoir. This may cause the brakes to fail.
... will cause permanent damage to fill the reservoir. Brake fluid is not DOT 3, DOT 4 or Super DOT 4 you use brake fluid that meets the Ford specification (see the chapter Capacities and specifications). Windshield washer system If necessary, add enough washer fluid to your brakes. Do not put engine coolant in... the container for the master cylinder run dry. Add only DOT 3, DOT 4 or Super DOT 4 brake fluid that is toxic. Maintenance and care Brake/clutch fluid reservoir Brake and clutch fluid systems are supplied from the same reservoir. This may cause the brakes to fail.
Owner's Manual
Page 237
... safety belts ...216 wheels ...212 wiper blades ...214 Climate control system air conditioning ...27 controlling airflow ...24 defrosting ...30 temperature ...25 vents ...24 Clock ...43 Clutch operation ...123 recommended shift speeds ...124 Cold engine starting ...110 Controls instrument panel ...18 power seats ...73 steering column ...53 Customer assistance ...223 D Page Daytime...
... safety belts ...216 wheels ...212 wiper blades ...214 Climate control system air conditioning ...27 controlling airflow ...24 defrosting ...30 temperature ...25 vents ...24 Clock ...43 Clutch operation ...123 recommended shift speeds ...124 Cold engine starting ...110 Controls instrument panel ...18 power seats ...73 steering column ...53 Customer assistance ...223 D Page Daytime...
Owner's Manual
Page 240
Index M Page Maintenance (see Servicing) Manual transaxle backing up (reverse) ...125 clutch ...123 fluid, capacity ...218 shift speeds ...124 Mileage, calculating fuel economy ...195 Mirrors side view mirrors (power) ...23 Motorcraft parts ...217 N National Highway Traffic Safety ...
Index M Page Maintenance (see Servicing) Manual transaxle backing up (reverse) ...125 clutch ...123 fluid, capacity ...218 shift speeds ...124 Mileage, calculating fuel economy ...195 Mirrors side view mirrors (power) ...23 Motorcraft parts ...217 N National Highway Traffic Safety ...
Scheduled Maintenance Guide 3rd Printing
Page 9
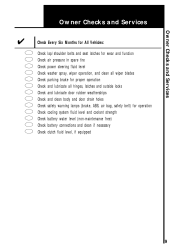
..., air bag, safety belt) for operation cooling system fluid level and coolant strength battery water level (non-maintenance free) battery connections and clean if necessary clutch fluid level, if equipped 9
..., air bag, safety belt) for operation cooling system fluid level and coolant strength battery water level (non-maintenance free) battery connections and clean if necessary clutch fluid level, if equipped 9
Warranty Guide 5th Printing
Page 13
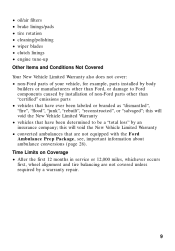
...first 12 months in service or 12,000 miles, whichever occurs first, wheel alignment and tire balancing are not equipped with the Ford Ambulance Prep Package, see, important information about ambulance conversions (page 28). oil/air filters brake linings/pads tire rotation cleaning/polishing wiper ...blades clutch linings engine tune-up Other Items and Conditions Not Covered Your New Vehicle Limited Warranty also does not cover: • non-Ford parts of non-Ford parts other than Ford, or damage to be a "total loss" by an ...
...first 12 months in service or 12,000 miles, whichever occurs first, wheel alignment and tire balancing are not equipped with the Ford Ambulance Prep Package, see, important information about ambulance conversions (page 28). oil/air filters brake linings/pads tire rotation cleaning/polishing wiper ...blades clutch linings engine tune-up Other Items and Conditions Not Covered Your New Vehicle Limited Warranty also does not cover: • non-Ford parts of non-Ford parts other than Ford, or damage to be a "total loss" by an ...


