
Owner Guide 1st Printing
Page 4
P BRAKE P R N D 2 1 ABS Trunk release (pg. 40) Parking brake release (pg. 92) Driver side air bag (pg. 67) Turn signal and wiper/washer control (pg. 33) Speed control* (pg. 29) *if equipped 4 Instrumentation Headlamp control (pg. 16) Instrument cluster (pg. 6) F H FUEL DOOR> 40 30 60 70 50 0 0 0 0 80 100 60 - + 3 90 2 1 0 O/D OFF 4 RPMx1000 5 6 7 20 E SERVICE ENGINE SOON LOW COOLANT THEFT 0 00000 20 140 100 180 C 10 110 120 PREMIUM UNLEADED FUEL RECOMMENDED REAR LAMP OUT MPH km/h 8 CRUISE !
P BRAKE P R N D 2 1 ABS Trunk release (pg. 40) Parking brake release (pg. 92) Driver side air bag (pg. 67) Turn signal and wiper/washer control (pg. 33) Speed control* (pg. 29) *if equipped 4 Instrumentation Headlamp control (pg. 16) Instrument cluster (pg. 6) F H FUEL DOOR> 40 30 60 70 50 0 0 0 0 80 100 60 - + 3 90 2 1 0 O/D OFF 4 RPMx1000 5 6 7 20 E SERVICE ENGINE SOON LOW COOLANT THEFT 0 00000 20 140 100 180 C 10 110 120 PREMIUM UNLEADED FUEL RECOMMENDED REAR LAMP OUT MPH km/h 8 CRUISE !

Owner Guide 1st Printing
Page 6
... 120 PREMIUM UNLEADED FUEL RECOMMENDED MPH km/h 8 CRUISE ! Refer to Exterior bulbs in the Maintenance and care chapter. High beams Illuminates when the high beam headlamps are turned on . 6 If one or both of the indicators stay on continuously or flash faster, check for a burned-out turn signal or the hazard...
... 120 PREMIUM UNLEADED FUEL RECOMMENDED MPH km/h 8 CRUISE ! Refer to Exterior bulbs in the Maintenance and care chapter. High beams Illuminates when the high beam headlamps are turned on . 6 If one or both of the indicators stay on continuously or flash faster, check for a burned-out turn signal or the hazard...

Owner Guide 1st Printing
Page 12
... 5 6 7 20 E SERVICE ENGINE SOON LOW COOLANT THEFT 0 00000 20 140 100 180 C 10 110 120 PREMIUM UNLEADED FUEL RECOMMENDED MPH km/h 8 CRUISE ! Headlamps on warning chime Sounds when the headlamps or parking lamps are on, the ignition is off (and the key is not in the OFF/LOCK or ACC position and...
... 5 6 7 20 E SERVICE ENGINE SOON LOW COOLANT THEFT 0 00000 20 140 100 180 C 10 110 120 PREMIUM UNLEADED FUEL RECOMMENDED MPH km/h 8 CRUISE ! Headlamps on warning chime Sounds when the headlamps or parking lamps are on, the ignition is off (and the key is not in the OFF/LOCK or ACC position and...
Owner Guide 1st Printing
Page 16
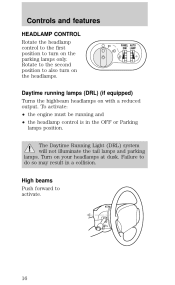
... may result in the OFF or Parking lamps position. To activate: • the engine must be running lamps (DRL) (if equipped) Turns the highbeam headlamps on your headlamps at dusk. Failure to turn on the parking lamps only. The Daytime Running Light (DRL) system will not illuminate the tail lamps and parking... lamps. Rotate to the second position to activate. 16 Turn on with a reduced output. P PANEL AUTO DIM LAMP Daytime running and • the headlamp control is in a collision. High beams Push forward to also turn on the...
... may result in the OFF or Parking lamps position. To activate: • the engine must be running lamps (DRL) (if equipped) Turns the highbeam headlamps on your headlamps at dusk. Failure to turn on the parking lamps only. The Daytime Running Light (DRL) system will not illuminate the tail lamps and parking... lamps. Rotate to the second position to activate. 16 Turn on with a reduced output. P PANEL AUTO DIM LAMP Daytime running and • the headlamp control is in a collision. High beams Push forward to also turn on the...

Owner Guide 1st Printing
Page 17
...The autolamp system PANEL AUTO P DIM LAMP provides light sensitive automatic on , rotate the control up to approximately three minutes by the headlamp control. PANEL DIMMER CONTROL Use to deactivate. Controls and features Flash to pass Pull toward you to activate and release to adjust the... of the exterior lights normally controlled by continuing to rotate the control upward. • To turn autolamps off control of the instrument panel during headlamp and parklamp operation. • Rotate up to brighten. • Rotate down to OFF. • To turn autolamps on -off , rotate...
...The autolamp system PANEL AUTO P DIM LAMP provides light sensitive automatic on , rotate the control up to approximately three minutes by the headlamp control. PANEL DIMMER CONTROL Use to deactivate. Controls and features Flash to pass Pull toward you to activate and release to adjust the... of the exterior lights normally controlled by continuing to rotate the control upward. • To turn autolamps off control of the instrument panel during headlamp and parklamp operation. • Rotate up to brighten. • Rotate down to OFF. • To turn autolamps on -off , rotate...
Owner Guide 1st Printing
Page 33
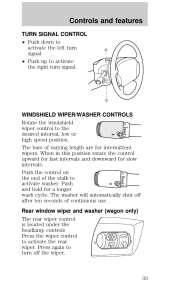
HI LO F S OFF HI LO F S OFF Rear window wiper and washer (wagon only) The rear wiper control is located under the headlamp controls Press the wiper control to the desired interval, low or high speed position. The bars of the stalk to activate washer. Push and hold ...
HI LO F S OFF HI LO F S OFF Rear window wiper and washer (wagon only) The rear wiper control is located under the headlamp controls Press the wiper control to the desired interval, low or high speed position. The bars of the stalk to activate washer. Push and hold ...

Owner Guide 1st Printing
Page 47
... battery in the same orientation. Place the positive ( +) side of the transmitter near the key ring. When unauthorized entry occurs, the system will flash the headlamps and/or parking lamps, and the theft indicator lamp and will help protect your vehicle from your vehicle. Snap the two halves back together. The...
... battery in the same orientation. Place the positive ( +) side of the transmitter near the key ring. When unauthorized entry occurs, the system will flash the headlamps and/or parking lamps, and the theft indicator lamp and will help protect your vehicle from your vehicle. Snap the two halves back together. The...

Owner Guide 1st Printing
Page 86
... vehicle occupants have buckled their proper usage, refer to warm the engine. Starting If you smell exhaust fumes. Before starting the vehicle: 1. Make sure the headlamps and vehicle accessories are off. 3. Do not drive if you smell exhaust fumes inside your vehicle, have the vehicle checked. Important safety precautions A computer system...
... vehicle occupants have buckled their proper usage, refer to warm the engine. Starting If you smell exhaust fumes. Before starting the vehicle: 1. Make sure the headlamps and vehicle accessories are off. 3. Do not drive if you smell exhaust fumes inside your vehicle, have the vehicle checked. Important safety precautions A computer system...

Owner Guide 1st Printing
Page 112
Not Used 2 5A Instrument Illumination 3 10A Left Low Beam Headlamp 4 10A Right Low Beam Headlamp 5 5A Brake Shift Interlock, Rear Defrost 6 15A MLPS Switch, Backup Lamps, Speed Control 7 10A MLPS Switch, Starter Relay 8 5A Power Antenna, RCU, GEM 9 10A ABS ... Bag, Blower Motor, EATC 14 5A Air Suspension 15 10A Multi-Function Switch (Turn Signal) 16 - Not Used 17 30A Front Wiper/Washer 18 5A Headlamp Switch 19 15A Rear Wiper/Washer 20 5A ICP, RAP, Phone 21 20A Cigar Lighter 22 5A Power Mirrors, Power Antenna, Decklid Lamps, Autolamp 23...
Not Used 2 5A Instrument Illumination 3 10A Left Low Beam Headlamp 4 10A Right Low Beam Headlamp 5 5A Brake Shift Interlock, Rear Defrost 6 15A MLPS Switch, Backup Lamps, Speed Control 7 10A MLPS Switch, Starter Relay 8 5A Power Antenna, RCU, GEM 9 10A ABS ... Bag, Blower Motor, EATC 14 5A Air Suspension 15 10A Multi-Function Switch (Turn Signal) 16 - Not Used 17 30A Front Wiper/Washer 18 5A Headlamp Switch 19 15A Rear Wiper/Washer 20 5A ICP, RAP, Phone 21 20A Cigar Lighter 22 5A Power Mirrors, Power Antenna, Decklid Lamps, Autolamp 23...

Owner Guide 1st Printing
Page 115
... Diagnostic Monitor 17 20A* Rear Control Unit, CD Changer 18 30A* Anti-Lock Brake Module 19 15A* Horn Relay, Powertrain Control Module (PCM) 20 15A* Headlamp Switch, Autolamp Park Relay 21 - Starter Relay 25 - A/C Clutch Relay 26 30A* Generator/Voltage Regulator 27 10A* A/C Clutch Relay 28 15A* Heated Oxygen Sensors, Canister...
... Diagnostic Monitor 17 20A* Rear Control Unit, CD Changer 18 30A* Anti-Lock Brake Module 19 15A* Horn Relay, Powertrain Control Module (PCM) 20 15A* Headlamp Switch, Autolamp Park Relay 21 - Starter Relay 25 - A/C Clutch Relay 26 30A* Generator/Voltage Regulator 27 10A* A/C Clutch Relay 28 15A* Heated Oxygen Sensors, Canister...

Owner Guide 1st Printing
Page 163
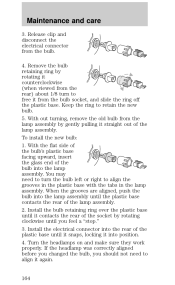
...be cleaned with rubbing alcohol before being used. The oil from your hand could cause the bulb to break the next time the headlamps are replacing the driver side headlamp, unclip the electronic module on the right side of the battery and move it should be replaced immediately. Make sure...through the hole in OFF position, then open the hood. If the bulb is accidentally touched, it out of the way. 2. Replacing headlamp bulbs Handle a halogen headlamp bulb carefully and keep out of time, contaminants may enter the lamp housings and affect performance. If a bulb is in the upper radiator...
...be cleaned with rubbing alcohol before being used. The oil from your hand could cause the bulb to break the next time the headlamps are replacing the driver side headlamp, unclip the electronic module on the right side of the battery and move it should be replaced immediately. Make sure...through the hole in OFF position, then open the hood. If the bulb is accidentally touched, it out of the way. 2. Replacing headlamp bulbs Handle a halogen headlamp bulb carefully and keep out of time, contaminants may enter the lamp housings and affect performance. If a bulb is in the upper radiator...
Owner Guide 1st Printing
Page 164
... it into the lamp assembly. Keep the ring to align the grooves in the plastic base with the tabs in the lamp assembly. Turn the headlamps on and make sure they work properly. Maintenance and care 3. To install the new bulb: 1. With out turning, remove the old bulb from the bulb... assembly until you should not need to turn to align it from the bulb socket, and slide the ring off the plastic base. If the headlamp was correctly aligned before you changed the bulb, you feel a "stop." 3. You may need to free it again. 164 Install the bulb retaining ring over...
... it into the lamp assembly. Keep the ring to align the grooves in the plastic base with the tabs in the lamp assembly. Turn the headlamps on and make sure they work properly. Maintenance and care 3. To install the new bulb: 1. With out turning, remove the old bulb from the bulb... assembly until you should not need to turn to align it from the bulb socket, and slide the ring off the plastic base. If the headlamp was correctly aligned before you changed the bulb, you feel a "stop." 3. You may need to free it again. 164 Install the bulb retaining ring over...
Owner Guide 1st Printing
Page 166
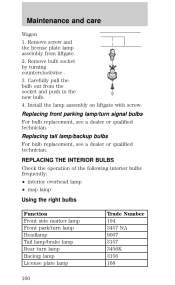
... the following interior bulbs frequently: • interior overhead lamp • map lamp Using the right bulbs Function Front side marker lamp Front park/turn lamp Headlamp Tail lamp/brake lamp Rear turn signal bulbs For bulb replacement, see a dealer or qualified technician. Maintenance and care Wagon 1. Remove screw and the license...
... the following interior bulbs frequently: • interior overhead lamp • map lamp Using the right bulbs Function Front side marker lamp Front park/turn lamp Headlamp Tail lamp/brake lamp Rear turn signal bulbs For bulb replacement, see a dealer or qualified technician. Maintenance and care Wagon 1. Remove screw and the license...
Owner Guide 1st Printing
Page 167
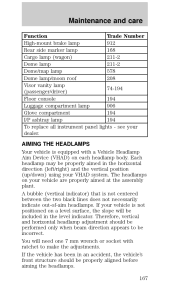
... surface, the slope will need one 7 mm wrench or socket with a Vehicle Headlamp Aim Device (VHAD) on your vehicle is not centered between the two black lines does not necessarily indicate out-of-aim headlamps. You will be performed only when beam direction appears to make the adjustments. If... be properly aimed in an accident, the vehicle's front structure should be included in the level indicator. Therefore, vertical and horizontal headlamp adjustment should be incorrect. Maintenance and care Function Trade Number High-mount brake lamp 912 Rear side marker lamp 168 Cargo lamp (...
... surface, the slope will need one 7 mm wrench or socket with a Vehicle Headlamp Aim Device (VHAD) on your vehicle is not centered between the two black lines does not necessarily indicate out-of-aim headlamps. You will be performed only when beam direction appears to make the adjustments. If... be properly aimed in an accident, the vehicle's front structure should be included in the level indicator. Therefore, vertical and horizontal headlamp adjustment should be incorrect. Maintenance and care Function Trade Number High-mount brake lamp 912 Rear side marker lamp 168 Cargo lamp (...

Owner Guide 1st Printing
Page 168
... and care Horizontal aim adjustment 1. Park the vehicle on the plastic housing. Turn the horizontal adjusting screw in the direction of the headlamp. Use a 7 mm wrench or socket to turn the horizontal adjusting screw until the "0" reference mark on the view dial is ... with the rearward facing tab (as shown. 4. Locate the vertical adjusting screw, located on a level surface. 2. Remove the protective cap to the headlamp upper outboard attachment. 168 With the hood open , locate the horizontal indicator and adjusting screw. With the hood open , locate the bubble level vertical ...
... and care Horizontal aim adjustment 1. Park the vehicle on the plastic housing. Turn the horizontal adjusting screw in the direction of the headlamp. Use a 7 mm wrench or socket to turn the horizontal adjusting screw until the "0" reference mark on the view dial is ... with the rearward facing tab (as shown. 4. Locate the vertical adjusting screw, located on a level surface. 2. Remove the protective cap to the headlamp upper outboard attachment. 168 With the hood open , locate the horizontal indicator and adjusting screw. With the hood open , locate the bubble level vertical ...
Owner Guide 1st Printing
Page 169
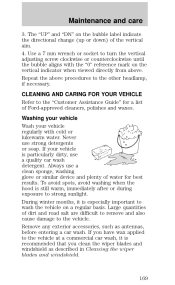
Repeat the above . Never use a clean sponge, washing glove or similar device and plenty of water for a list of Ford-approved cleaners, polishes and waxes. Use a 7 mm wrench or socket to turn the vertical adjusting screw clockwise or counterclockwise until the bubble aligns with cold ... wash detergent. Large quantities of the vertical aim. 4. Washing your vehicle Wash your vehicle is still warm, immediately after or during exposure to the other headlamp, if necessary. Always use strong detergents or soap. Maintenance and care 3.
Repeat the above . Never use a clean sponge, washing glove or similar device and plenty of water for a list of Ford-approved cleaners, polishes and waxes. Use a 7 mm wrench or socket to turn the vertical adjusting screw clockwise or counterclockwise until the bubble aligns with cold ... wash detergent. Large quantities of the vertical aim. 4. Washing your vehicle Wash your vehicle is still warm, immediately after or during exposure to the other headlamp, if necessary. Always use strong detergents or soap. Maintenance and care 3.
Owner Guide 1st Printing
Page 187
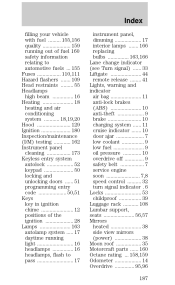
......159 running out of fuel 160 safety information relating to automotive fuels ...155 Fuses ...110,111 Hazard flashers ...109 Head restraints ...55 Headlamps high beam ...16 Heating ...18 heating and air conditioning system ...18,19,20 Hood ...129 Ignition ...180 Inspection/maintenance (I/M) testing ......50,51 Keys key in ignition chime ...12 positions of the ignition ...28 Lamps ...163 autolamp system ...17 daytime running light ...16 headlamps ...16 headlamps, flash to pass ...17 instrument panel, dimming ...17 interior lamps ...166 replacing bulbs ...163,166 Lane change indicator (see Turn ...
......159 running out of fuel 160 safety information relating to automotive fuels ...155 Fuses ...110,111 Hazard flashers ...109 Head restraints ...55 Headlamps high beam ...16 Heating ...18 heating and air conditioning system ...18,19,20 Hood ...129 Ignition ...180 Inspection/maintenance (I/M) testing ......50,51 Keys key in ignition chime ...12 positions of the ignition ...28 Lamps ...163 autolamp system ...17 daytime running light ...16 headlamps ...16 headlamps, flash to pass ...17 instrument panel, dimming ...17 interior lamps ...166 replacing bulbs ...163,166 Lane change indicator (see Turn ...
Scheduled Maintenance Guide 2nd Printing
Page 27
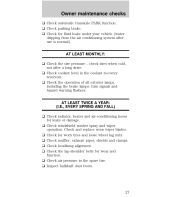
... washer spray and wiper operation. AT LEAST TWICE A YEAR: (I.E., EVERY SPRING AND FALL) u Check radiator, heater and air-conditioning hoses for wear and function. u Check headlamp alignment. AT LEAST MONTHLY: u Check the tire pressure - u Check air pressure in the coolant recovery reservoir. u Check coolant level in the spare tire. u Check the...
... washer spray and wiper operation. AT LEAST TWICE A YEAR: (I.E., EVERY SPRING AND FALL) u Check radiator, heater and air-conditioning hoses for wear and function. u Check headlamp alignment. AT LEAST MONTHLY: u Check the tire pressure - u Check air pressure in the coolant recovery reservoir. u Check coolant level in the spare tire. u Check the...