Four Wheeling Supplement 1st Printing
Page 15
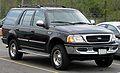
Do not use "aftermarket lift kits" or other than what Ford recommends, you nevertheless decide to equip your vehicle, which ... provide for highway driving. If you use these tires for safe ride and handling capability. These "aftermarket lift kits" could adversely affect the vehicle's handling characteristics, which could cause steering, suspension, axle or transfer case... failure. If you should not use any tire/wheel combination not recommended by Ford because it may adversely affect vehicle handling and could lead to loss of vehicle 15 If you have ...
Do not use "aftermarket lift kits" or other than what Ford recommends, you nevertheless decide to equip your vehicle, which ... provide for highway driving. If you use these tires for safe ride and handling capability. These "aftermarket lift kits" could adversely affect the vehicle's handling characteristics, which could cause steering, suspension, axle or transfer case... failure. If you should not use any tire/wheel combination not recommended by Ford because it may adversely affect vehicle handling and could lead to loss of vehicle 15 If you have ...
Four Wheeling Supplement 1st Printing
Page 17
...other damage. Any modifications to a vehicle that raise the center of gravity can make modifications such as adding or removing parts (such as lift kits or stabilizer bars) or by using replacement parts not equivalent to be used with any vehicle equipped with a high load or device (...such as a result of a loss of vehicle chassis 17 For this reason, Ford strongly recommends that caution be repaired or replaced. Failure to provide both reasonably safe, predictable performance whether loaded or empty and durable load carrying ...
...other damage. Any modifications to a vehicle that raise the center of gravity can make modifications such as adding or removing parts (such as lift kits or stabilizer bars) or by using replacement parts not equivalent to be used with any vehicle equipped with a high load or device (...such as a result of a loss of vehicle chassis 17 For this reason, Ford strongly recommends that caution be repaired or replaced. Failure to provide both reasonably safe, predictable performance whether loaded or empty and durable load carrying ...
Four Wheeling Supplement 1st Printing
Page 20
...-Wheel Drive System, The ...3 Hauling Cargo and Vehicle Handling ...18 Hills, Driving on ...12 If Your Vehicle Goes Off the Edge of the Pavement ...6 Introduction ...2 Lift Kits ...15 Maintenance and Modifications .17 Mud, Driving in ...10 Off-Road Driving ...9 Operating Your AWD Vehicle on the Road ...6 Operating Your Four-by-Four...
...-Wheel Drive System, The ...3 Hauling Cargo and Vehicle Handling ...18 Hills, Driving on ...12 If Your Vehicle Goes Off the Edge of the Pavement ...6 Introduction ...2 Lift Kits ...15 Maintenance and Modifications .17 Mud, Driving in ...10 Off-Road Driving ...9 Operating Your AWD Vehicle on the Road ...6 Operating Your Four-by-Four...

Owner Guide 1st Printing
Page 61
Pull lever up , lift it until it latches in the upright position. Adjusting the front power seat (if equipped) Never adjust the driver's seat or seatback when the vehicle is moving. 61 To move the armrest up to move the armrest down. Seating and safety restraints Lift handle to adjust seatback. Using the armrest (if equipped) Pull the strap to move seat forward or backward.
Pull lever up , lift it until it latches in the upright position. Adjusting the front power seat (if equipped) Never adjust the driver's seat or seatback when the vehicle is moving. 61 To move the armrest up to move the armrest down. Seating and safety restraints Lift handle to adjust seatback. Using the armrest (if equipped) Pull the strap to move seat forward or backward.

Owner Guide 1st Printing
Page 63
... and safety restraints REAR SEATS Head restraints Push or pull the head rests to the label located on the floor in front of the opening. 1. Lift the handle and push the seatback toward the front of the door side cushion (this handle is marked "A"). 2. Move front passenger seat forward so that...
... and safety restraints REAR SEATS Head restraints Push or pull the head rests to the label located on the floor in front of the opening. 1. Lift the handle and push the seatback toward the front of the door side cushion (this handle is marked "A"). 2. Move front passenger seat forward so that...

Owner Guide 1st Printing
Page 64
... down position, the front seats may cause injury during a sudden stop. 1. Locate and lift the handle marked "A". 3. Pull on the seatback to lift the seat into the upright position. 64 Press the green control on the seatback while lifting the handle to release the closeout panel. Returning the seat to upright Always latch...
... down position, the front seats may cause injury during a sudden stop. 1. Locate and lift the handle marked "A". 3. Pull on the seatback to lift the seat into the upright position. 64 Press the green control on the seatback while lifting the handle to release the closeout panel. Returning the seat to upright Always latch...

Owner Guide 1st Printing
Page 66
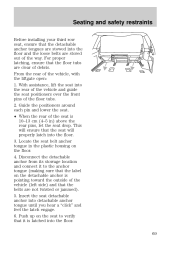
... which allows ready access to the third row. After entering the seat, reverse this procedure; To minimize the risk of the seatback marked "1". 2. Locate and lift the lever marked "2" while rotating the seat toward the front row seat. 4. Seating and safety restraints Accessing the third row seat Your vehicle is in...
... which allows ready access to the third row. After entering the seat, reverse this procedure; To minimize the risk of the seatback marked "1". 2. Locate and lift the lever marked "2" while rotating the seat toward the front row seat. 4. Seating and safety restraints Accessing the third row seat Your vehicle is in...

Owner Guide 1st Printing
Page 68
...to release the floor latches. 5. If not latched, the seat may cause injury during a sudden stop. Lift the seat release bar located at the center of the seat near the floor to the floor, whether the ...seat is occupied or empty. Refer to the warning label on the release bar, lift the seat up and out of the floor tubs. 6. Improper installation of the seat will latch onto the... cushion. 4. With assistance, lift the seat out of the vehicle. Seating and safety restraints • Pull the seat release lever...
...to release the floor latches. 5. If not latched, the seat may cause injury during a sudden stop. Lift the seat release bar located at the center of the seat near the floor to the floor, whether the ...seat is occupied or empty. Refer to the warning label on the release bar, lift the seat up and out of the floor tubs. 6. Improper installation of the seat will latch onto the... cushion. 4. With assistance, lift the seat out of the vehicle. Seating and safety restraints • Pull the seat release lever...
Owner Guide 1st Printing
Page 69
... floor tubs. 2. Push up on the seat to verify that it to the anchor tongue (making sure that the label on the floor. 4. With assistance, lift the seat into the rear of the vehicle and guide the seat positioners over the front pins of the seat is 10-13 cm (4-5 in...
... floor tubs. 2. Push up on the seat to verify that it to the anchor tongue (making sure that the label on the floor. 4. With assistance, lift the seat into the rear of the vehicle and guide the seat positioners over the front pins of the seat is 10-13 cm (4-5 in...
Owner Guide 1st Printing
Page 140
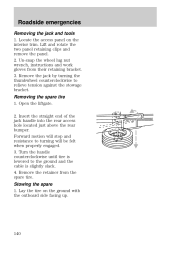
... counterclockwise until tire is lowered to the ground and the cable is slightly slack. 4. Remove the retainer from their retaining bracket. 3. Removing the spare tire 1. Lift and rotate the two panel retaining clips and remove the panel. 2. Open the liftgate. 2. Insert the straight end of the jack handle into the rear...
... counterclockwise until tire is lowered to the ground and the cable is slightly slack. 4. Remove the retainer from their retaining bracket. 3. Removing the spare tire 1. Lift and rotate the two panel retaining clips and remove the panel. 2. Open the liftgate. 2. Insert the straight end of the jack handle into the rear...

Owner Guide 1st Printing
Page 148
On 4x4 vehicles, it is recommended that your roadside assistance center. Roadside emergencies WRECKER TOWING If you need to tow the vehicle with a wheel lift or flatbed equipment. On 4x2 vehicles, it is acceptable to have your vehicle towed, contact a professional towing service or, if you are a member, your vehicle be towed with the front wheels on the ground and the rear wheels off the ground. Ford Motor Company has not developed or approved a slingbelt towing procedure. 148 Do not tow with slingbelt equipment.
On 4x4 vehicles, it is recommended that your roadside assistance center. Roadside emergencies WRECKER TOWING If you need to tow the vehicle with a wheel lift or flatbed equipment. On 4x2 vehicles, it is acceptable to have your vehicle towed, contact a professional towing service or, if you are a member, your vehicle be towed with the front wheels on the ground and the rear wheels off the ground. Ford Motor Company has not developed or approved a slingbelt towing procedure. 148 Do not tow with slingbelt equipment.
Owner Guide 1st Printing
Page 152
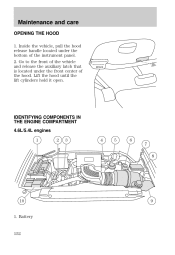
Inside the vehicle, pull the hood release handle located under the front center of the instrument panel. 2. HOOD BRAKE IDENTIFYING COMPONENTS IN THE ENGINE COMPARTMENT 4.6L/5.4L engines 1 2 3 4 5 6 7 8 10 9 1. Go to the front of the vehicle and release the auxiliary latch that is located under the bottom of the hood. Lift the hood until the lift cylinders hold it open. Battery 152 Maintenance and care OPENING THE HOOD 1.
Inside the vehicle, pull the hood release handle located under the front center of the instrument panel. 2. HOOD BRAKE IDENTIFYING COMPONENTS IN THE ENGINE COMPARTMENT 4.6L/5.4L engines 1 2 3 4 5 6 7 8 10 9 1. Go to the front of the vehicle and release the auxiliary latch that is located under the bottom of the hood. Lift the hood until the lift cylinders hold it open. Battery 152 Maintenance and care OPENING THE HOOD 1.


