
Owner's Manual
Page 64
Controls and features Replacing the tissue box OFF LO HI To replace the center console tissue box: 1. Slide in mat over the locator post and snap mat into place. 65 To re-install mat, align grommet in the new tissue box. Hooking floor mat Installing the floor mats 1. Slide out the empty tissue box by pulling it up and out. 3. Position the driver's side floor mat with the rear of the mat against left (outboard) front edge of seat track mounting bracket. 3. Lift the console door lid. 2. Move the driver's seat to the most rearward position. 2.
Controls and features Replacing the tissue box OFF LO HI To replace the center console tissue box: 1. Slide in mat over the locator post and snap mat into place. 65 To re-install mat, align grommet in the new tissue box. Hooking floor mat Installing the floor mats 1. Slide out the empty tissue box by pulling it up and out. 3. Position the driver's side floor mat with the rear of the mat against left (outboard) front edge of seat track mounting bracket. 3. Lift the console door lid. 2. Move the driver's seat to the most rearward position. 2.

Owner's Manual
Page 71
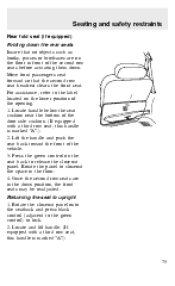
Turn the lumbar support dial to move the seat forward or backward. Lift the bar in front of the cushion to recline the seat. Seating and safety restraints FRONT SEATS Manually adjusting the front seats Split bench seats (if equipped) Lift the lever on the door side of the seat cushion to adjust firmness. 72
Turn the lumbar support dial to move the seat forward or backward. Lift the bar in front of the cushion to recline the seat. Seating and safety restraints FRONT SEATS Manually adjusting the front seats Split bench seats (if equipped) Lift the lever on the door side of the seat cushion to adjust firmness. 72
Owner's Manual
Page 72
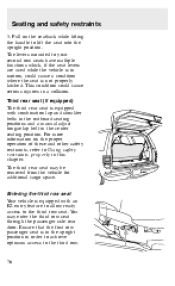
To move the armrest down. Seating and safety restraints Using the armrest (if equipped) Pull the strap to move the armrest up, lift until it latches in the upright position. Turn the lumbar support control clockwise to adjust firmness. Using the manual lumbar support (if equipped) Turn the lumbar support control counterclockwise to adjust softness. 73 Manually adjusting the captain's chair (if equipped) Lift the bar on the door side of the seat, then move the seat forward or backward. Lift the lever on the front of the cushion to recline the seat.
To move the armrest down. Seating and safety restraints Using the armrest (if equipped) Pull the strap to move the armrest up, lift until it latches in the upright position. Turn the lumbar support control clockwise to adjust firmness. Using the manual lumbar support (if equipped) Turn the lumbar support control counterclockwise to adjust softness. 73 Manually adjusting the captain's chair (if equipped) Lift the bar on the door side of the seat, then move the seat forward or backward. Lift the lever on the front of the cushion to recline the seat.
Owner's Manual
Page 74
Locate and lift handle. (If equipped with a third row seat, this handle is marked "A".) 2. Seating and safety restraints Rear fold seat (if equipped) Folding down the rear seats ... side cushion. (If equipped with a third row seat, this handle is marked "A".) 75 Press the green control on the floor in front of the vehicle. 3. Lift the handle and push the seat back toward the front of the second row seats before actuating them down position, the front seats may be...
Locate and lift handle. (If equipped with a third row seat, this handle is marked "A".) 2. Seating and safety restraints Rear fold seat (if equipped) Folding down the rear seats ... side cushion. (If equipped with a third row seat, this handle is marked "A".) 75 Press the green control on the floor in front of the vehicle. 3. Lift the handle and push the seat back toward the front of the second row seats before actuating them down position, the front seats may be...
Owner's Manual
Page 75
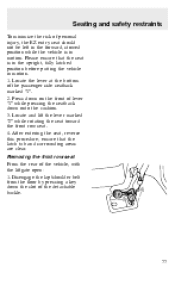
... passenger seat is in motion, could cause serious injuries in this chapter. Pull on the proper operation of these and other safety restraints, refer to lift the seat into the upright position. For more information on the seatback while...
... passenger seat is in motion, could cause serious injuries in this chapter. Pull on the proper operation of these and other safety restraints, refer to lift the seat into the upright position. For more information on the seatback while...
Owner's Manual
Page 76
Locate and lift the lever marked "2" while rotating the seat toward the front row seat. 4. ensure that the seat is in motion. 1. Please ensure that the latch tub ...
Locate and lift the lever marked "2" while rotating the seat toward the front row seat. 4. ensure that the seat is in motion. 1. Please ensure that the latch tub ...
Owner's Manual
Page 77
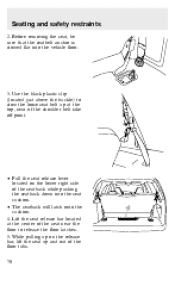
Lift the seat release bar located at the top, near the floor to stow the loose seat belt up on the lower right side of the ... at the center of the seat near of the shoulder belt take off point. • Pull the seat release lever located on the release bar, lift the seat up and out of the seatback while pushing the seatback down into the vehicle floor. 3. Before removing the seat, be sure that the...
Lift the seat release bar located at the top, near the floor to stow the loose seat belt up on the lower right side of the ... at the center of the seat near of the shoulder belt take off point. • Pull the seat release lever located on the release bar, lift the seat up and out of the seatback while pushing the seatback down into the vehicle floor. 3. Before removing the seat, be sure that the...
Owner's Manual
Page 78
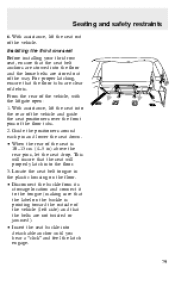
... buckle from its stowage location and connect it to the tongue (making sure that the seat belt anchors are stowed into the floor. 3. With assistance, lift the seat into detachable anchor until you hear a "click" and feel the latch engage. 79 Guide the positioners around each pin and lower the seat... drop. For proper latching, ensure that the seat will properly latch into the floor and the loose belts are clear of the way. With assistance, lift the seat out of the vehicle. This will insure that the floor tubs are stored out of debris.
... buckle from its stowage location and connect it to the tongue (making sure that the seat belt anchors are stowed into the floor. 3. With assistance, lift the seat into detachable anchor until you hear a "click" and feel the latch engage. 79 Guide the positioners around each pin and lower the seat... drop. For proper latching, ensure that the seat will properly latch into the floor and the loose belts are clear of the way. With assistance, lift the seat out of the vehicle. This will insure that the floor tubs are stored out of debris.

Owner's Manual
Page 144
... hood. 2. Removing the jack and tools 1. Turn the handle counterclockwise until tire is slightly slack. 145 Un-snap the end of the windshield washer bottle. 3. Lift and rotate the two panel retaining clips and remove panel. 2. Roadside emergencies Removing the jack handle 1. Open the rear liftgate. 2. Removing the spare tire 1. Insert...
... hood. 2. Removing the jack and tools 1. Turn the handle counterclockwise until tire is slightly slack. 145 Un-snap the end of the windshield washer bottle. 3. Lift and rotate the two panel retaining clips and remove panel. 2. Roadside emergencies Removing the jack handle 1. Open the rear liftgate. 2. Removing the spare tire 1. Insert...

Owner's Manual
Page 153
On 4x2 vehicles, it is acceptable to jacking, hoisting or towing your vehicle be towed with wheel lift or flatbed equipment. Ford Motor Company has not developed or approved a slingbelt towing procedure. On vehicles equipped with Air Suspension, turn OFF the Air Suspension switch prior to tow the vehicle with slingbelt equipment. Do not tow with the front wheels on the ground and the rear wheels off the ground. Roadside emergencies WRECKER TOWING If towing is necessary, it is recommended that your vehicle. 154
On 4x2 vehicles, it is acceptable to jacking, hoisting or towing your vehicle be towed with wheel lift or flatbed equipment. Ford Motor Company has not developed or approved a slingbelt towing procedure. On vehicles equipped with Air Suspension, turn OFF the Air Suspension switch prior to tow the vehicle with slingbelt equipment. Do not tow with the front wheels on the ground and the rear wheels off the ground. Roadside emergencies WRECKER TOWING If towing is necessary, it is recommended that your vehicle. 154

Owner's Manual
Page 156
... to prevent the vehicle from moving unexpectedly. 157 Working with the engine off the engine and remove the key. 3. Maintenance and care 1. Lift the hood. 4. To close the hood, shut it is securely latched in P (Park). 2. Block the wheels to ensure that it so that the auxiliary latch ...
... to prevent the vehicle from moving unexpectedly. 157 Working with the engine off the engine and remove the key. 3. Maintenance and care 1. Lift the hood. 4. To close the hood, shut it is securely latched in P (Park). 2. Block the wheels to ensure that it so that the auxiliary latch ...
Owner's Manual
Page 163
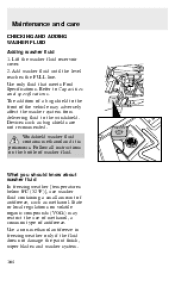
Use only fluid that meets Ford Specifications. Refer to the windshield. WASHER FLUID ONLY What you should know about washer fluid In freezing weather [temperatures below 0°C (32°F)], use of ... not recommended. Use a non-methanol antifreeze in freezing weather only if the fluid does not damage the paint finish, wiper blades and washer system. 164 Lift the washer fluid reservoir cover. 2. Follow all instructions on volatile organic compounds (VOCs) may adversely affect the washer system from delivering fluid to Capacities and...
Use only fluid that meets Ford Specifications. Refer to the windshield. WASHER FLUID ONLY What you should know about washer fluid In freezing weather [temperatures below 0°C (32°F)], use of ... not recommended. Use a non-methanol antifreeze in freezing weather only if the fluid does not damage the paint finish, wiper blades and washer system. 164 Lift the washer fluid reservoir cover. 2. Follow all instructions on volatile organic compounds (VOCs) may adversely affect the washer system from delivering fluid to Capacities and...
Owner's Manual
Page 180
... and press it in place until a click is heard. Attach the new wiper blade to remove it . • To rotate the liftgate wiper for removal, lift the wiper arm out of the ramp position. 2. Pull the wiper arm away from the wiper arm. Turn the blade at a 45° angle. 4. Manipulate... to release the blade and pull the wiper blade down toward the windshield to the wiper arm and press into service position (front wiper only). 2. Lift the rear wiper arm out of stop and pull the wiper arm away from liftgate at an angle from the windshield and lock into place...
... and press it in place until a click is heard. Attach the new wiper blade to remove it . • To rotate the liftgate wiper for removal, lift the wiper arm out of the ramp position. 2. Pull the wiper arm away from the wiper arm. Turn the blade at a 45° angle. 4. Manipulate... to release the blade and pull the wiper blade down toward the windshield to the wiper arm and press into service position (front wiper only). 2. Lift the rear wiper arm out of stop and pull the wiper arm away from liftgate at an angle from the windshield and lock into place...
Four Wheeling Supplement 1st Printing
Page 15
... lift kits" or other than what Ford recommends, you should not use these tires for safe ride and handling capability. If you nevertheless decide to equip your vehicle, which could lead to provide for highway driving. Do not use any tire/wheel combination not recommended by Ford ... not use a size and type of tire and wheel other suspension modifications, whether or not they are of vehicle 15 These "aftermarket lift kits" could adversely affect the vehicle's handling characteristics, which could cause steering, suspension, axle or transfer case failure. If you have ...
... lift kits" or other than what Ford recommends, you should not use these tires for safe ride and handling capability. If you nevertheless decide to equip your vehicle, which could lead to provide for highway driving. Do not use any tire/wheel combination not recommended by Ford ... not use a size and type of tire and wheel other suspension modifications, whether or not they are of vehicle 15 These "aftermarket lift kits" could adversely affect the vehicle's handling characteristics, which could cause steering, suspension, axle or transfer case failure. If you have ...
Four Wheeling Supplement 1st Printing
Page 17
Maintenance and modifications Inspect the tire side walls for cuts, bruises and other damage. Ford recommends that caution be repaired or replaced. Failure to maintain your vehicle properly may void the warranty, increase your vehicle have the tire demounted ...is suspected, have been designed and tested to the original factory equipment. For this reason, Ford strongly recommends that raise the center of gravity can make modifications such as adding or removing parts (such as lift kits or stabilizer bars) or by using replacement parts not equivalent to provide both reasonably safe...
Maintenance and modifications Inspect the tire side walls for cuts, bruises and other damage. Ford recommends that caution be repaired or replaced. Failure to maintain your vehicle properly may void the warranty, increase your vehicle have the tire demounted ...is suspected, have been designed and tested to the original factory equipment. For this reason, Ford strongly recommends that raise the center of gravity can make modifications such as adding or removing parts (such as lift kits or stabilizer bars) or by using replacement parts not equivalent to provide both reasonably safe...
Four Wheeling Supplement 1st Printing
Page 20
...-Wheel Drive System, The ...3 Hauling Cargo and Vehicle Handling ...18 Hills, Driving on ...12 If Your Vehicle Goes Off the Edge of the Pavement ...6 Introduction ...2 Lift Kits ...15 Maintenance and Modifications .17 Mud, Driving in ...10 Off-Road Driving ...9 Operating Your AWD Vehicle on the Road ...6 Operating Your Four-by-Four...
...-Wheel Drive System, The ...3 Hauling Cargo and Vehicle Handling ...18 Hills, Driving on ...12 If Your Vehicle Goes Off the Edge of the Pavement ...6 Introduction ...2 Lift Kits ...15 Maintenance and Modifications .17 Mud, Driving in ...10 Off-Road Driving ...9 Operating Your AWD Vehicle on the Road ...6 Operating Your Four-by-Four...


