
Owner's Manual
Page 3
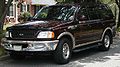
...brakes for your vehicle. From 1,600 km (1,000 miles) onwards you should avoid full use of your vehicle as an ambulance Do not use this guide was in effect at the time of driving. SPECIAL NOTICES Using your vehicle up to break in rules for the first 1,600 km (1,000 miles).... Vary speeds frequently. Ford may change the contents without notice and without incurring obligation. INFORMATION ABOUT THIS GUIDE The information found in this ...
...brakes for your vehicle. From 1,600 km (1,000 miles) onwards you should avoid full use of your vehicle as an ambulance Do not use this guide was in effect at the time of driving. SPECIAL NOTICES Using your vehicle up to break in rules for the first 1,600 km (1,000 miles).... Vary speeds frequently. Ford may change the contents without notice and without incurring obligation. INFORMATION ABOUT THIS GUIDE The information found in this ...

Owner's Manual
Page 4
Introduction Using your vehicle as a snowplow Do not use this vehicle for snowplowing. 4
Introduction Using your vehicle as a snowplow Do not use this vehicle for snowplowing. 4
Owner's Manual
Page 9
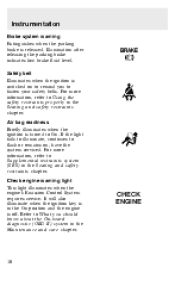
... diagnostic (OBD II) system in the Seating and safety restraints chapter. BRAKE ! If the light fails to illuminate, continues to flash or remains on to Using the safety restraints properly in the On position and the engine is turned to fasten your safety belts. It will also illuminate when the ignition...
... diagnostic (OBD II) system in the Seating and safety restraints chapter. BRAKE ! If the light fails to illuminate, continues to flash or remains on to Using the safety restraints properly in the On position and the engine is turned to fasten your safety belts. It will also illuminate when the ignition...

Owner's Manual
Page 22
Use the power point. 23 Controls and features 4WD control (if equipped) This control operates the Control Trac 4WD. Refer to Control trac system in the Driving chapter for electrical accessories. VOL - PUSH ON AM FM BASS TREB FM 1 ST CLK BAL FADE AUTO SET SEEK TUNE DISCS SCAN EJ DOLBY SYSTEM TAPE CD P REW 1 FF 2 SIDE 1-2 3 4 COMP 5 SHUFFLE 6 LO 2H A4WD OFF 4H 4L HI *A/C *MAX A/C A4WD 4H 4L 2H Auxiliary power point This 12V power point is an additional power source for more information. Do not plug optional electrical accessories into the cigarette lighter.
Use the power point. 23 Controls and features 4WD control (if equipped) This control operates the Control Trac 4WD. Refer to Control trac system in the Driving chapter for electrical accessories. VOL - PUSH ON AM FM BASS TREB FM 1 ST CLK BAL FADE AUTO SET SEEK TUNE DISCS SCAN EJ DOLBY SYSTEM TAPE CD P REW 1 FF 2 SIDE 1-2 3 4 COMP 5 SHUFFLE 6 LO 2H A4WD OFF 4H 4L HI *A/C *MAX A/C A4WD 4H 4L 2H Auxiliary power point This 12V power point is an additional power source for more information. Do not plug optional electrical accessories into the cigarette lighter.
Owner's Manual
Page 31
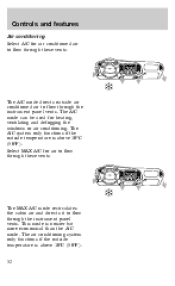
... 2 SIDE 1-2 3 4 COMP 5 SHUFFLE 6 LO OFF HI *A/C *MAX A/C c The A/C mode directs outside air conditioned air to flow through the instrument panel vents. The A/C mode can be used for heating, ventilating and defogging the windows or air conditioning.
... 2 SIDE 1-2 3 4 COMP 5 SHUFFLE 6 LO OFF HI *A/C *MAX A/C c The A/C mode directs outside air conditioned air to flow through the instrument panel vents. The A/C mode can be used for heating, ventilating and defogging the windows or air conditioning.

Owner's Manual
Page 41
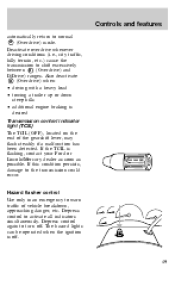
... pedal at any time during speed control usage. Release the switch when the desired vehicle speed is normal. RES SET ACCEL COAST 42 Do not use the speed control in heavy traffic or on a downhill in Overdrive, you may accelerate with your vehicle speed. To set speed while driving on roads...
... pedal at any time during speed control usage. Release the switch when the desired vehicle speed is normal. RES SET ACCEL COAST 42 Do not use the speed control in heavy traffic or on a downhill in Overdrive, you may accelerate with your vehicle speed. To set speed while driving on roads...
Owner's Manual
Page 48
... vehicle breakdown, approaching danger, etc. If this condition persists, damage to activate all indicators simultaneously. OVERDRIVE OFF Hazard flasher control Use only in an emergency to turn off . 49 Depress control to the transmission could occur. Depress control again to warn traffic ...; driving with a heavy load • towing a trailer up or down steep hills • additional engine braking is flashing, contact your Ford or Lincoln/Mercury dealer as soon as possible. The hazard lights can be operated when the ignition is off . Controls and features automatically return...
... vehicle breakdown, approaching danger, etc. If this condition persists, damage to activate all indicators simultaneously. OVERDRIVE OFF Hazard flasher control Use only in an emergency to turn off . 49 Depress control to the transmission could occur. Depress control again to warn traffic ...; driving with a heavy load • towing a trailer up or down steep hills • additional engine braking is flashing, contact your Ford or Lincoln/Mercury dealer as soon as possible. The hazard lights can be operated when the ignition is off . Controls and features automatically return...
Owner's Manual
Page 53
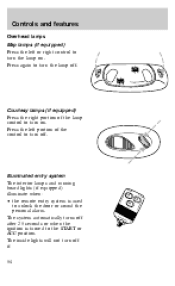
... N CK PA NIC Courtesy lamps (if equipped) Press the right portion of the control to turn off after 25 seconds or when the ignition is used to unlock the door or sound the personal alarm. Controls and features Overhead lamps Map lamps (if equipped) Press the left portion of the lamp...
... N CK PA NIC Courtesy lamps (if equipped) Press the right portion of the control to turn off after 25 seconds or when the ignition is used to unlock the door or sound the personal alarm. Controls and features Overhead lamps Map lamps (if equipped) Press the left portion of the lamp...
Owner's Manual
Page 54
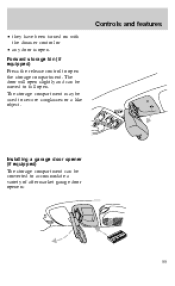
The storage compartment may be used to accommodate a variety of aftermarket garage door openers: 55 Installing a garage door opener (if equipped) The storage compartment can be converted to secure sunglasses or a like object. Forward storage bin (if equipped) Press the release control to full open. The door will open slightly and can be moved to open . Controls and features • they have been turned on with the dimmer control or • any door is open the storage compartment.
The storage compartment may be used to accommodate a variety of aftermarket garage door openers: 55 Installing a garage door opener (if equipped) The storage compartment can be converted to secure sunglasses or a like object. Forward storage bin (if equipped) Press the release control to full open. The door will open slightly and can be moved to open . Controls and features • they have been turned on with the dimmer control or • any door is open the storage compartment.

Owner's Manual
Page 58
Controls and features Passenger-side window controls • Press rear of switches to open passenger window. • Press front of switches to the Off position or until either door is turned to close passenger window. U L Accessory delay With accessory delay, the window switches may be used for up to ten minutes after the ignition switch is opened. 59
Controls and features Passenger-side window controls • Press rear of switches to open passenger window. • Press front of switches to the Off position or until either door is turned to close passenger window. U L Accessory delay With accessory delay, the window switches may be used for up to ten minutes after the ignition switch is opened. 59

Owner's Manual
Page 63
PANEL FLOOR Your vehicle may be equipped with a variety of the driver seat. Hard objects can injure you in the cupholder. These include: • utility compartment • cupholders • coin holder slots • tissue box holder • compact disc changer Use only soft cups in a collision. 64 Controls and features A second auxiliary power point is accessible from the rear seats. The power point is located on the left side of the rear console at the rear of console features.
PANEL FLOOR Your vehicle may be equipped with a variety of the driver seat. Hard objects can injure you in the cupholder. These include: • utility compartment • cupholders • coin holder slots • tissue box holder • compact disc changer Use only soft cups in a collision. 64 Controls and features A second auxiliary power point is accessible from the rear seats. The power point is located on the left side of the rear console at the rear of console features.

Owner's Manual
Page 66
...vehicle to program additional keys: 67 A theft indicator in the instrument cluster provides operating status of the two electronically coded keys supplied with the Ford logo to start , the coded key is equipped with two electronically coded keys. For more information on this indicator and its function, refer ...to Warning and indicator lights in the anti-theft system, the vehicle is enabled to ensure proper functionality. THEFT Programming spare keys Use one of the anti-theft system. Your vehicle is read by the dealer. If the key's ID code matches the code in the ...
...vehicle to program additional keys: 67 A theft indicator in the instrument cluster provides operating status of the two electronically coded keys supplied with the Ford logo to start , the coded key is equipped with two electronically coded keys. For more information on this indicator and its function, refer ...to Warning and indicator lights in the anti-theft system, the vehicle is enabled to ensure proper functionality. THEFT Programming spare keys Use one of the anti-theft system. Your vehicle is read by the dealer. If the key's ID code matches the code in the ...

Owner's Manual
Page 67
... newly coded key can then be repeated to code up to 16 keys. The vehicle does not have an electronic code. This process may be used to program the key. There are several possible explanations: • The new key was not inserted within 15 seconds. • All 16 key codes have...
... newly coded key can then be repeated to code up to 16 keys. The vehicle does not have an electronic code. This process may be used to program the key. There are several possible explanations: • The new key was not inserted within 15 seconds. • All 16 key codes have...
Owner's Manual
Page 72
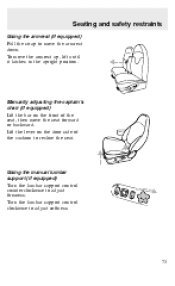
Seating and safety restraints Using the armrest (if equipped) Pull the strap to move the armrest up, lift until it latches in the upright position. Manually adjusting the captain's chair (if equipped) Lift the bar on the door side of the seat, then move the seat forward or backward. Using the manual lumbar support (if equipped) Turn the lumbar support control counterclockwise to adjust softness. 73 Turn the lumbar support control clockwise to adjust firmness. To move the armrest down. Lift the lever on the front of the cushion to recline the seat.
Seating and safety restraints Using the armrest (if equipped) Pull the strap to move the armrest up, lift until it latches in the upright position. Manually adjusting the captain's chair (if equipped) Lift the bar on the door side of the seat, then move the seat forward or backward. Using the manual lumbar support (if equipped) Turn the lumbar support control counterclockwise to adjust softness. 73 Turn the lumbar support control clockwise to adjust firmness. To move the armrest down. Lift the lever on the front of the cushion to recline the seat.
Owner's Manual
Page 75
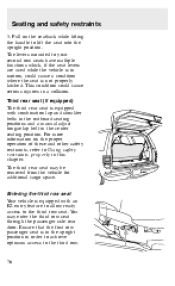
... restraints properly in order to achieve optimum access to your second row seats have multiple functions which, if the seat levers are used while the vehicle is not properly latched. The levers mounted to the third row. 76 Third rear seat (if equipped) The third rear seat is ...
... restraints properly in order to achieve optimum access to your second row seats have multiple functions which, if the seat levers are used while the vehicle is not properly latched. The levers mounted to the third row. 76 Third rear seat (if equipped) The third rear seat is ...
Owner's Manual
Page 77
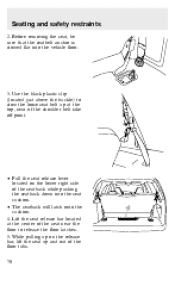
... of the seatback while pushing the seatback down into the vehicle floor. 3. While pulling up on the lower right side of the floor tubs. 78 Use the black plastic clip (located just above the buckle) to release the floor latches. 5. Seating and safety restraints 2. Before removing the seat, be sure that...
... of the seatback while pushing the seatback down into the vehicle floor. 3. While pulling up on the lower right side of the floor tubs. 78 Use the black plastic clip (located just above the buckle) to release the floor latches. 5. Seating and safety restraints 2. Before removing the seat, be sure that...

Owner's Manual
Page 79
Verify that it is provided. Most states and in Canada, the law requires the use of safety belts helps to verify that the safety belts can be properly restrained. 80 All occupants of the seat. Seating and safety restraints 4. Always ... the driver, should always wear their safety belts, even when an air bag Supplemental Restraint System is latched into the floor. 5. SAFETY RESTRAINTS PRECAUTIONS The use of injury, make sure children sit where they can move freely on the seat to restrain both driver and passengers in case of a collision. To...
Verify that it is provided. Most states and in Canada, the law requires the use of safety belts helps to verify that the safety belts can be properly restrained. 80 All occupants of the seat. Seating and safety restraints 4. Always ... the driver, should always wear their safety belts, even when an air bag Supplemental Restraint System is latched into the floor. 5. SAFETY RESTRAINTS PRECAUTIONS The use of injury, make sure children sit where they can move freely on the seat to restrain both driver and passengers in case of a collision. To...
Owner's Manual
Page 80
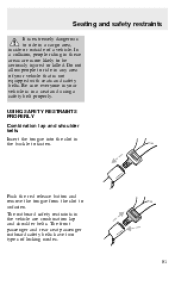
... vehicle are more likely to be seriously injured or killed. In a collision, people riding in these areas are combination lap and shoulder belts. USING SAFETY RESTRAINTS PROPERLY Combination lap and shoulder belts Insert the tongue into the slot in the buckle to unfasten. The front passenger and rear seat... passenger outboard safety belts have two types of a vehicle. Be sure everyone in your vehicle that is in a seat and using a safety belt properly. Do not allow people to ride in any area of your vehicle is not equipped with seats and safety belts. Push ...
... vehicle are more likely to be seriously injured or killed. In a collision, people riding in these areas are combination lap and shoulder belts. USING SAFETY RESTRAINTS PROPERLY Combination lap and shoulder belts Insert the tongue into the slot in the buckle to unfasten. The front passenger and rear seat... passenger outboard safety belts have two types of a vehicle. Be sure everyone in your vehicle that is in a seat and using a safety belt properly. Do not allow people to ride in any area of your vehicle is not equipped with seats and safety belts. Push ...

Owner's Manual
Page 81
For information on the proper use the automatic locking mode • When a tight lap and shoulder belt fit is desired. • Any time a child safety seat is installed in the vehicle. ... suddenly or turns a corner sharply or if the vehicle receives an impact of approximately 8 km/h (5 mph) or more, the combination safety belts will retract to use of the driver and passengers. The retractor can be made to help reduce the forward movement of a child safety seat, refer to vehicle movement. The...
For information on the proper use the automatic locking mode • When a tight lap and shoulder belt fit is desired. • Any time a child safety seat is installed in the vehicle. ... suddenly or turns a corner sharply or if the vehicle receives an impact of approximately 8 km/h (5 mph) or more, the combination safety belts will retract to use of the driver and passengers. The retractor can be made to help reduce the forward movement of a child safety seat, refer to vehicle movement. The...

Owner's Manual
Page 82
... Because the lap belt does not have a retractor to automatically adjust itself during vehicle movement, the lap belt must be adjusted before use. 83 As the belt retracts, you will cancel the automatic locking mode and activate the vehicle sensitive (emergency) locking mode. Canceling automatic... and shoulder belt and allow it to retract. Allow the belt to completely retract. Seating and safety restraints Using automatic locking mode The automatic locking mode must be used when installing a child safety seat in the automatic locking mode. Adjusting the lap belt A lap belt is...
... Because the lap belt does not have a retractor to automatically adjust itself during vehicle movement, the lap belt must be adjusted before use. 83 As the belt retracts, you will cancel the automatic locking mode and activate the vehicle sensitive (emergency) locking mode. Canceling automatic... and shoulder belt and allow it to retract. Allow the belt to completely retract. Seating and safety restraints Using automatic locking mode The automatic locking mode must be used when installing a child safety seat in the automatic locking mode. Adjusting the lap belt A lap belt is...


