
Owner's Manual
Page 16
... lap/shoulder combination belt. At this operating mode, the shoulder belt retractor will continue to be heard as the belt is allowed to the automatic locking mode, perform the following : u A tight lap/shoulder belt fit on the front passenger seat and rear outboard seats where dual locking... retractors are provided. RWARNING Never install a rear-facing child seat or infant carrier in the automatic locking mode (child restraint mode). Automatic locking mode In this time, the belt retractor is in the right front passenger seat. This mode must be...
... lap/shoulder combination belt. At this operating mode, the shoulder belt retractor will continue to be heard as the belt is allowed to the automatic locking mode, perform the following : u A tight lap/shoulder belt fit on the front passenger seat and rear outboard seats where dual locking... retractors are provided. RWARNING Never install a rear-facing child seat or infant carrier in the automatic locking mode (child restraint mode). Automatic locking mode In this time, the belt retractor is in the right front passenger seat. This mode must be...
Owner's Manual
Page 17
... passenger seat lap belt retractors operate in this chapter. See the detailed instructions under Safety Seats for the front seat passenger. Automatic locking mode In this operating mode, the lap belt retractor will switch back to lock by pulling on the belt. This... made to the vehicle sensitive (emergency) locking mode. Front Passenger Lap Belt Retractor (Convertible Only) Your convertible is unbuckled and allowed to the automatic locking mode, perform the following : u A tight lap/shoulder belt on the occupant. u Child safety seat installation. To switch the retractor ...
... passenger seat lap belt retractors operate in this chapter. See the detailed instructions under Safety Seats for the front seat passenger. Automatic locking mode In this operating mode, the lap belt retractor will switch back to lock by pulling on the belt. This... made to the vehicle sensitive (emergency) locking mode. Front Passenger Lap Belt Retractor (Convertible Only) Your convertible is unbuckled and allowed to the automatic locking mode, perform the following : u A tight lap/shoulder belt on the occupant. u Child safety seat installation. To switch the retractor ...

Owner's Manual
Page 18
... belt retracts. Pull upward until all of the belt below the child seat label. See the detailed instructions under Safety Seats for Children in the automatic locking mode. At this chapter. 16 Pull down on the belt to retract. RWARNING Never install a rear-facing child seat or infant carrier in the...
... belt retracts. Pull upward until all of the belt below the child seat label. See the detailed instructions under Safety Seats for Children in the automatic locking mode. At this chapter. 16 Pull down on the belt to retract. RWARNING Never install a rear-facing child seat or infant carrier in the...
Owner's Manual
Page 32
... a shoulder/lap belt combination with a sliding tongue, make sure the tongue is recommended for that is securely fastened in the buckle. Ford recommends the use child or infant seats. Forward facing child seats must have the passenger seat moved as far back from the instrument panel...When using the safety seat. Install the child safety seat in a seating position which is in your Ford or Lincoln-Mercury dealer. RWARNING Never leave a child unattended in the automatic locking mode. NEVER SECURE REAR-FACING INFANT SEATS IN THE FRONT SEAT. Children weighing less than 40 lbs...
... a shoulder/lap belt combination with a sliding tongue, make sure the tongue is recommended for that is securely fastened in the buckle. Ford recommends the use child or infant seats. Forward facing child seats must have the passenger seat moved as far back from the instrument panel...When using the safety seat. Install the child safety seat in a seating position which is in your Ford or Lincoln-Mercury dealer. RWARNING Never leave a child unattended in the automatic locking mode. NEVER SECURE REAR-FACING INFANT SEATS IN THE FRONT SEAT. Children weighing less than 40 lbs...

Owner's Manual
Page 34
If you choose to install a child safety seat in the front passenger seat. The automatic locking mode must be used when installing a child seat in the front seat: 1. 2. RWARNING Never install a rear-facing child seat or infant carrier in the right front passenger seat. Position the child seat in the front passenger seat of the lap/shoulder belt at the front passenger seat. Pull up on the lap belt portion of the vehicle. Installing Safety Seats in the Front Seat - Convertible Your Mustang Convertible is equipped with a dual locking mode retractor on the lap belt, Figure 1. 32
If you choose to install a child safety seat in the front passenger seat. The automatic locking mode must be used when installing a child seat in the front seat: 1. 2. RWARNING Never install a rear-facing child seat or infant carrier in the right front passenger seat. Position the child seat in the front passenger seat of the lap/shoulder belt at the front passenger seat. Pull up on the lap belt portion of the vehicle. Installing Safety Seats in the Front Seat - Convertible Your Mustang Convertible is equipped with a dual locking mode retractor on the lap belt, Figure 1. 32

Owner's Manual
Page 36
4. Grasp the lap portion of the belt is extracted and a click is in the automatic locking mode (child seat restraint mode), Figure 3. At this time, the lap belt retractor is heard. Pull the lap belt out completely to set the automatic locking mode 34 Pull upward until all of the belt below the child seat label.
4. Grasp the lap portion of the belt is extracted and a click is in the automatic locking mode (child seat restraint mode), Figure 3. At this time, the lap belt retractor is heard. Pull the lap belt out completely to set the automatic locking mode 34 Pull upward until all of the belt below the child seat label.

Owner's Manual
Page 37
Allowing belt to retract. This indicates the retractor is in the automatic locking mode, Figure 4. A clicking sound will be heard as the belt retracts. 5. Allow the belt to retract 35
Allowing belt to retract. This indicates the retractor is in the automatic locking mode, Figure 4. A clicking sound will be heard as the belt retracts. 5. Allow the belt to retract 35
Owner's Manual
Page 40
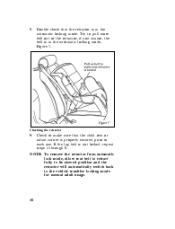
... 9. Check to make sure that the retractor is in the automatic locking mode, Figure 7. Try to each use. NOTE: To remove the retractor from automatic lock mode, allow seat belt to retract fully to its stowed position and the retractor will automatically switch back to the vehicle sensitive locking mode for normal adult... usage. 38 If the lap belt is in the automatic locking mode. 8. Double check that the child seat or infant carrier is properly secured prior to pull more belt out of the retractor, if you ...
... 9. Check to make sure that the retractor is in the automatic locking mode, Figure 7. Try to each use. NOTE: To remove the retractor from automatic lock mode, allow seat belt to retract fully to its stowed position and the retractor will automatically switch back to the vehicle sensitive locking mode for normal adult... usage. 38 If the lap belt is in the automatic locking mode. 8. Double check that the child seat or infant carrier is properly secured prior to pull more belt out of the retractor, if you ...

Owner's Manual
Page 43
See Figure 4. Grasp the shoulder portion of the belt and pull downward until all of the belt is extracted and a click is in the automatic locking mode to properly restrain a child. 41 NOTE: The dual-locking mode retractor must be in the automatic locking mode (child seat restraint mode). Buckling the belt 5. At this time, the retractor is heard.
See Figure 4. Grasp the shoulder portion of the belt and pull downward until all of the belt is extracted and a click is in the automatic locking mode to properly restrain a child. 41 NOTE: The dual-locking mode retractor must be in the automatic locking mode (child seat restraint mode). Buckling the belt 5. At this time, the retractor is heard.

Owner's Manual
Page 44
This indicates the retractor is in the belt. Pull up on the shoulder webbing. See Figures 5 and 6. 42 A clicking sound will be heard as the belt retracts. Allow the belt to automatic locking mode 6. Push down on the child seat while you pull up on the belt to remove any slack in the automatic locking mode. Setting the retractor to retract.
This indicates the retractor is in the belt. Pull up on the shoulder webbing. See Figures 5 and 6. 42 A clicking sound will be heard as the belt retracts. Allow the belt to automatic locking mode 6. Push down on the child seat while you pull up on the belt to remove any slack in the automatic locking mode. Setting the retractor to retract.

Owner's Manual
Page 47
Checking the retractor 9. If you cannot, the belt is properly secured prior to make sure that the retractor is not locked, repeat steps 4 through 7. Check to each use. Try to the vehicle sensitive locking mode for normal adult usage. 45 If the retractor is in the automatic locking mode. To remove the retractor from automatic lock mode, allow webbing to retract fully to its stowed position and the retractor will automatically switch back to pull more belt out of the retractor. Double check that the child seat is in the automatic locking mode. See Figure 8. 8.
Checking the retractor 9. If you cannot, the belt is properly secured prior to make sure that the retractor is not locked, repeat steps 4 through 7. Check to each use. Try to the vehicle sensitive locking mode for normal adult usage. 45 If the retractor is in the automatic locking mode. To remove the retractor from automatic lock mode, allow webbing to retract fully to its stowed position and the retractor will automatically switch back to pull more belt out of the retractor. Double check that the child seat is in the automatic locking mode. See Figure 8. 8.

Owner's Manual
Page 50
... position that allows you to shut off the engine and all accessories without locking the steering wheel or the automatic transmission gearshift lever. 49 It also locks the automatic transmission gearshift lever. Starting Your Mustang Ignition Understanding the Positions of the Ignition The positions of the key in the ignition ACCESSORY allows some...
... position that allows you to shut off the engine and all accessories without locking the steering wheel or the automatic transmission gearshift lever. 49 It also locks the automatic transmission gearshift lever. Starting Your Mustang Ignition Understanding the Positions of the Ignition The positions of the key in the ignition ACCESSORY allows some...

Owner's Manual
Page 51
.... Set the parking brake fully. Key release button (manual transmission only) 5. 6. 50 Turn the key to the OFF (manual transmission) or LOCK (automatic transmission). Release the key once the engine starts so that you to test the brake warning light. Put the gearshift in this position while the... and stays in (manual transmission only). 2. 3. 4. The key returns to the ON position once the engine is started and remains in P (Park) (automatic transmission) or 1 (First) (manual transmission). Push in the key release button until it . Removing the Key From the Ignition 1.
.... Set the parking brake fully. Key release button (manual transmission only) 5. 6. 50 Turn the key to the OFF (manual transmission) or LOCK (automatic transmission). Release the key once the engine starts so that you to test the brake warning light. Put the gearshift in this position while the... and stays in (manual transmission only). 2. 3. 4. The key returns to the ON position once the engine is started and remains in P (Park) (automatic transmission) or 1 (First) (manual transmission). Push in the key release button until it . Removing the Key From the Ignition 1.
Owner's Manual
Page 52
... in the ignition, a warning chime sounds. RWARNING Always set the parking brake fully and make sure that the gearshift is still in P (Park) (automatic transmission) or 1 (First) (manual transmission). If the key is to avoid pressing down on hot, sunny days, temperatures in the P (Park) .... Fuel-Injected Engines When starting . RWARNING Do not leave children, unreliable adults, or pets alone in your vehicle has an automatic transmission, the gearshift lever must be in a closed vehicle could accidentally injure themselves or others through inadvertent operation of the vehicle.
... in the ignition, a warning chime sounds. RWARNING Always set the parking brake fully and make sure that the gearshift is still in P (Park) (automatic transmission) or 1 (First) (manual transmission). If the key is to avoid pressing down on hot, sunny days, temperatures in the P (Park) .... Fuel-Injected Engines When starting . RWARNING Do not leave children, unreliable adults, or pets alone in your vehicle has an automatic transmission, the gearshift lever must be in a closed vehicle could accidentally injure themselves or others through inadvertent operation of the vehicle.
Owner's Manual
Page 53
If you have an automatic transmission, make sure that the gearshift is fully set before you start your vehicle, do the following: 1. Exhaust fumes are turned off when starting. Make ...
If you have an automatic transmission, make sure that the gearshift is fully set before you start your vehicle, do the following: 1. Exhaust fumes are turned off when starting. Make ...
Owner's Manual
Page 56
..., simply plug it into a grounded 110-volt outlet. If the engine idle speed does not slow down automatically, do not use your heater with ungrounded electrical systems or two-pronged (cheater) adapters. 55 Ford recommends that you live in dry grass or other damage. Engine Block Heater (If equipped) Engine block heaters...
..., simply plug it into a grounded 110-volt outlet. If the engine idle speed does not slow down automatically, do not use your heater with ungrounded electrical systems or two-pronged (cheater) adapters. 55 Ford recommends that you live in dry grass or other damage. Engine Block Heater (If equipped) Engine block heaters...

Owner's Manual
Page 60
If you see or smell fuel, do not see or smell fuel, you do not start your vehicle again. Vehicles with automatic transmissions cannot be push started by pushing. Check all vehicle warning lights before driving the vehicle. 6. If you can try to possible catalytic converter damage. Follow the directions under the vehicle again for leaking fuel. Pushing Vehicles with manual transmissions should not be started due to start your vehicle again. 5. Check under If Your Vehicle Needs a Jump-Start. 59
If you see or smell fuel, do not see or smell fuel, you do not start your vehicle again. Vehicles with automatic transmissions cannot be push started by pushing. Check all vehicle warning lights before driving the vehicle. 6. If you can try to possible catalytic converter damage. Follow the directions under the vehicle again for leaking fuel. Pushing Vehicles with manual transmissions should not be started due to start your vehicle again. 5. Check under If Your Vehicle Needs a Jump-Start. 59
Owner's Manual
Page 69
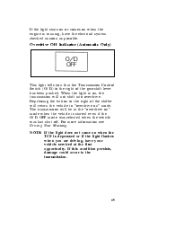
... when the vehicle is started even if the O/D OFF mode was selected when the vehicle was last shut off. For more information see Driving Your Mustang. Overdrive Off Indicator (Automatic Only) This light tells you are driving, have the electrical system checked as soon as possible.
... when the vehicle is started even if the O/D OFF mode was selected when the vehicle was last shut off. For more information see Driving Your Mustang. Overdrive Off Indicator (Automatic Only) This light tells you are driving, have the electrical system checked as soon as possible.

Owner's Manual
Page 86
.... u To turn on , push the concave side of the parking brake. But you turn on the headlamps, the parking lamps, tail lamps, and side markers automatically turn off, push the raised side of the 86
.... u To turn on , push the concave side of the parking brake. But you turn on the headlamps, the parking lamps, tail lamps, and side markers automatically turn off, push the raised side of the 86

Owner's Manual
Page 96
...to drive in 4 (Fourth) gear in the Overdrive off mode. NOTE: For vehicles equipped with 5-speed manual transmission, it may occur. This can automatically maintain a constant speed at high elevations, or when pulling a trailer, it may require 97 When driving uphill, especially with the transmission in mountainous ... (FCC) or in hilly terrain, at or above 30 mph (50 km/h). If the speed drops more than 10 mph (16 km/h) the automatic speed control will cause the engine to N (Neutral) when using the speed control. Therefore, use only properly installed FCC (CRTC in Canada) approved...
...to drive in 4 (Fourth) gear in the Overdrive off mode. NOTE: For vehicles equipped with 5-speed manual transmission, it may occur. This can automatically maintain a constant speed at high elevations, or when pulling a trailer, it may require 97 When driving uphill, especially with the transmission in mountainous ... (FCC) or in hilly terrain, at or above 30 mph (50 km/h). If the speed drops more than 10 mph (16 km/h) the automatic speed control will cause the engine to N (Neutral) when using the speed control. Therefore, use only properly installed FCC (CRTC in Canada) approved...


