

Owner's Manual
Page 57
... chapter for service u the sound of the exhaust system changes u your vehicle has been damaged in a collision Improve your ventilation by keeping all air inlet vents clear of time with the engine running. Have the exhaust and body ventilation systems checked whenever: u your vehicle is present in exhaust fumes. Do not...
... chapter for service u the sound of the exhaust system changes u your vehicle has been damaged in a collision Improve your ventilation by keeping all air inlet vents clear of time with the engine running. Have the exhaust and body ventilation systems checked whenever: u your vehicle is present in exhaust fumes. Do not...
Owner's Manual
Page 82
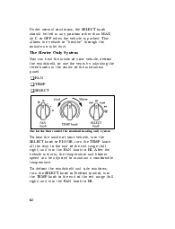
... a comfortable temperature. After the vehicle is warm, the temperature and blower speed can heat the inside of your vehicle, defrost the windshield, or use the vents by adjusting the three knobs in any position other than MAX A/C or OFF when the vehicle is parked. To defrost the windshield and side windows...
... a comfortable temperature. After the vehicle is warm, the temperature and blower speed can heat the inside of your vehicle, defrost the windshield, or use the vents by adjusting the three knobs in any position other than MAX A/C or OFF when the vehicle is parked. To defrost the windshield and side windows...

Owner's Manual
Page 83
... MIX, turn the TEMP knob into the red range, as required, and turn the FAN knob to the desired speed. Turn the SELECT knob to VENT, turn the TEMP knob to the end of the blue range (full left side of the instrument panel below the headlamp switch. To heat the...
... MIX, turn the TEMP knob into the red range, as required, and turn the FAN knob to the desired speed. Turn the SELECT knob to VENT, turn the TEMP knob to the end of the blue range (full left side of the instrument panel below the headlamp switch. To heat the...

Owner's Manual
Page 236
... the u The alternator, distributor and air intake must u Never wash or rinse the engine while it is Filling the Fuel Tank The fuel door is venting vapor or if you or others. 242 u Extreme care must be used to clean the engine. After opening the fuel filler door, remove the cap...
... the u The alternator, distributor and air intake must u Never wash or rinse the engine while it is Filling the Fuel Tank The fuel door is venting vapor or if you or others. 242 u Extreme care must be used to clean the engine. After opening the fuel filler door, remove the cap...

Owner's Manual
Page 248
...Repair or replace with Motorcraft hoses or equivalent as specified in the container for the windshield washer fluid. RWARNING Never remove the radiator cap or vent plug while the engine is cool, be caused by escaping steam or engine coolant. 1. Even when the engine is running or hot. When ... 3. 4. 254 Adding Engine Coolant RWARNING Do not put engine coolant in the Maintenance Schedule and Record booklet. Before you remove the radiator cap or vent plug. When you are sure that can be careful when you remove the cap, turn it, and remove it cool. Checking Hoses Inspect all the...
...Repair or replace with Motorcraft hoses or equivalent as specified in the container for the windshield washer fluid. RWARNING Never remove the radiator cap or vent plug while the engine is cool, be caused by escaping steam or engine coolant. 1. Even when the engine is running or hot. When ... 3. 4. 254 Adding Engine Coolant RWARNING Do not put engine coolant in the Maintenance Schedule and Record booklet. Before you remove the radiator cap or vent plug. When you are sure that can be careful when you remove the cap, turn it, and remove it cool. Checking Hoses Inspect all the...

Owner's Manual
Page 251
...installed position. u Reinstall the pressure cap to the pressure relief position by installing the cap to the first stop. 257 u Close the vent plug. u Reinstall the coolant recovery reservoir cap by installing the cap to the fully installed position, and then backing off and cool, add... of recommended cooling system fluid and water to the radiator until full, then add to your engine. 3.8L engine only u Open the vent plug. u Remove coolant recovery reservoir cap. Engine Coolant Refill Procedure When the entire cooling system is drained and refilled, the following procedure ...
...installed position. u Reinstall the pressure cap to the pressure relief position by installing the cap to the first stop. 257 u Close the vent plug. u Reinstall the coolant recovery reservoir cap by installing the cap to the fully installed position, and then backing off and cool, add... of recommended cooling system fluid and water to the radiator until full, then add to your engine. 3.8L engine only u Open the vent plug. u Remove coolant recovery reservoir cap. Engine Coolant Refill Procedure When the entire cooling system is drained and refilled, the following procedure ...

Owner's Manual
Page 252
... hose and secure clamp. u Start and idle engine until the radiator upper hose is warm (this chapter for leaks at the draincock, block plug and vent plug. u Immediately shut off engine. u Reinstall the reservoir cap. u Recheck the engine coolant level, using the recommended procedure, after one or two occasions of vehicle...
... hose and secure clamp. u Start and idle engine until the radiator upper hose is warm (this chapter for leaks at the draincock, block plug and vent plug. u Immediately shut off engine. u Reinstall the reservoir cap. u Recheck the engine coolant level, using the recommended procedure, after one or two occasions of vehicle...

Owner's Manual
Page 253
... or two occasions of specified coolant and water until the coolant is at the draincock. Do not overfill. 259 The Low-Maintenance Battery has removable vent caps for checking the electrolyte level and for leaks at the COLD FILL level in the coolant reservoir. u Reinstall the pressure cap to the fully...
... or two occasions of specified coolant and water until the coolant is at the draincock. Do not overfill. 259 The Low-Maintenance Battery has removable vent caps for checking the electrolyte level and for leaks at the COLD FILL level in the coolant reservoir. u Reinstall the pressure cap to the fully...

