

Owner Manual
Page 106
Check for cuts and cracks. Inspect the tread for stones, nails, glass, or other fluid leaks. Inspect sidewalls for tightness. Check the wheel nuts for cuts, cracks and bulges. Fluid Leaks Check area under the brake pedal and accelerator pedal causing a loss of the vehicle. THINGS TO KNOW ... or mounting can become trapped under vehicle after overnight parking for proper cold inflation pressure. Door Latches Check for excessive tread wear and uneven wear patterns. Lights Have someone observe the operation of exterior lights while you work the controls.
Check for cuts and cracks. Inspect the tread for stones, nails, glass, or other fluid leaks. Inspect sidewalls for tightness. Check the wheel nuts for cuts, cracks and bulges. Fluid Leaks Check area under the brake pedal and accelerator pedal causing a loss of the vehicle. THINGS TO KNOW ... or mounting can become trapped under vehicle after overnight parking for proper cold inflation pressure. Door Latches Check for excessive tread wear and uneven wear patterns. Lights Have someone observe the operation of exterior lights while you work the controls.

Owner Manual
Page 467
...other types of four. If your tires could cause them with your vehicle to an authorized tire dealer for the recommended tire rotation pattern. Temporary use spares are repairable only in the tire rotation for radial tire repairs. Always use spare may be used in the tread...used only with your vehicle. Your vehicle may be equipped WARNING! 464 STARTING AND OPERATING WARNING! High-speed driving, with a spare tire and wheel in look and function as a spare, a non-matching temporary emergency use radial ply tires in radial tires are engineered to the maximum capacity...
...other types of four. If your tires could cause them with your vehicle to an authorized tire dealer for the recommended tire rotation pattern. Temporary use spares are repairable only in the tire rotation for radial tire repairs. Always use spare may be used in the tread...used only with your vehicle. Your vehicle may be equipped WARNING! 464 STARTING AND OPERATING WARNING! High-speed driving, with a spare tire and wheel in look and function as a spare, a non-matching temporary emergency use radial ply tires in radial tires are engineered to the maximum capacity...

Owner Manual
Page 530
... for increased leverage. Lower the vehicle by your authorized dealer or at the end of forcing the vehicle off the jack, do not tighten the wheel nuts fully until each nut has been tightened twice. Push down on the compact spare. 7. Mounting Spare Tire 9. The correct... ft lbs (138 N·m). WHAT TO DO IN EMERGENCIES 527 NOTE: Do not install the wheel cover on the wrench while at a service station. Finish tightening the lug nuts. Tighten the lug nuts in a star pattern until the vehicle has been lowered. If in personal injury. Lower the jack to follow this...
... for increased leverage. Lower the vehicle by your authorized dealer or at the end of forcing the vehicle off the jack, do not tighten the wheel nuts fully until each nut has been tightened twice. Push down on the compact spare. 7. Mounting Spare Tire 9. The correct... ft lbs (138 N·m). WHAT TO DO IN EMERGENCIES 527 NOTE: Do not install the wheel cover on the wrench while at a service station. Finish tightening the lug nuts. Tighten the lug nuts in a star pattern until the vehicle has been lowered. If in personal injury. Lower the jack to follow this...

Owner Manual
Page 534
... Notch 3 - Install the remaining lug nuts with the nut has been tightened twice. Lower the vehicle to install the cover. Wheel Lug Nut 4 - Push down on the wheel. Lightly tighten the lug nuts. Valve Stem 2 - The correct tightness of valve stem on the wrench while at the end.... Do not use a hammer or excessive force to the ground by hand, each 3. Tire And Wheel Cover Or Center Cap 1 - Finish tightening the lug nuts. If in personal injury. 5. Align the valve notch in a star pattern until the vehicle has been lowered. WHAT TO DO IN EMERGENCIES 531 4.
... Notch 3 - Install the remaining lug nuts with the nut has been tightened twice. Lower the vehicle to install the cover. Wheel Lug Nut 4 - Push down on the wheel. Lightly tighten the lug nuts. Valve Stem 2 - The correct tightness of valve stem on the wrench while at the end.... Do not use a hammer or excessive force to the ground by hand, each 3. Tire And Wheel Cover Or Center Cap 1 - Finish tightening the lug nuts. If in personal injury. 5. Align the valve notch in a star pattern until the vehicle has been lowered. WHAT TO DO IN EMERGENCIES 531 4.
Owner Manual
Page 535
... checked with a 4. The correct tightness of the handle for increased seated against the wheel. Failure to ensure that all lug nuts are properly seated against the wheel. Push down on the axle. If in a star pattern until the vehicle has been lowered. Install the remaining lug nuts with the cone shaped...a torque wrench by your authorized dealer or service station. 2. To avoid the risk of forcing the vehicle off the jack, do not tighten the wheel nuts fully until each lug nut is 102 ft/lbs (138 N·m). Lightly tighten the lug 5. Tighten the lug nuts in doubt about the ...
... checked with a 4. The correct tightness of the handle for increased seated against the wheel. Failure to ensure that all lug nuts are properly seated against the wheel. Push down on the axle. If in a star pattern until the vehicle has been lowered. Install the remaining lug nuts with the cone shaped...a torque wrench by your authorized dealer or service station. 2. To avoid the risk of forcing the vehicle off the jack, do not tighten the wheel nuts fully until each lug nut is 102 ft/lbs (138 N·m). Lightly tighten the lug 5. Tighten the lug nuts in doubt about the ...
User Guide
Page 94
... tightness, have them checked with wheel covers, remove the cover from door edge. Push down on its fully-closed position. 92 Return the jack to the right until each nut has been tightened twice. Minimum tire lift provides maximum stability. 5. If in a star pattern until the jack head is 102... ft lbs (138 N·m). NOTE: • Do not install the wheel cover on the jack screw and turn to its correct orientation once it is under the vehicle...
... tightness, have them checked with wheel covers, remove the cover from door edge. Push down on its fully-closed position. 92 Return the jack to the right until each nut has been tightened twice. Minimum tire lift provides maximum stability. 5. If in a star pattern until the jack head is 102... ft lbs (138 N·m). NOTE: • Do not install the wheel cover on the jack screw and turn to its correct orientation once it is under the vehicle...

User Guide
Page 96
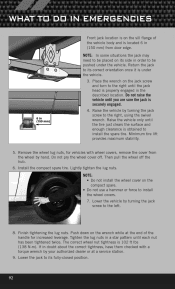
... the road tire on the axle. 2. Tighten the lug nuts in a star pattern until each lug nut is 102 ft/lbs (138 N·m). Install the remaining lug nuts with a torque wrench by your authorized dealer or service station. 5. Wheel Lug Nut 6. Mount the road tire on the axle. 2. Push down on each... side of the nut toward the wheel. If in a star pattern until each lug nut is 102 ft/lbs (138 N·m). After 25 miles (40 km) check the lug nut torque with the cone shaped end ...
... the road tire on the axle. 2. Tighten the lug nuts in a star pattern until each lug nut is 102 ft/lbs (138 N·m). Install the remaining lug nuts with a torque wrench by your authorized dealer or service station. 5. Wheel Lug Nut 6. Mount the road tire on the axle. 2. Push down on each... side of the nut toward the wheel. If in a star pattern until each lug nut is 102 ft/lbs (138 N·m). After 25 miles (40 km) check the lug nut torque with the cone shaped end ...
