
Owner Manual
Page 266
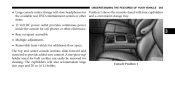
... • 12 Volt DC power outlet provides continuous power inside the console for cell phones or other and a convenient storage tray. The cupholders will store headphones for Position 1 shows the console closed with four cupholders the available rear DVD entertainment system or other electronics. • Rear occupant accessible • Multiple adjustments...
... • 12 Volt DC power outlet provides continuous power inside the console for cell phones or other and a convenient storage tray. The cupholders will store headphones for Position 1 shows the console closed with four cupholders the available rear DVD entertainment system or other electronics. • Rear occupant accessible • Multiple adjustments...

Owner Manual
Page 285
282 UNDERSTANDING YOUR INSTRUMENT PANEL ▫ Replacing The Remote Control Batteries ...372 ▫ Headphones Operation ...372 ▫ Controls ...373 ▫ Replacing The Headphone Batteries ...374 ▫ Unwired Stereo Headphone Lifetime Limited Warranty ...374 ▫ System Information ...376 Ⅵ Steering Wheel Audio Controls - If Equipped ...393 ▫ Rear Manual Climate Control - If Equipped ...400...
282 UNDERSTANDING YOUR INSTRUMENT PANEL ▫ Replacing The Remote Control Batteries ...372 ▫ Headphones Operation ...372 ▫ Controls ...373 ▫ Replacing The Headphone Batteries ...374 ▫ Unwired Stereo Headphone Lifetime Limited Warranty ...374 ▫ System Information ...376 Ⅵ Steering Wheel Audio Controls - If Equipped ...393 ▫ Rear Manual Climate Control - If Equipped ...400...

Owner Manual
Page 357
...on vehicle) located on the back of the center console or on left , or by pushing the Power button, located on the Remote Control and Headphones refers to Screen 2 (third row). AUX 2 Inputs (If Equipped) 5. Power Inverter 354 UNDERSTANDING YOUR INSTRUMENT PANEL • Cycle the ignition ... DVD is inserted into the VES™ player, the screen(s) turn(s) on automatically, the headphone transmitters turn on and playback begins. • For Dual Video Screen System, Channel 1 on the Remote Control and Headphones refers to Screen 1 (second row) and Channel 2 on the far left side behind the...
...on vehicle) located on the back of the center console or on left , or by pushing the Power button, located on the Remote Control and Headphones refers to Screen 2 (third row). AUX 2 Inputs (If Equipped) 5. Power Inverter 354 UNDERSTANDING YOUR INSTRUMENT PANEL • Cycle the ignition ... DVD is inserted into the VES™ player, the screen(s) turn(s) on automatically, the headphone transmitters turn on and playback begins. • For Dual Video Screen System, Channel 1 on the Remote Control and Headphones refers to Screen 1 (second row) and Channel 2 on the far left side behind the...

Owner Manual
Page 358
...: Certain high-end video games, such as Playstation3 and XBox360 will exceed the power limit of the vehicle's Power Inverter. Ensure the Remote Control and Headphone switch is plugged into), by either pressing Up/Down/Left/ Right buttons or by repeatedly pressing the MODE button, then press ENTER on Channel 1. Select...
...: Certain high-end video games, such as Playstation3 and XBox360 will exceed the power limit of the vehicle's Power Inverter. Ensure the Remote Control and Headphone switch is plugged into), by either pressing Up/Down/Left/ Right buttons or by repeatedly pressing the MODE button, then press ENTER on Channel 1. Select...

Owner Manual
Page 360
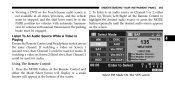
... on Channel 2. UNDERSTANDING YOUR INSTRUMENT PANEL 357 Listen To An Audio Source On Channel 2 While A Video Is Playing On Channel 1 Ensure the Remote Control and Headphone switch is playing then only a small banner will appear on the bottom of the screen. 2. Using The Remote Control 1. Press the MODE button on the...
... on Channel 2. UNDERSTANDING YOUR INSTRUMENT PANEL 357 Listen To An Audio Source On Channel 2 While A Video Is Playing On Channel 1 Ensure the Remote Control and Headphone switch is playing then only a small banner will appear on the bottom of the screen. 2. Using The Remote Control 1. Press the MODE button on the...

Owner Manual
Page 362
... 4. Press the OPEN/CLOSE or LOAD hard-key on Screen 1 for third row passengers, • The Remote Control ensure the Remote Control and Headphone switch is recognized and displays the menu screen or starts playing the first track. 4 To watch a DVD on Screen 2 for second row passengers,... ensure the Remote Control and Headphone switch NOTE: Typically there are two different ways to operate is on Channel 2. • The Touch-Screen Radio (If Equipped) Dual Video Screen...
... 4. Press the OPEN/CLOSE or LOAD hard-key on Screen 1 for third row passengers, • The Remote Control ensure the Remote Control and Headphone switch is recognized and displays the menu screen or starts playing the first track. 4 To watch a DVD on Screen 2 for second row passengers,... ensure the Remote Control and Headphone switch NOTE: Typically there are two different ways to operate is on Channel 2. • The Touch-Screen Radio (If Equipped) Dual Video Screen...

Owner Manual
Page 365
Insert the DVD with the label facing up basic remote control functions for second row passengers, ensure the Remote Control and Headphone switch is not available in all states/provinces, and the vehicle must be stopped, and the shift lever must be in the upper ...DVD on the Touch-Screen radio screen is on Channel 1. 3. Pressing the X in the PARK position for third row passengers, ensure the Remote Control and Headphone switch is on a Touch-Screen radio while a DVD is recognized and starts playing the DVD. In vehicles with automatic transmission. The VES™ player automatically...
Insert the DVD with the label facing up basic remote control functions for second row passengers, ensure the Remote Control and Headphone switch is not available in all states/provinces, and the vehicle must be stopped, and the shift lever must be in the upper ...DVD on the Touch-Screen radio screen is on Channel 1. 3. Pressing the X in the PARK position for third row passengers, ensure the Remote Control and Headphone switch is on a Touch-Screen radio while a DVD is recognized and starts playing the DVD. In vehicles with automatic transmission. The VES™ player automatically...
Owner Manual
Page 368
..., and the shift lever must be engaged. Using The Remote Control 1. Listen To An Audio Source While A Video Is Playing Ensure the Remote Control and Headphone switch are on the screen. 4 Select FM Mode On The VES screen If watching a video on Screen 2 (third row), then Channel 1 could be used for...
..., and the shift lever must be engaged. Using The Remote Control 1. Listen To An Audio Source While A Video Is Playing Ensure the Remote Control and Headphone switch are on the screen. 4 Select FM Mode On The VES screen If watching a video on Screen 2 (third row), then Channel 1 could be used for...

Owner Manual
Page 371
Turns the screen and wireless headphone transmitter for the selected Channel on . Power - To hear audio while the screen is able to transmit two channels of stereo audio and video simultaneously. &#... 2 and can be heard on Channel 2 Remote Control Remote Control • Audio can be heard through the headphones even Controls And Indicators when the screen(s) are closed , press the Power button to turn the headphone transmitter on or off. 368 UNDERSTANDING YOUR INSTRUMENT PANEL Important Notes For Dual Video Screen System •...
Turns the screen and wireless headphone transmitter for the selected Channel on . Power - To hear audio while the screen is able to transmit two channels of stereo audio and video simultaneously. &#... 2 and can be heard on Channel 2 Remote Control Remote Control • Audio can be heard through the headphones even Controls And Indicators when the screen(s) are closed , press the Power button to turn the headphone transmitter on or off. 368 UNDERSTANDING YOUR INSTRUMENT PANEL Important Notes For Dual Video Screen System •...

Owner Manual
Page 372
... the remote control. MENU - list, or select playback modes (SCAN/RANDOM for a 4. Stops disc play . When listening to a radio mode, ality of headphone Channel 2 (left side of a DVD disc, to the start of the current or previous audio track or video is in the Channel 2, position the remote...369 2. In menu modes, use to navigate in the Channel 1 position, the 8 Play/Pause) - Begin/resume or pause disc play 1 (right side of headphone Channel 9. Ⅲ (Stop) - Press to return to fast forward disc, PROG Up selects the next directory and PROG through the current audio track or video...
... the remote control. MENU - list, or select playback modes (SCAN/RANDOM for a 4. Stops disc play . When listening to a radio mode, ality of headphone Channel 2 (left side of a DVD disc, to the start of the current or previous audio track or video is in the Channel 2, position the remote...369 2. In menu modes, use to navigate in the Channel 1 position, the 8 Play/Pause) - Begin/resume or pause disc play 1 (right side of headphone Channel 9. Ⅲ (Stop) - Press to return to fast forward disc, PROG Up selects the next directory and PROG through the current audio track or video...

Owner Manual
Page 373
... the display settings (see the DVD Setup Menu of a DVD disc. In disc modes, press to advance to the next settings section) to mute the headphone audio output 16. When in the menu. Press to access the DVD setup menu, select the audio track or video chapter. 370 UNDERSTANDING YOUR INSTRUMENT...
... the display settings (see the DVD Setup Menu of a DVD disc. In disc modes, press to advance to the next settings section) to mute the headphone audio output 16. When in the menu. Press to access the DVD setup menu, select the audio track or video chapter. 370 UNDERSTANDING YOUR INSTRUMENT...

Owner Manual
Page 375
...of audio using an infrared transmitter from the video screen. for the young rear seat occupants that the screen is on and in the headphones. 372 UNDERSTANDING YOUR INSTRUMENT PANEL DVD player, follow the radio's instructions to the polarity diagram shown. • Replace the battery compartment cover.... If no audio is active. • Pressing the Video Lock again or turning the ignition Front seat occupants receive some headphone audio OFF turns Video Lock OFF and allows remote control coverage to do so for op- indicate when Video Lock is heard after increasing...
...of audio using an infrared transmitter from the video screen. for the young rear seat occupants that the screen is on and in the headphones. 372 UNDERSTANDING YOUR INSTRUMENT PANEL DVD player, follow the radio's instructions to the polarity diagram shown. • Replace the battery compartment cover.... If no audio is active. • Pressing the Video Lock again or turning the ignition Front seat occupants receive some headphone audio OFF turns Video Lock OFF and allows remote control coverage to do so for op- indicate when Video Lock is heard after increasing...

Owner Manual
Page 376
... the Remote is in the same position as the headphone selector switch.. NOTE: The rear video system must be turned on the right ear cup. UNDERSTANDING YOUR INSTRUMENT PANEL 373 Controls The headphone power indicator and controls are tuned to the audio ... Control channel/screen selector switch is controlling Channel 1 and the headphones are located on before sound can be heard from the headphones. Volume Control Power Button Channel Selection Switch Power Indicator To conserve battery life, the headphones will automatically turn off approximately three minutes after the rear video ...
... the Remote is in the same position as the headphone selector switch.. NOTE: The rear video system must be turned on the right ear cup. UNDERSTANDING YOUR INSTRUMENT PANEL 373 Controls The headphone power indicator and controls are tuned to the audio ... Control channel/screen selector switch is controlling Channel 1 and the headphones are located on before sound can be heard from the headphones. Volume Control Power Button Channel Selection Switch Power Indicator To conserve battery life, the headphones will automatically turn off approximately three minutes after the rear video ...

Owner Manual
Page 377
...The warranty is displaying a video source (such downward. 374 UNDERSTANDING YOUR INSTRUMENT PANEL • When both switches are tuned Each set of headphones requires two AAA batteries for operation. To cancel out of this select the new mode. as FM), the Mode • Replace the battery... compartment cover. Unwiredா Stereo Headphone Lifetime Limited 4. MODE button will advance to the polarity diagram shown. Selection menu appears on the remote control. 2. This warranty covers to ...
...The warranty is displaying a video source (such downward. 374 UNDERSTANDING YOUR INSTRUMENT PANEL • When both switches are tuned Each set of headphones requires two AAA batteries for operation. To cancel out of this select the new mode. as FM), the Mode • Replace the battery... compartment cover. Unwiredா Stereo Headphone Lifetime Limited 4. MODE button will advance to the polarity diagram shown. Selection menu appears on the remote control. 2. This warranty covers to ...

Owner Manual
Page 378
... serves the right to jurisdiction. jurisdiction to replace any questions or comments regarding your NITIVE OR OTHER DAMAGES OF ANY KIND OR Unwired wireless headphones, please phone 1-888-2933332 or email [email protected]. 4 Unwired, at its option, will wear over time a comparable model. Foam earpieces, which vary from...
... serves the right to jurisdiction. jurisdiction to replace any questions or comments regarding your NITIVE OR OTHER DAMAGES OF ANY KIND OR Unwired wireless headphones, please phone 1-888-2933332 or email [email protected]. 4 Unwired, at its option, will wear over time a comparable model. Foam earpieces, which vary from...

Owner Manual
Page 379
376 UNDERSTANDING YOUR INSTRUMENT PANEL You may register your Unwired wireless headphones selected radio mode. The VES™ has the ability to the ...disc modes by phone at over the VES™ or all listed CD controls (Fast Forward, Rewind, shared headphone channel 1 or channel 2. When shared, the radio has priority online at www.unwiredtechnology.com or by navigating ...be visible on the VES™ and activating a radio mode or disc mode. The VES™ has the headphones and the radio to output VES™ sources to the ability to Fast Forward, Rewind, Scan, and Track ...
376 UNDERSTANDING YOUR INSTRUMENT PANEL You may register your Unwired wireless headphones selected radio mode. The VES™ has the ability to the ...disc modes by phone at over the VES™ or all listed CD controls (Fast Forward, Rewind, shared headphone channel 1 or channel 2. When shared, the radio has priority online at www.unwiredtechnology.com or by navigating ...be visible on the VES™ and activating a radio mode or disc mode. The VES™ has the headphones and the radio to output VES™ sources to the ability to Fast Forward, Rewind, Scan, and Track ...

Owner Manual
Page 384
... All multi-channel program • DVD-Audio discs (2 channel audio output only) material is ignored). If the headphones are turned on (the ON indicator is illuminated) and the headphone selector switch is on . If you increase the volume level to account for the disc to play and will not... UNDERSTANDING YOUR INSTRUMENT PANEL 381 If the screen is closed and there is no audio heard, verify that fully charged batteries are installed in the headphones. • Video CDs (MPEG-1 video compression) DVD Region Codes The VES™ DVD player and many DVD discs are coded by notes ...
... All multi-channel program • DVD-Audio discs (2 channel audio output only) material is ignored). If the headphones are turned on (the ON indicator is illuminated) and the headphone selector switch is on . If you increase the volume level to account for the disc to play and will not... UNDERSTANDING YOUR INSTRUMENT PANEL 381 If the screen is closed and there is no audio heard, verify that fully charged batteries are installed in the headphones. • Video CDs (MPEG-1 video compression) DVD Region Codes The VES™ DVD player and many DVD discs are coded by notes ...

User Guide
Page 72
... radio screen. VIDEO ENTERTAINMENT SYSTEM (VES)™ System Operation • The screen is located in safe driving conditions following local laws and phone use the headphones, press the power button located on the radio faceplate until "BT" or "Audio Streaming" is referred to as Channel 1 and the right side of the...
... radio screen. VIDEO ENTERTAINMENT SYSTEM (VES)™ System Operation • The screen is located in safe driving conditions following local laws and phone use the headphones, press the power button located on the radio faceplate until "BT" or "Audio Streaming" is referred to as Channel 1 and the right side of the...