

Owner Manual
Page 441
...increase the steering fluid temperature and it checked if a leak is suspected, abnormal noises are apparent, and/or the system is not covered by the New Vehicle Limited Warranty. The fluid should only be considered normal, and it should be WARNING! Service should be obtained as... fluid. Do not overfill. Coordinate inspection efforts through an authoWARNING! Power Steering Fluid Check Checking the power steering fluid level at the end of the steering system at a defined service interval is not required. Such damage is not functioning as anticidoes not in your power ...
...increase the steering fluid temperature and it checked if a leak is suspected, abnormal noises are apparent, and/or the system is not covered by the New Vehicle Limited Warranty. The fluid should only be considered normal, and it should be WARNING! Service should be obtained as... fluid. Do not overfill. Coordinate inspection efforts through an authoWARNING! Power Steering Fluid Check Checking the power steering fluid level at the end of the steering system at a defined service interval is not required. Such damage is not functioning as anticidoes not in your power ...

Owner Manual
Page 523
...a spare tire hook, and pull the spare tire out from underneath the vehicle. To remove the compact spare tire/cover assembly, assemble the winch T-handle extensions to allow enough slack in the center console area. The winch mechanism is ...not recommended and can damage the winch. 3. CAUTION! 520 WHAT TO DO IN EMERGENCIES 2. Spare Tire And Cover 1. Rotate the nut to pull the spare tire out from under the vehicle beneath the stops turning freely. This ...vehicle. Assemble the spare tire tools into a T-handle and place the square end over the spare tire winch drive nut.
...a spare tire hook, and pull the spare tire out from underneath the vehicle. To remove the compact spare tire/cover assembly, assemble the winch T-handle extensions to allow enough slack in the center console area. The winch mechanism is ...not recommended and can damage the winch. 3. CAUTION! 520 WHAT TO DO IN EMERGENCIES 2. Spare Tire And Cover 1. Rotate the nut to pull the spare tire out from under the vehicle beneath the stops turning freely. This ...vehicle. Assemble the spare tire tools into a T-handle and place the square end over the spare tire winch drive nut.

Owner Manual
Page 530
... its fully-closed position. 6 WARNING! To avoid the risk of the handle for increased leverage. Lower the vehicle by your authorized dealer or at the end of forcing the vehicle off the jack, do not tighten the wheel nuts fully until each nut has been tightened twice. Tighten the lug nuts... this warning may result in a star pattern until the vehicle has been lowered. WHAT TO DO IN EMERGENCIES 527 NOTE: Do not install the wheel cover on the wrench while at a service station. Push down on the compact spare. 7.
... its fully-closed position. 6 WARNING! To avoid the risk of the handle for increased leverage. Lower the vehicle by your authorized dealer or at the end of forcing the vehicle off the jack, do not tighten the wheel nuts fully until each nut has been tightened twice. Tighten the lug nuts... this warning may result in a star pattern until the vehicle has been lowered. WHAT TO DO IN EMERGENCIES 527 NOTE: Do not install the wheel cover on the wrench while at a service station. Push down on the compact spare. 7.
Owner Manual
Page 533
...Vehicle damage may cause loss of vehicle control. To ease the installation process for steel wheels with the cone shaped end of the valve stem. compact spare tire/cover assembly is 2. wheel covers, install two lug nuts on each side of the nut toward the overtightened. Continue to rotate the nut to ... hear which will cause vehicle damage and may result. It cannot be nuts with drawn into place against the underside of the spare tire and cover assembly, which are on the mounting studs 5. Do not attempt to use the winch to the 1. Check under the vehicle to stow a ...
...Vehicle damage may cause loss of vehicle control. To ease the installation process for steel wheels with the cone shaped end of the valve stem. compact spare tire/cover assembly is 2. wheel covers, install two lug nuts on each side of the nut toward the overtightened. Continue to rotate the nut to ... hear which will cause vehicle damage and may result. It cannot be nuts with drawn into place against the underside of the spare tire and cover assembly, which are on the mounting studs 5. Do not attempt to use the winch to the 1. Check under the vehicle to stow a ...

Owner Manual
Page 534
... tighten the lug nuts. Failure to the ground by hand, each 3. Lower the vehicle to follow this warning may result in the wheel cover with the cone shaped end of the nut toward the wheel. Align the valve notch in personal injury. 5. Do not use a hammer or excessive force to install the... on the wrench while at the end of forcing the vehicle off the jack, do not tighten the wheel nuts fully until each lug nut is 102 ft/lbs (138 N·m). Push down on the wheel. Tighten the lug nuts in doubt about the snapping the cover over the two lug nuts...
... tighten the lug nuts. Failure to the ground by hand, each 3. Lower the vehicle to follow this warning may result in the wheel cover with the cone shaped end of the nut toward the wheel. Align the valve notch in personal injury. 5. Do not use a hammer or excessive force to install the... on the wrench while at the end of forcing the vehicle off the jack, do not tighten the wheel nuts fully until each lug nut is 102 ft/lbs (138 N·m). Push down on the wheel. Tighten the lug nuts in doubt about the snapping the cover over the two lug nuts...
Owner Manual
Page 535
Lower the vehicle to ensure that all lug nuts are properly wrench while at the end of the nut toward the wheel. Install the remaining lug nuts with the cone shaped end of the handle for increased seated against the wheel. After 25 miles (40 km) check the lug nut torque with a 4.... tire on the torque wrench to follow the procedures in this warning may result in another vehicle or by using a set of Vehicles Without Wheel Covers each nut has been tightened twice. torque wrench to the ground by turning the jack wrench by your authorized dealer or service station. 2. 532...
Lower the vehicle to ensure that all lug nuts are properly wrench while at the end of the nut toward the wheel. Install the remaining lug nuts with the cone shaped end of the handle for increased seated against the wheel. After 25 miles (40 km) check the lug nut torque with a 4.... tire on the torque wrench to follow the procedures in this warning may result in another vehicle or by using a set of Vehicles Without Wheel Covers each nut has been tightened twice. torque wrench to the ground by turning the jack wrench by your authorized dealer or service station. 2. 532...

Owner Manual
Page 614
...a clue to have the for an appointment. Prepare A List We strongly recommend that you get prompt and high quality or work to be covered by an authorized dealer. facilities, factory-trained technicians, special tools, and the latest information to ensure the vehicle is advisable to make these ... ASSISTANCE warranty. Take your maintenance log, let the service. current problem. If you've had an accident are vitally manager. vehicle by the end of your vehicle's interested in your vehicle's problems or the authorized dealer. All work done that you take the vehicle to an Make a...
...a clue to have the for an appointment. Prepare A List We strongly recommend that you get prompt and high quality or work to be covered by an authorized dealer. facilities, factory-trained technicians, special tools, and the latest information to ensure the vehicle is advisable to make these ... ASSISTANCE warranty. Take your maintenance log, let the service. current problem. If you've had an accident are vitally manager. vehicle by the end of your vehicle's interested in your vehicle's problems or the authorized dealer. All work done that you take the vehicle to an Make a...

User Guide
Page 81
... 79 Installing The Crossbars • To install the crossbars, completely loosen the thumb screws at both ends and lift the crossbar from its stowed position. • Bend the pivot points at each end of evenly distributed weight. This line indicates how far rearward cargo can hold a maximum of 150 lbs...on the storage bin latch to the storage bin. UTILITY IN-FLOOR STORAGE - Pull up on the crossbar aligns with the storage bin covers open the cover. When installed, the roof rack can be used when the second row seat is in the upright position. Slide the storage bin ...
... 79 Installing The Crossbars • To install the crossbars, completely loosen the thumb screws at both ends and lift the crossbar from its stowed position. • Bend the pivot points at each end of evenly distributed weight. This line indicates how far rearward cargo can hold a maximum of 150 lbs...on the storage bin latch to the storage bin. UTILITY IN-FLOOR STORAGE - Pull up on the crossbar aligns with the storage bin covers open the cover. When installed, the roof rack can be used when the second row seat is in the upright position. Slide the storage bin ...
User Guide
Page 92
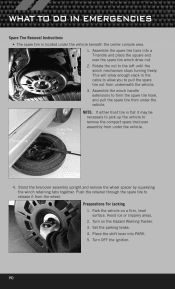
...cable to allow you to the left until the winch mechanism stops turning freely. Assemble the winch handle extensions to remove the compact spare tire/cover assembly from under the vehicle. Set the parking brake. 4. Rotate the nut to pull the spare tire out from underneath the vehicle. ... center console area. 1. Turn on a firm, level surface. Preparations For Jacking 1. Place the shift lever into a T-handle and place the square end over the spare tire winch drive nut. 2. Avoid ice or slippery areas. 2. Turn OFF the ignition. 90 Push the retainer through the spare tire...
...cable to allow you to the left until the winch mechanism stops turning freely. Assemble the winch handle extensions to remove the compact spare tire/cover assembly from under the vehicle. Set the parking brake. 4. Rotate the nut to pull the spare tire out from underneath the vehicle. ... center console area. 1. Turn on a firm, level surface. Preparations For Jacking 1. Place the shift lever into a T-handle and place the square end over the spare tire winch drive nut. 2. Avoid ice or slippery areas. 2. Turn OFF the ignition. 90 Push the retainer through the spare tire...
User Guide
Page 94
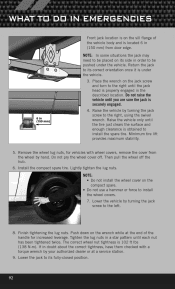
... IN EMERGENCIES Front jack location is on the sill flange of the handle for vehicles with a torque wrench by your authorized dealer or at the end of the vehicle body and is properly engaged in the described location. Return the jack to the left. 8. Place the wrench on the wrench ... (150 mm) from the wheel by turning the jack screw to its side in doubt about the correct tightness, have them checked with wheel covers, remove the cover from door edge. Then pull the wheel off . Lower the jack to the right, using the swivel wrench. Finish tightening the lug nuts. Raise...
... IN EMERGENCIES Front jack location is on the sill flange of the handle for vehicles with a torque wrench by your authorized dealer or at the end of the vehicle body and is properly engaged in the described location. Return the jack to the left. 8. Place the wrench on the wrench ... (150 mm) from the wheel by turning the jack screw to its side in doubt about the correct tightness, have them checked with wheel covers, remove the cover from door edge. Then pull the wheel off . Lower the jack to the right, using the swivel wrench. Finish tightening the lug nuts. Raise...

User Guide
Page 96
...with a torque wrench to the ground by your authorized dealer or service station. 5. Wheel Cover 5 - Lower the vehicle to install the cover. 4. Wheel Lug Nut 6. Install the remaining lug nuts with the cone shaped end of the nut toward the wheel. WHAT TO DO IN EMERGENCIES Road Tire Installation Vehicles Equipped.../lbs (138 N·m). After 25 miles (40 km) check the lug nut torque with the cone shaped end of the handle for steel wheels with a torque wrench by hand, snapping the cover over the two lug nuts. Valve Stem 2 - Mount the road tire on the mounting studs which are...
...with a torque wrench to the ground by your authorized dealer or service station. 5. Wheel Cover 5 - Lower the vehicle to install the cover. 4. Wheel Lug Nut 6. Install the remaining lug nuts with the cone shaped end of the nut toward the wheel. WHAT TO DO IN EMERGENCIES Road Tire Installation Vehicles Equipped.../lbs (138 N·m). After 25 miles (40 km) check the lug nut torque with the cone shaped end of the handle for steel wheels with a torque wrench by hand, snapping the cover over the two lug nuts. Valve Stem 2 - Mount the road tire on the mounting studs which are...

User Guide
Page 119
...ELECTRONICS: • Portable Navigation Systems • iPod® Adapter • Electronic Vehicle Tracking System • Front End Cover • Fog Lights • Full Vehicle Cover • Molded Splash Guards • Door Sill Guards • Ambient Light Kit • Rear Seat Floor Liner...and • Tent Kit Snowboard Carrier iPod® is a registered trademark of Authentic Dodge Accessories by Mopar featuring a fit, finish, and functionality specifically for your Dodge Grand Caravan. • In choosing Authentic Accessories you gain far more than expressive style, premium ...
...ELECTRONICS: • Portable Navigation Systems • iPod® Adapter • Electronic Vehicle Tracking System • Front End Cover • Fog Lights • Full Vehicle Cover • Molded Splash Guards • Door Sill Guards • Ambient Light Kit • Rear Seat Floor Liner...and • Tent Kit Snowboard Carrier iPod® is a registered trademark of Authentic Dodge Accessories by Mopar featuring a fit, finish, and functionality specifically for your Dodge Grand Caravan. • In choosing Authentic Accessories you gain far more than expressive style, premium ...


