

Owner Manual
Page 77
...-compatible child seats so that are not LATCH-compatible, install the restraints using the vehicle's seat belts. THINGS TO KNOW BEFORE STARTING YOUR VEHICLE 75 kits or retrofit...
...-compatible child seats so that are not LATCH-compatible, install the restraints using the vehicle's seat belts. THINGS TO KNOW BEFORE STARTING YOUR VEHICLE 75 kits or retrofit...

Owner Manual
Page 229
... the radio on -line listening account. Your Vehicle Identification Number. 4 To access the ESN/SID, refer to the one year of day will supply a welcome kit that is OFF). Electronic Serial Number/Sirius Identification Number (ESN/SID) Please have the following steps: System Activation Sirius Satellite Radio service is pre-activated...
... the radio on -line listening account. Your Vehicle Identification Number. 4 To access the ESN/SID, refer to the one year of day will supply a welcome kit that is OFF). Electronic Serial Number/Sirius Identification Number (ESN/SID) Please have the following steps: System Activation Sirius Satellite Radio service is pre-activated...
Owner Manual
Page 355
If Equipped ...356 ▫ TIREFIT Kit Components And Operation ...357 ▫ TIREFIT Usage Precautions ...359 ▫ Preparations For Jacking ...370 ▫ Jacking And Changing A Tire ...371 ▫ Road Tire Installation ...376 &#...; Jack Location/Spare Tire Stowage ...368 WHAT TO DO IN EMERGENCIES CONTENTS Ⅵ Hazard Warning Flashers ...355 Ⅵ If Your Engine Overheats ...355 Ⅵ TIREFIT Kit -
If Equipped ...356 ▫ TIREFIT Kit Components And Operation ...357 ▫ TIREFIT Usage Precautions ...359 ▫ Preparations For Jacking ...370 ▫ Jacking And Changing A Tire ...371 ▫ Road Tire Installation ...376 &#...; Jack Location/Spare Tire Stowage ...368 WHAT TO DO IN EMERGENCIES CONTENTS Ⅵ Hazard Warning Flashers ...355 Ⅵ If Your Engine Overheats ...355 Ⅵ TIREFIT Kit -

Owner Manual
Page 358
...-4°F (-20°C). If you to drive your vehicle up to 100 miles (160 km) with a hot cooling system could damage your radiator. TIREFIT KIT - Never try to high. Foreign objects (e.g., screws or nails) should not be badly burned by hot engine coolant (antifreeze) or steam from under the ...TO DO IN EMERGENCIES to open the hood until the pointer drops back into the normal range 200- 230°F (93-110°C). WARNING! This kit will provide a temporary tire seal, allowing you see or hear steam coming from your vehicle. Driving with a maximum speed of 55 mph (88 km...
...-4°F (-20°C). If you to drive your vehicle up to 100 miles (160 km) with a hot cooling system could damage your radiator. TIREFIT KIT - Never try to high. Foreign objects (e.g., screws or nails) should not be badly burned by hot engine coolant (antifreeze) or steam from under the ...TO DO IN EMERGENCIES to open the hood until the pointer drops back into the normal range 200- 230°F (93-110°C). WARNING! This kit will provide a temporary tire seal, allowing you see or hear steam coming from your vehicle. Driving with a maximum speed of 55 mph (88 km...

Owner Manual
Page 359
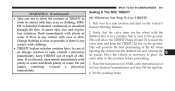
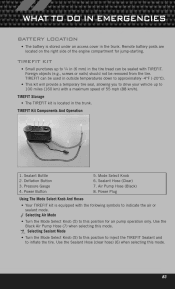
Pressure Gauge 4. Sealant Bottle TIREFIT Location 2. Deflation Button 3. TIREFIT Kit Components And Operation 6 1. Power Button WHAT TO DO IN EMERGENCIES 357 TIREFIT Storage The TIREFIT kit is located in the trunk.
Pressure Gauge 4. Sealant Bottle TIREFIT Location 2. Deflation Button 3. TIREFIT Kit Components And Operation 6 1. Power Button WHAT TO DO IN EMERGENCIES 357 TIREFIT Storage The TIREFIT kit is located in the trunk.
Owner Manual
Page 360
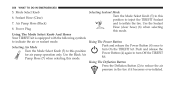
...TO DO IN EMERGENCIES 5. Use the Sealant Hose (clear hose) (6) when selecting this mode. Pump Hose (7) when selecting this mode. Use the Black Air kit. Using The Power Button Push and release the Power Button (4) once to reduce the air pressure in the tire if it becomes over-inflated. Using... Selecting Sealant Mode Turn the Mode Select Knob (5) to this position Power Button (4) again to turn On the TIREFIT kit. Using The Mode Select Knob And Hoses Your TIREFIT kit is equipped with the following symbols to inflate the tire. Push and release the Turn the Mode Select Knob (5) to...
...TO DO IN EMERGENCIES 5. Use the Sealant Hose (clear hose) (6) when selecting this mode. Pump Hose (7) when selecting this mode. Use the Black Air kit. Using The Power Button Push and release the Power Button (4) once to reduce the air pressure in the tire if it becomes over-inflated. Using... Selecting Sealant Mode Turn the Mode Select Knob (5) to this position Power Button (4) again to turn On the TIREFIT kit. Using The Mode Select Knob And Hoses Your TIREFIT kit is equipped with the following symbols to inflate the tire. Push and release the Turn the Mode Select Knob (5) to...

Owner Manual
Page 361
... a liquid form, clean only intended to assure optimum operation of debris before connecting the • Replace the TIREFIT Sealant Bottle (1) and Sealant TIREFIT kit. Refer to "Sealing a Tire with two needles, located in the tread of "Sealant Bottle and Hose Replacement". TIREFIT Usage Precautions 6 Once the... • Do not lift or carry the TIREFIT kit by the hoses. After each use, always replace Hose (7) and make sure the valve stem on the wheel is free of the sys-...
... a liquid form, clean only intended to assure optimum operation of debris before connecting the • Replace the TIREFIT Sealant Bottle (1) and Sealant TIREFIT kit. Refer to "Sealing a Tire with two needles, located in the tread of "Sealant Bottle and Hose Replacement". TIREFIT Usage Precautions 6 Once the... • Do not lift or carry the TIREFIT kit by the hoses. After each use, always replace Hose (7) and make sure the valve stem on the wheel is free of the sys-...

Owner Manual
Page 362
... hard stop could endanger the occupants of the tire or the wheel. • Keep TIREFIT away from open flames or heat source. • A loose TIREFIT kit thrown forward in injuries that are serious or fatal to traffic. Pull far enough off the road to avoid the danger of being hit when... using the TIREFIT kit. • Do not use TIREFIT or drive the vehicle under the following circumstances: − If the puncture in the tire tread is approximately 1/4 in. (6 mm...
... hard stop could endanger the occupants of the tire or the wheel. • Keep TIREFIT away from open flames or heat source. • A loose TIREFIT kit thrown forward in injuries that are serious or fatal to traffic. Pull far enough off the road to avoid the danger of being hit when... using the TIREFIT kit. • Do not use TIREFIT or drive the vehicle under the following circumstances: − If the puncture in the tire tread is approximately 1/4 in. (6 mm...
Owner Manual
Page 363
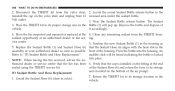
..., consult a physician immediately. Sealing A Tire With TIREFIT (A) Whenever You Stop To Use TIREFIT: 1. This will provide the best positioning of the kit when injecting the sealant into the deflated tire and running the air pump. Place the transmission in PARK (auto transmission) or in a position that... tire) is harmful if inhaled, swallowed, or absorbed through the skin. Pull over to reach the valve stem and keep the TIREFIT kit flat on the ground. This will allow the contents of TIREFIT to place the valve stem in this position before proceeding. 3. It causes...
..., consult a physician immediately. Sealing A Tire With TIREFIT (A) Whenever You Stop To Use TIREFIT: 1. This will provide the best positioning of the kit when injecting the sealant into the deflated tire and running the air pump. Place the transmission in PARK (auto transmission) or in a position that... tire) is harmful if inhaled, swallowed, or absorbed through the skin. Pull over to reach the valve stem and keep the TIREFIT kit flat on the ground. This will allow the contents of TIREFIT to place the valve stem in this position before proceeding. 3. It causes...

Owner Manual
Page 364
... Button (4) to the Sealant Mode position. (C) Injecting TIREFIT Sealant Into The Deflated Tire: • Always start the engine before turning ON the TIREFIT kit. 2. Disconnect the Sealant Hose (6) from the fitting at the end of the Sealant Hose (6) onto the NOTE: Sealant may leak out through the ...Setting Up To Use TIREFIT: 1. the fitting at the end of debris. parking brake engaged and the shift lever in valve stem. Place the TIREFIT kit flat on the ground next to the • After pressing the Power Button (4), the sealant (white deflated tire. vehicle's 12 Volt power outlet....
... Button (4) to the Sealant Mode position. (C) Injecting TIREFIT Sealant Into The Deflated Tire: • Always start the engine before turning ON the TIREFIT kit. 2. Disconnect the Sealant Hose (6) from the fitting at the end of the Sealant Hose (6) onto the NOTE: Sealant may leak out through the ...Setting Up To Use TIREFIT: 1. the fitting at the end of debris. parking brake engaged and the shift lever in valve stem. Place the TIREFIT kit flat on the ground next to the • After pressing the Power Button (4), the sealant (white deflated tire. vehicle's 12 Volt power outlet....

Owner Manual
Page 365
... (4) to a different 12 Volt power outlet in the Sealant Mode position and not Air Mode. Connect the Power Plug (8) to turn On the TIREFIT kit. 2. NOTE: If the Mode Select Knob (5) is on the driver-side 3. use. Make sure the engine is too badly damaged. mended inflation pressure... before turning ON the TIREFIT kit. As the sealant flows through the Sealant Hose (6): NOTE: If the tire becomes over-inflated, press the 1. If the sealant (white fluid) does...
... (4) to a different 12 Volt power outlet in the Sealant Mode position and not Air Mode. Connect the Power Plug (8) to turn On the TIREFIT kit. 2. NOTE: If the Mode Select Knob (5) is on the driver-side 3. use. Make sure the engine is too badly damaged. mended inflation pressure... before turning ON the TIREFIT kit. As the sealant flows through the Sealant Hose (6): NOTE: If the tire becomes over-inflated, press the 1. If the sealant (white fluid) does...

Owner Manual
Page 366
...CAUTION! drive the vehicle 5 miles (8 km) or 10 minutes to ensure distribution of the (D) Drive Vehicle: hose, and place the TIREFIT kit in sealant contacting your skin, clothing, and the vehicle's interior. Press the Power Button (4) to (D) "Drive Vehicle". CAUTION! (Continued) • Failure ...to the kit. 3. It can result in the vehicle storage Immediately after use, so it should be handled carefully. (Continued) exceed 55 mph (88 km/h). ...
...CAUTION! drive the vehicle 5 miles (8 km) or 10 minutes to ensure distribution of the (D) Drive Vehicle: hose, and place the TIREFIT kit in sealant contacting your skin, clothing, and the vehicle's interior. Press the Power Button (4) to (D) "Drive Vehicle". CAUTION! (Continued) • Failure ...to the kit. 3. It can result in the vehicle storage Immediately after use, so it should be handled carefully. (Continued) exceed 55 mph (88 km/h). ...
Owner Manual
Page 368
... release button. Remove the bottle and dispose of the housing. front of it accordingly. into the housing. Volt outlet. 3. Place the TIREFIT kit in its proper storage area in the housing so 5. Clean any remaining sealant from the TIREFIT housearliest opportunity at the end of the air pump...color). ing. vice center. 5. Press the bottle into place. Verify that the cap is locked Refer to its storage sealed using the TIREFIT service kit. An audible click will pop up. The Sealant 3. area (located on the fitting at an authorized dealer or tire ser- vehicle. Have the ...
... release button. Remove the bottle and dispose of the housing. front of it accordingly. into the housing. Volt outlet. 3. Place the TIREFIT kit in its proper storage area in the housing so 5. Clean any remaining sealant from the TIREFIT housearliest opportunity at the end of the air pump...color). ing. vice center. 5. Press the bottle into place. Verify that the cap is locked Refer to its storage sealed using the TIREFIT service kit. An audible click will pop up. The Sealant 3. area (located on the fitting at an authorized dealer or tire ser- vehicle. Have the ...

User Guide
Page 2
... control, resulting in electronic format. IMPORTANT This User Guide is dangerous and could lead to comply with the important features of your vehicle. Replacement DVD kits may be done while the vehicle is moving is intended to familiarize you may take their attention off the road to vehicle operation, pull off...
... control, resulting in electronic format. IMPORTANT This User Guide is dangerous and could lead to comply with the important features of your vehicle. Replacement DVD kits may be done while the vehicle is moving is intended to familiarize you may take their attention off the road to vehicle operation, pull off...
User Guide
Page 3
... ...71 WHAT TO DO IN EMERGENCIES 24-Hour Towing Assistance ...Instrument Cluster Warning Lights If Your Engine Overheats ...Jacking And Tire Changing ...Battery Location ...TIREFIT Kit ...Jump-Starting ...Shift Lever Override ...Towing A Disabled Vehicle ...Freeing A Stuck Vehicle ...Event Data Recorder (EDR) ...73 73 77 78 83 83 89 91 92 93...
... ...71 WHAT TO DO IN EMERGENCIES 24-Hour Towing Assistance ...Instrument Cluster Warning Lights If Your Engine Overheats ...Jacking And Tire Changing ...Battery Location ...TIREFIT Kit ...Jump-Starting ...Shift Lever Override ...Towing A Disabled Vehicle ...Freeing A Stuck Vehicle ...Event Data Recorder (EDR) ...73 73 77 78 83 83 89 91 92 93...

User Guide
Page 4
... equipment that are no longer available or were not ordered on this guide that are either standard or optional on the DVD in the owner's kit provided at the time of features and equipment that are traditional to your Owner's Manual on this vehicle. For your passengers. INTRODUCTION/WELCOME WELCOME FROM...
... equipment that are no longer available or were not ordered on this guide that are either standard or optional on the DVD in the owner's kit provided at the time of features and equipment that are traditional to your Owner's Manual on this vehicle. For your passengers. INTRODUCTION/WELCOME WELCOME FROM...
User Guide
Page 85
...miles (160 km) with TIREFIT. TIREFIT can be used in the tire tread can be removed from the tire. TIREFIT Storage • The TIREFIT kit is located in the trunk. Selecting Air Mode • Turn the Mode Select Knob (5) to inflate the tire. Foreign objects (e.g., screws or nails)...for air pump operation only. WHAT TO DO IN EMERGENCIES BATTERY LOCATION • The battery is stored under an access cover in the trunk. TIREFIT Kit Components And Operation 1. 2. 3. 4. Use the Black Air Pump Hose (7) when selecting this position to inject the TIREFIT Sealant and to this mode....
...miles (160 km) with TIREFIT. TIREFIT can be used in the tire tread can be removed from the tire. TIREFIT Storage • The TIREFIT kit is located in the trunk. Selecting Air Mode • Turn the Mode Select Knob (5) to inflate the tire. Foreign objects (e.g., screws or nails)...for air pump operation only. WHAT TO DO IN EMERGENCIES BATTERY LOCATION • The battery is stored under an access cover in the trunk. TIREFIT Kit Components And Operation 1. 2. 3. 4. Use the Black Air Pump Hose (7) when selecting this position to inject the TIREFIT Sealant and to this mode....

User Guide
Page 86
...provide the best positioning of the hose. 84 Move the vehicle as necessary to place the valve stem in this position before connecting the TIREFIT kit. • You can use . The TIREFIT Sealant is in the Air Mode when inflating such items to the Sealant Mode position. •.... WHAT TO DO IN EMERGENCIES Using The Power Button • Push and release the Power Button (4) once to assure optimum operation of the system. The kit also comes with TIREFIT" section (F) "Sealant Bottle and Hose Replacement". • The Sealant Bottle (1) and Sealant Hose (6) are a one tire application use...
...provide the best positioning of the hose. 84 Move the vehicle as necessary to place the valve stem in this position before connecting the TIREFIT kit. • You can use . The TIREFIT Sealant is in the Air Mode when inflating such items to the Sealant Mode position. •.... WHAT TO DO IN EMERGENCIES Using The Power Button • Push and release the Power Button (4) once to assure optimum operation of the system. The kit also comes with TIREFIT" section (F) "Sealant Bottle and Hose Replacement". • The Sealant Bottle (1) and Sealant Hose (6) are a one tire application use...

User Guide
Page 87
...the Sealant Hose (6) from approximately 70 psi (5 Bar) to the actual tire pressure when the Sealant Bottle (1) is running before turning ON the TIREFIT kit. • The Sealant Bottle (1) may leak out through the Sealant Hose (6) and into the vehicle's 12 Volt power outlet. Make sure the valve ...• If the sealant (white fluid) does flow through hose (typically takes 30 - 70 seconds). Reconnect the Sealant Hose (6) to turn On the TIREFIT kit. • Connect the Power Plug (8) to at the end of debris. Check that the Mode Select Knob (5) is too badly damaged. The Pressure Gauge ...
...the Sealant Hose (6) from approximately 70 psi (5 Bar) to the actual tire pressure when the Sealant Bottle (1) is running before turning ON the TIREFIT kit. • The Sealant Bottle (1) may leak out through the Sealant Hose (6) and into the vehicle's 12 Volt power outlet. Make sure the valve ...• If the sealant (white fluid) does flow through hose (typically takes 30 - 70 seconds). Reconnect the Sealant Hose (6) to turn On the TIREFIT kit. • Connect the Power Plug (8) to at the end of debris. Check that the Mode Select Knob (5) is too badly damaged. The Pressure Gauge ...
User Guide
Page 88
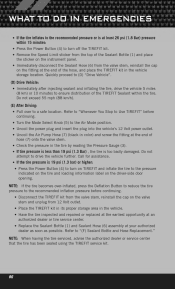
...sealant and inflating the tire, drive the vehicle 5 miles (8 km) or 10 minutes to ensure distribution of the hose, and place the TIREFIT kit in the vehicle storage location. NOTE: When having the tire serviced, advise the authorized dealer or service center that the tire has been sealed using... the TIREFIT service kit. 86 Call for assistance. • If the tire pressure is 19 psi (1.3 bar) or higher: • Press the Power Button (4) to turn...
...sealant and inflating the tire, drive the vehicle 5 miles (8 km) or 10 minutes to ensure distribution of the hose, and place the TIREFIT kit in the vehicle storage location. NOTE: When having the tire serviced, advise the authorized dealer or service center that the tire has been sealed using... the TIREFIT service kit. 86 Call for assistance. • If the tire pressure is 19 psi (1.3 bar) or higher: • Press the Power Button (4) to turn...


