
Owner Manual
Page 304
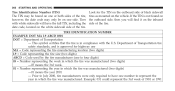
If the TIN is not found on one or both sides of black sidewall tires as mounted on the vehicle. This symbol certifies that the tire is approved for the TIN on the outboard side of the tire, ...
If the TIN is not found on one or both sides of black sidewall tires as mounted on the vehicle. This symbol certifies that the tire is approved for the TIN on the outboard side of the tire, ...
Owner Manual
Page 360
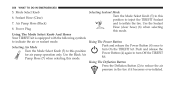
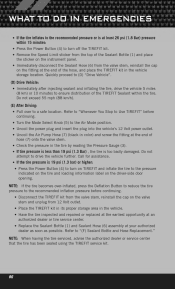
... The Power Button Push and release the Power Button (4) once to Selecting Air Mode turn Off the TIREFIT for air pump operation only. Use the Black Air kit. 358 WHAT TO DO IN EMERGENCIES 5. Mode Select Knob 6. Push and release the Turn the Mode Select Knob (5) to this position ...to inject the TIREFIT Sealant and to turn On the TIREFIT kit. Air Pump Hose (Black) 8. Using The Deflation Button Press the Deflation Button (2) to indicate the air or sealant mode. Sealant Hose (Clear) 7. Pump Hose (7) when selecting this mode....
... The Power Button Push and release the Power Button (4) once to Selecting Air Mode turn Off the TIREFIT for air pump operation only. Use the Black Air kit. 358 WHAT TO DO IN EMERGENCIES 5. Mode Select Knob 6. Push and release the Turn the Mode Select Knob (5) to this position ...to inject the TIREFIT Sealant and to turn On the TIREFIT kit. Air Pump Hose (Black) 8. Using The Deflation Button Press the Deflation Button (2) to indicate the air or sealant mode. Sealant Hose (Clear) 7. Pump Hose (7) when selecting this mode....

Owner Manual
Page 367
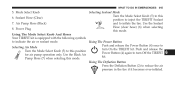
... km/h) until the tire is 19 psi (1.3 bar) or higher: Pull over -inflated, press the vehicle's 12 Volt power outlet. Uncoil the Air Pump Hose (7) (black in the tire by reading the Pressure Gauge (3). Check the pressure in color) and screw the fitting at the end of hose (7) onto the valve...
... km/h) until the tire is 19 psi (1.3 bar) or higher: Pull over -inflated, press the vehicle's 12 Volt power outlet. Uncoil the Air Pump Hose (7) (black in the tire by reading the Pressure Gauge (3). Check the pressure in color) and screw the fitting at the end of hose (7) onto the valve...
Owner Manual
Page 430
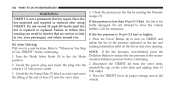
... the circuit that must be corrected. If a properly rated fuse continues to blow, it is important to use of the Rear Power Distribution Center contains a black IOD fuse needed for vehicle processing during assembly. Integrated Power Module (IPM) - 428 MAINTAINING YOUR VEHICLE CAUTION! • When installing the power distribution center cover...
... the circuit that must be corrected. If a properly rated fuse continues to blow, it is important to use of the Rear Power Distribution Center contains a black IOD fuse needed for vehicle processing during assembly. Integrated Power Module (IPM) - 428 MAINTAINING YOUR VEHICLE CAUTION! • When installing the power distribution center cover...
User Guide
Page 85
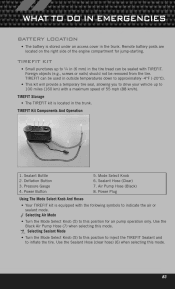
... indicate the air or sealant mode. Use the Sealant Hose (clear hose) (6) when selecting this mode. Mode Select Knob Sealant Hose (Clear) Air Pump Hose (Black) Power Plug Using The Mode Select Knob And Hoses • Your TIREFIT kit is located in the trunk. Remote battery posts are located on the... position for jump-starting. WHAT TO DO IN EMERGENCIES BATTERY LOCATION • The battery is stored under an access cover in the trunk. Use the Black Air Pump Hose (7) when selecting this mode. 83
... indicate the air or sealant mode. Use the Sealant Hose (clear hose) (6) when selecting this mode. Mode Select Knob Sealant Hose (Clear) Air Pump Hose (Black) Power Plug Using The Mode Select Knob And Hoses • Your TIREFIT kit is located in the trunk. Remote battery posts are located on the... position for jump-starting. WHAT TO DO IN EMERGENCIES BATTERY LOCATION • The battery is stored under an access cover in the trunk. Use the Black Air Pump Hose (7) when selecting this mode. 83
User Guide
Page 88
... Air Mode position. • Uncoil the power plug and insert the plug into the vehicle's 12 Volt power outlet. • Uncoil the Air Pump Hose (7) (black in color) and screw the fitting at the end of hose (7) onto the valve stem. • Check the pressure in the vehicle. • Have the...
... Air Mode position. • Uncoil the power plug and insert the plug into the vehicle's 12 Volt power outlet. • Uncoil the Air Pump Hose (7) (black in color) and screw the fitting at the end of hose (7) onto the valve stem. • Check the pressure in the vehicle. • Have the...

Owner Manual SRT8
Page 308
... were only required to represent the year in which the tire was manufactured. TIRE IDENTIFICATION NUMBER EXAMPLE: DOT MA L9 ABCD 0301 DOT = Department of black sidewall tires as mounted on the white sidewall side of 1981 or 1991 Example: 031 could represent the 3rd week of the tire. This symbol...
... were only required to represent the year in which the tire was manufactured. TIRE IDENTIFICATION NUMBER EXAMPLE: DOT MA L9 ABCD 0301 DOT = Department of black sidewall tires as mounted on the white sidewall side of 1981 or 1991 Example: 031 could represent the 3rd week of the tire. This symbol...
Owner Manual SRT8
Page 347
Air Pump Hose (Black) 8. Using The Mode Select Knob And Hoses Your TIREFIT kit is equipped with the following symbols to reduce the air pressure in the tire if ... Turn the Mode Select Knob (5) to this mode. Using The Deflation Button Press the Deflation Button (2) to indicate the air or sealant mode. Use the Black Air kit. Power Plug Selecting Sealant Mode Turn the Mode Select Knob (5) to Selecting Air Mode turn Off the TIREFIT for air pump operation only...
Air Pump Hose (Black) 8. Using The Mode Select Knob And Hoses Your TIREFIT kit is equipped with the following symbols to reduce the air pressure in the tire if ... Turn the Mode Select Knob (5) to this mode. Using The Deflation Button Press the Deflation Button (2) to indicate the air or sealant mode. Use the Black Air kit. Power Plug Selecting Sealant Mode Turn the Mode Select Knob (5) to Selecting Air Mode turn Off the TIREFIT for air pump operation only...
Owner Manual SRT8
Page 354
... at the end of hose (7) onto the valve stem. TIREFIT is 19 psi (1.3 bar) or higher: 1. Failure to a safe location. Uncoil the Air Pump Hose (7) (black in the tire by reading the Pressure Gauge (3). Check the pressure in color) and screw 3. Do not attempt to the recommended inflation pressure before continuing...
... at the end of hose (7) onto the valve stem. TIREFIT is 19 psi (1.3 bar) or higher: 1. Failure to a safe location. Uncoil the Air Pump Hose (7) (black in the tire by reading the Pressure Gauge (3). Check the pressure in color) and screw 3. Do not attempt to the recommended inflation pressure before continuing...
Owner Manual SRT8
Page 402
... - - - 400 MAINTAINING YOUR VEHICLE CAUTION! • When installing the power distribution center cover, it is important to use of the Rear Power Distribution Center contains a black IOD fuse needed for vehicle processing during assembly. The service replacement part is a 60 Amp yellow cartridge fuse. Integrated Power Module (IPM) - The use only...
... - - - 400 MAINTAINING YOUR VEHICLE CAUTION! • When installing the power distribution center cover, it is important to use of the Rear Power Distribution Center contains a black IOD fuse needed for vehicle processing during assembly. The service replacement part is a 60 Amp yellow cartridge fuse. Integrated Power Module (IPM) - The use only...

User Guide SRT8
Page 86
...km/h). Sealant Bottle Deflation Button Pressure Gauge Power Button 5. 6. 7. 8. Use the Sealant Hose (clear hose) (6) when selecting this mode. Use the Black Air Pump Hose (7) when selecting this mode. Selecting Sealant Mode • Turn the Mode Select Knob (5) to this position for air pump operation only. ... • Press the Deflation Button (2) to indicate the air or sealant mode. Mode Select Knob Sealant Hose (Clear) Air Pump Hose (Black) Power Plug Using The Mode Select Knob And Hoses • Your TIREFIT kit is located in the tire if it becomes over-inflated. 84...
...km/h). Sealant Bottle Deflation Button Pressure Gauge Power Button 5. 6. 7. 8. Use the Sealant Hose (clear hose) (6) when selecting this mode. Use the Black Air Pump Hose (7) when selecting this mode. Selecting Sealant Mode • Turn the Mode Select Knob (5) to this position for air pump operation only. ... • Press the Deflation Button (2) to indicate the air or sealant mode. Mode Select Knob Sealant Hose (Clear) Air Pump Hose (Black) Power Plug Using The Mode Select Knob And Hoses • Your TIREFIT kit is located in the tire if it becomes over-inflated. 84...

User Guide SRT8
Page 89
... TO DO IN EMERGENCIES • The pump will start to inject air into the vehicle's 12 Volt power outlet. • Uncoil the Air Pump Hose (7) (black in color) and screw the fitting at the end of hose (7) onto the valve stem. • Check the pressure in the vehicle storage location. Continue...
... TO DO IN EMERGENCIES • The pump will start to inject air into the vehicle's 12 Volt power outlet. • Uncoil the Air Pump Hose (7) (black in color) and screw the fitting at the end of hose (7) onto the valve stem. • Check the pressure in the vehicle storage location. Continue...
