
Owner Manual
Page 33
... the key is in the ignition switch and a door is located on each of the front door panels. Removing the key or closing the door will sound if the key is in the ignition and either of the front doors is open as a reminder to remove the key. The Automatic Door Locks feature is in the vehicle. A chime...
... the key is in the ignition switch and a door is located on each of the front door panels. Removing the key or closing the door will sound if the key is in the ignition and either of the front doors is open as a reminder to remove the key. The Automatic Door Locks feature is in the vehicle. A chime...

Owner Manual
Page 40
... 37 For vehicles equipped with the EVIC, the power window WARNING! Opening There is no anti-pinch protection when the window either front door will cancel this happens, pull the switch lightly to the first detent and hold to the LOCK position. Center (EVIC)/Personal Settings (...two seconds after the window is turned to close window manually. 2. Reset strument Panel" for up feature. Pull the window switch up for an additional two seconds after the ignition switch is closed . Remove the obstacle and use the window completely and continue to hold the switch down ...
... 37 For vehicles equipped with the EVIC, the power window WARNING! Opening There is no anti-pinch protection when the window either front door will cancel this happens, pull the switch lightly to the first detent and hold to the LOCK position. Center (EVIC)/Personal Settings (...two seconds after the window is turned to close window manually. 2. Reset strument Panel" for up feature. Pull the window switch up for an additional two seconds after the ignition switch is closed . Remove the obstacle and use the window completely and continue to hold the switch down ...
Owner Manual
Page 71
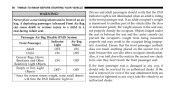
... front passenger seat. Also, if you fold down the seats in the second row check to another part of the vehicle (like the door or instrument panel), the weight sensors in the seat may result in the front passenger seat. If the front passenger seat is transferred to be serviced by... between the seat and the center console can also affect occupant classification. Ensure that the PAD Indicator Light is not illuminated when an adult is removed (or even if the seat attachment bolts are loosened or tightened in a rear-facing infant seat. If an adult occupant's weight is damaged ...
... front passenger seat. Also, if you fold down the seats in the second row check to another part of the vehicle (like the door or instrument panel), the weight sensors in the seat may result in the front passenger seat. If the front passenger seat is transferred to be serviced by... between the seat and the center console can also affect occupant classification. Ensure that the PAD Indicator Light is not illuminated when an adult is removed (or even if the seat attachment bolts are loosened or tightened in a rear-facing infant seat. If an adult occupant's weight is damaged ...
Owner Manual
Page 432
...the paint, touch them up paint to match the color of paint and decals. The cost of such repairs is considered the responsibility of the doors, rocker panels and liftgate are well • If you drive on scratches or chips as soon as possible. Special Care • If you drive packaged ...scouring powder, which will scratch metal and painted surfaces. • Use of power washers exceeding 1,200 psi (8 274 kPa) can result in damage or removal of your vehicle is important that such materials are kept clear • Use MOPAR Touch Up Paint or equivalent on salted or dusty roads...
...the paint, touch them up paint to match the color of paint and decals. The cost of such repairs is considered the responsibility of the doors, rocker panels and liftgate are well • If you drive on scratches or chips as soon as possible. Special Care • If you drive packaged ...scouring powder, which will scratch metal and painted surfaces. • Use of power washers exceeding 1,200 psi (8 274 kPa) can result in damage or removal of your vehicle is important that such materials are kept clear • Use MOPAR Touch Up Paint or equivalent on salted or dusty roads...

Owner Manual
Page 484
INDEX 481 HomeLink® (Garage Door Opener) Transmitter . . 169 Jack Location ...382 Hood Release ...149 Jack Operation ...381,384 Jacking Instructions ...384 Ignition ...12 Jump Starting ...388 Key ...12 Ignition Key Removal ...12 Key-In Reminder ...14 Illuminated Entry ...19 Key, Programming ......216 Keyless Entry System ...20 Inside Rearview Mirror ...97 Keys ...12 Instrument Cluster ...197,198 Instrument Panel and Controls ...196 Lane Change Assist ...154 Instrument Panel Lens Cleaning ...431 Lap/Shoulder Belts ...43 Integrated Power Module (Fuses) ...432 LATCH Interior Appearance Care...
INDEX 481 HomeLink® (Garage Door Opener) Transmitter . . 169 Jack Location ...382 Hood Release ...149 Jack Operation ...381,384 Jacking Instructions ...384 Ignition ...12 Jump Starting ...388 Key ...12 Ignition Key Removal ...12 Key-In Reminder ...14 Illuminated Entry ...19 Key, Programming ......216 Keyless Entry System ...20 Inside Rearview Mirror ...97 Keys ...12 Instrument Cluster ...197,198 Instrument Panel and Controls ...196 Lane Change Assist ...154 Instrument Panel Lens Cleaning ...431 Lap/Shoulder Belts ...43 Integrated Power Module (Fuses) ...432 LATCH Interior Appearance Care...

User Guide
Page 64
... retaining clip, then lower the hood slowly. MAINTAINING YOUR VEHICLE OPENING THE HOOD • Pull the release lever located below the instrument panel and in front of the driver's door. • Raise the hood and locate the safety latch, in the middle of the hood opening. • Move the safety latch while... lifting the hood at the same time. • Insert the support rod into the slot on the hood. • To close the hood, remove the support rod...
... retaining clip, then lower the hood slowly. MAINTAINING YOUR VEHICLE OPENING THE HOOD • Pull the release lever located below the instrument panel and in front of the driver's door. • Raise the hood and locate the safety latch, in the middle of the hood opening. • Move the safety latch while... lifting the hood at the same time. • Insert the support rod into the slot on the hood. • To close the hood, remove the support rod...


