

Owner Manual
Page 196
...(CD Mode For MP3 Play) ...265 ▫ Operating Instructions - RBZ Radio ...241 ▫ Clock Setting Procedure - AM/FM Stereo Radio With CD Player (MP3 AUX Jack) And Sirius Radio ...254 ▫ Operating Instructions - 194 UNDERSTANDING YOUR INSTRUMENT PANEL ▫ Customer-Programmable Features (System Setup) ...235 Ⅵ Media Center 730N/430 (... - RER/REN Radio ...243 Ⅵ Media Center 130 (RES) - Radio Mode ...254 ▫ Operation Instructions - AM/FM Stereo Radio With CD Player (MP3 AUX Jack)...245 ▫ Operating Instructions - AM/FM Stereo Radio And CD/DVD/HDD/ NAV -
...(CD Mode For MP3 Play) ...265 ▫ Operating Instructions - RBZ Radio ...241 ▫ Clock Setting Procedure - AM/FM Stereo Radio With CD Player (MP3 AUX Jack) And Sirius Radio ...254 ▫ Operating Instructions - 194 UNDERSTANDING YOUR INSTRUMENT PANEL ▫ Customer-Programmable Features (System Setup) ...235 Ⅵ Media Center 730N/430 (... - RER/REN Radio ...243 Ⅵ Media Center 130 (RES) - Radio Mode ...254 ▫ Operation Instructions - AM/FM Stereo Radio With CD Player (MP3 AUX Jack)...245 ▫ Operating Instructions - AM/FM Stereo Radio And CD/DVD/HDD/ NAV -
Owner Manual
Page 247
... the ON or ACC position to select, touch the screen where the word "Page" is displayed. AM/FM STEREO RADIO WITH CD PLAYER (MP3 AUX JACK) Media Center 130 (RES) 4 Operating Instructions - The time zone selection menu will appear on the screen. 5. Select a time zone by touching the screen where your...
... the ON or ACC position to select, touch the screen where the word "Page" is displayed. AM/FM STEREO RADIO WITH CD PLAYER (MP3 AUX JACK) Media Center 130 (RES) 4 Operating Instructions - The time zone selection menu will appear on the screen. 5. Select a time zone by touching the screen where your...

Owner Manual
Page 255
UNDERSTANDING YOUR INSTRUMENT PANEL 253 Playback of day. Multisession discs may be turned on the medium. Auxiliary Mode The auxiliary (AUX) jack is loaded, the radio checks all files on and the device's volume set to amplify the source and play through the vehicle speakers. 4 To... create a OFF). Loading times will change the display to time of MP3 Files When a medium containing MP3 data is an audio input jack, which allows the user to plug in a portable device, such as an MP3 player, or cassette player, and utilize the vehicle's audio system to ...
UNDERSTANDING YOUR INSTRUMENT PANEL 253 Playback of day. Multisession discs may be turned on the medium. Auxiliary Mode The auxiliary (AUX) jack is loaded, the radio checks all files on and the device's volume set to amplify the source and play through the vehicle speakers. 4 To... create a OFF). Loading times will change the display to time of MP3 Files When a medium containing MP3 data is an audio input jack, which allows the user to plug in a portable device, such as an MP3 player, or cassette player, and utilize the vehicle's audio system to ...
Owner Manual
Page 256
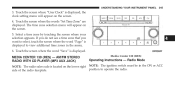
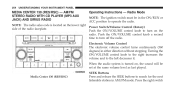
... off the radio. Press the right switch When the audio system is located on the radio. AM/FM STEREO RADIO WITH CD PLAYER (MP3 AUX JACK) AND SIRIUS RADIO Operating Instructions - 254 UNDERSTANDING YOUR INSTRUMENT PANEL MEDIA CENTER 130 (RES/RSC) - Radio Mode NOTE: The ignition switch must be set at...
... off the radio. Press the right switch When the audio system is located on the radio. AM/FM STEREO RADIO WITH CD PLAYER (MP3 AUX JACK) AND SIRIUS RADIO Operating Instructions - 254 UNDERSTANDING YOUR INSTRUMENT PANEL MEDIA CENTER 130 (RES/RSC) - Radio Mode NOTE: The ignition switch must be set at...

Owner Manual
Page 268
Operating Instructions - Operating Instructions - NOTE: The AUX device must be turned on the DVD for further iary device if the AUX jack is an audio input jack which allows the user to the proper level. Uconnect™ Phone (If is OFF). TIME Button (Auxiliary Mode) Press this ... The time of day will change the display to amplify the source and play through the vehicle speakers. Auxiliary Mode The auxiliary (AUX) jack is connected. If the AUX audio Operating Instructions - Uconnect™ Multimedia (Satellite Radio) (If Equipped) Pressing the AUX button will display for...
Operating Instructions - Operating Instructions - NOTE: The AUX device must be turned on the DVD for further iary device if the AUX jack is an audio input jack which allows the user to the proper level. Uconnect™ Phone (If is OFF). TIME Button (Auxiliary Mode) Press this ... The time of day will change the display to amplify the source and play through the vehicle speakers. Auxiliary Mode The auxiliary (AUX) jack is connected. If the AUX audio Operating Instructions - Uconnect™ Multimedia (Satellite Radio) (If Equipped) Pressing the AUX button will display for...

Owner Manual
Page 278
... Uconnect™ User • Easy menu-driven functions on touch-screen radios Manual located on the DVD for further details. • Video and audio input jacks available in SET 2 VIDEO ENTERTAINMENT SYSTEM (VES)™ - IF memory can be selected by pressing the pushbutton EQUIPPED The optional Video Entertainment System (VES)™...
... Uconnect™ User • Easy menu-driven functions on touch-screen radios Manual located on the DVD for further details. • Video and audio input jacks available in SET 2 VIDEO ENTERTAINMENT SYSTEM (VES)™ - IF memory can be selected by pressing the pushbutton EQUIPPED The optional Video Entertainment System (VES)™...

Owner Manual
Page 346
... be attempted. Hills can side trail. You should always climb hills straight up and down . Look to see what you get out feel confident with , jack the vehicle up or high centered on , where it is and place a few rocks under your brakes. Determine if it is off top and the...
... be attempted. Hills can side trail. You should always climb hills straight up and down . Look to see what you get out feel confident with , jack the vehicle up or high centered on , where it is and place a few rocks under your brakes. Determine if it is off top and the...

Owner Manual
Page 353
This should jack the vehicle up or in a situation where great care needs to be taken during this process, for additional traction, try turning your steering wheel quickly ...
This should jack the vehicle up or in a situation where great care needs to be taken during this process, for additional traction, try turning your steering wheel quickly ...

Owner Manual
Page 477
If Equipped ...501 ▫ Four-Wheel Drive Vehicles ...502 ▫ Two-Wheel Drive Vehicles ...502 Ⅵ Jacking And Tire Changing ...476 ▫ Jack Location ...477 ▫ Removing The Spare Tire ...482 ▫ Preparations ...483 ▫ Instructions ...484 ▫ Wheel Nuts ...492 ▫ To Stow The Flat Or Spare ......
If Equipped ...501 ▫ Four-Wheel Drive Vehicles ...502 ▫ Two-Wheel Drive Vehicles ...502 Ⅵ Jacking And Tire Changing ...476 ▫ Jack Location ...477 ▫ Removing The Spare Tire ...482 ▫ Preparations ...483 ▫ Instructions ...484 ▫ Wheel Nuts ...492 ▫ To Stow The Flat Or Spare ......

Owner Manual
Page 478
... vehicle is located on the WARNING! If you . When the switch is activated, all directional turn signals will continue to get under a jacked-up vehicle is in motion. Press the switch a second time to turn off the jack and fall on you need to operate even though the ignition switch is on...: With extended use, the Hazard Warning flasher may discharge your battery. • Being under a raised vehicle, take it can be raised on a lift. • The jack is an emergency warning system and should be crushed. 476 WHAT TO DO IN EMERGENCIES HAZARD WARNING FLASHER...
... vehicle is located on the WARNING! If you . When the switch is activated, all directional turn signals will continue to get under a jacked-up vehicle is in motion. Press the switch a second time to turn off the jack and fall on you need to operate even though the ignition switch is on...: With extended use, the Hazard Warning flasher may discharge your battery. • Being under a raised vehicle, take it can be raised on a lift. • The jack is an emergency warning system and should be crushed. 476 WHAT TO DO IN EMERGENCIES HAZARD WARNING FLASHER...

Owner Manual
Page 479
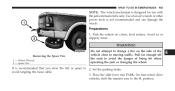
Jack Access Cover 6 Once the front of the cover is free from the seat frame. To remove the cover, pull the front part of the cover (closest to the front of the seat until it is loose, slide the cover toward the front of the seat) toward you must remove the plastic access cover, located on the side of the seat. WHAT TO DO IN EMERGENCIES 477 Jack Location The jack and jack tools are stored under the front passenger seat. Removal To access the jack and jack tools you to release a locking tab.
Jack Access Cover 6 Once the front of the cover is free from the seat frame. To remove the cover, pull the front part of the cover (closest to the front of the seat until it is loose, slide the cover toward the front of the seat) toward you must remove the plastic access cover, located on the side of the seat. WHAT TO DO IN EMERGENCIES 477 Jack Location The jack and jack tools are stored under the front passenger seat. Removal To access the jack and jack tools you to release a locking tab.

Owner Manual
Page 480
478 WHAT TO DO IN EMERGENCIES Remove the jack and tools by removing the wing bolt and sliding the assembly from under the seat. Jack and Tools (2500/3500 Series) Jack and Tools (1500 Series)
478 WHAT TO DO IN EMERGENCIES Remove the jack and tools by removing the wing bolt and sliding the assembly from under the seat. Jack and Tools (2500/3500 Series) Jack and Tools (1500 Series)

Owner Manual
Page 481
...the lug wrench is snug. 2. Reinstalling The Jack And Tools (1500 Series) 1. After using the jack and tools, always reinstall them in serious injury. Lower the jack all the way down by turning the jack turn-screw until the jack is under the jack near the jack turn-screw. 6 Turn Screw and Lug While ...driving you may move around with force, resulting in the original carrier and location. A loose jack, tools, bracket or ...
...the lug wrench is snug. 2. Reinstalling The Jack And Tools (1500 Series) 1. After using the jack and tools, always reinstall them in serious injury. Lower the jack all the way down by turning the jack turn-screw until the jack is under the jack near the jack turn-screw. 6 Turn Screw and Lug While ...driving you may move around with force, resulting in the original carrier and location. A loose jack, tools, bracket or ...

Owner Manual
Page 482
Tying Bag to the jack using the tie straps. Fold the flap and roll the jack tool kit into a cylindrical package (in direction of arrows) and tie to Jack with Straps Folding Flap and Rolling Bag 480 WHAT TO DO IN EMERGENCIES 3.
Tying Bag to the jack using the tie straps. Fold the flap and roll the jack tool kit into a cylindrical package (in direction of arrows) and tie to Jack with Straps Folding Flap and Rolling Bag 480 WHAT TO DO IN EMERGENCIES 3.

Owner Manual
Page 483
Place the jack and tools in the storage position holding the jack by the jack turn-screw, slip the jack and tools under the seat so that the bottom slot engages into the fastener on the floor, and then secure to the floor pan using the wing bolt. Reinstall the plastic cover. WHAT TO DO IN EMERGENCIES 481 6 Jack and Tools Tied Jack and Tools (1500 Series) 4.
Place the jack and tools in the storage position holding the jack by the jack turn-screw, slip the jack and tools under the seat so that the bottom slot engages into the fastener on the floor, and then secure to the floor pan using the wing bolt. Reinstall the plastic cover. WHAT TO DO IN EMERGENCIES 481 6 Jack and Tools Tied Jack and Tools (1500 Series) 4.
Owner Manual
Page 484
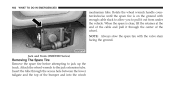
When the spare is on the ground with the valve stem facing the ground. Attach the wheel wrench to jack up the truck. Insert the tube through the center of the wheel. Rotate the wheel wrench handle counterclockwise until the spare tire is clear, tilt ... the lower tailgate and the top of the cable and pull it out from under the vehicle. 482 WHAT TO DO IN EMERGENCIES mechanism tube. Jack and Tools (2500/3500 Series) Removing The Spare Tire Remove the spare tire before attempting to the...
When the spare is on the ground with the valve stem facing the ground. Attach the wheel wrench to jack up the truck. Insert the tube through the center of the wheel. Rotate the wheel wrench handle counterclockwise until the spare tire is clear, tilt ... the lower tailgate and the top of the cable and pull it out from under the vehicle. 482 WHAT TO DO IN EMERGENCIES mechanism tube. Jack and Tools (2500/3500 Series) Removing The Spare Tire Remove the spare tire before attempting to the...
Owner Manual
Page 485
... four-wheel drive vehicles, shift the transfer case to the 4L position. Use of being hit when operating the jack or changing the wheel. 6 It is designed for use with the jack extension tube only. WHAT TO DO IN EMERGENCIES 483 NOTE: The winch mechanism is recommended that you stow the flat...
... four-wheel drive vehicles, shift the transfer case to the 4L position. Use of being hit when operating the jack or changing the wheel. 6 It is designed for use with the jack extension tube only. WHAT TO DO IN EMERGENCIES 483 NOTE: The winch mechanism is recommended that you stow the flat...
Owner Manual
Page 486
...8226; Block the wheel diagonally opposite the wheel to your vehicle: • Always park on a jack. (Continued) NOTE: Passengers should not remain in the vehicle when the vehicle is being jacked. Carefully follow these tire changing warnings to help prevent personal injury or damage to be raised. •... Never start or run the engine with the vehicle on a firm, level surface as far from the edge of the wheel diagonally opposite the jacking position. a manual transmission in PARK; Turn on the Hazard Warning flasher. 6. For example, if the right front wheel is being changed, ...
...8226; Block the wheel diagonally opposite the wheel to your vehicle: • Always park on a jack. (Continued) NOTE: Passengers should not remain in the vehicle when the vehicle is being jacked. Carefully follow these tire changing warnings to help prevent personal injury or damage to be raised. •... Never start or run the engine with the vehicle on a firm, level surface as far from the edge of the wheel diagonally opposite the jacking position. a manual transmission in PARK; Turn on the Hazard Warning flasher. 6. For example, if the right front wheel is being changed, ...

Owner Manual
Page 487
...WARNING! (Continued) • Do not let anyone sit in the vehicle when it is on a jack. • Do not get under the vehicle when it is still on the Hazard Warning flasher. Remove the spare wheel, jack, and tools from storage. 2. Using the wheel wrench, loosen, but do not remove, the ...wheel nuts by turning them counterclockwise one turn while the wheel is on a jack. • Only use the jack in the positions indicated and for lifting this vehicle during a tire change. • If working on or near a roadway, be stowed with the...
...WARNING! (Continued) • Do not let anyone sit in the vehicle when it is on a jack. • Do not get under the vehicle when it is still on the Hazard Warning flasher. Remove the spare wheel, jack, and tools from storage. 2. Using the wheel wrench, loosen, but do not remove, the ...wheel nuts by turning them counterclockwise one turn while the wheel is on a jack. • Only use the jack in the positions indicated and for lifting this vehicle during a tire change. • If working on or near a roadway, be stowed with the...

Owner Manual
Page 488
The tube extension may be used but is not required. 4X2 Jacking Location 486 WHAT TO DO IN EMERGENCIES • 1500 Series Trucks When changing a front wheel, place the scissors jack under the rear portion of the lower control arm as shown below. 4X4 Jacking Location Operate the jack using the jack drive tube and the wheel wrench.
The tube extension may be used but is not required. 4X2 Jacking Location 486 WHAT TO DO IN EMERGENCIES • 1500 Series Trucks When changing a front wheel, place the scissors jack under the rear portion of the lower control arm as shown below. 4X4 Jacking Location Operate the jack using the jack drive tube and the wheel wrench.