Owner Manual
Page 93
......161 ▫ Rear Cupholder - Quad Cab ...161 ▫ Rear Cupholder - If Equipped ...167 ▫ Seatback Storage ...168 ▫ Storage (Regular Cab) ...168 ▫ Storage And Seats (Crew Cab) ...169 ▫ Plastic Grocery Bag Retainers (Regular Cab Models) ...170 Ⅵ Rear Window ...160 ▫ Front Instrument Panel Cupholders - If Equipped ...165 ▫ Second Row In-Floor Storage Bin - Crew Cab ...162 Ⅵ Storage ...162 ▫ Glove Box Storage ...162 ▫ Door Storage ...164 ▫ Center Storage Compartment - UNDERSTANDING THE FEATURES OF YOUR VEHICLE 91...
......161 ▫ Rear Cupholder - Quad Cab ...161 ▫ Rear Cupholder - If Equipped ...167 ▫ Seatback Storage ...168 ▫ Storage (Regular Cab) ...168 ▫ Storage And Seats (Crew Cab) ...169 ▫ Plastic Grocery Bag Retainers (Regular Cab Models) ...170 Ⅵ Rear Window ...160 ▫ Front Instrument Panel Cupholders - If Equipped ...165 ▫ Second Row In-Floor Storage Bin - Crew Cab ...162 Ⅵ Storage ...162 ▫ Glove Box Storage ...162 ▫ Door Storage ...164 ▫ Center Storage Compartment - UNDERSTANDING THE FEATURES OF YOUR VEHICLE 91...

Owner Manual
Page 164
Upper Glove Box 2 - Lower Glove Box 162 UNDERSTANDING THE FEATURES OF YOUR VEHICLE Rear Cupholder - Crew Cab Rear Armrest Cupholder Glove Box 1 - Crew Cab STORAGE Crew Cab vehicles are equipped with rear cupholders Glove Box Storage located in the center armrest. The glove box is located on the passenger side of the instrument panel and features both an upper and lower storage area.
Upper Glove Box 2 - Lower Glove Box 162 UNDERSTANDING THE FEATURES OF YOUR VEHICLE Rear Cupholder - Crew Cab Rear Armrest Cupholder Glove Box 1 - Crew Cab STORAGE Crew Cab vehicles are equipped with rear cupholders Glove Box Storage located in the center armrest. The glove box is located on the passenger side of the instrument panel and features both an upper and lower storage area.

Owner Manual
Page 165
The glove box door will automatically open the lower glove box, pull on the handle To open . the latch and lower the door. 3 Upper Glove Box Lower Glove Box UNDERSTANDING THE FEATURES OF YOUR VEHICLE 163 To open the upper glove box push upward on the handle to release release.
The glove box door will automatically open the lower glove box, pull on the handle To open . the latch and lower the door. 3 Upper Glove Box Lower Glove Box UNDERSTANDING THE FEATURES OF YOUR VEHICLE 163 To open the upper glove box push upward on the handle to release release.
Owner Manual
Page 191
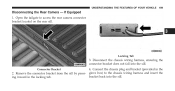
Disconnect the chassis wiring harness, ensuring the connector bracket does not fall into the sill. Connect the chassis plug and bracket (provided in the locking tab. Remove the connector bracket from the sill by press- UNDERSTANDING THE FEATURES OF YOUR VEHICLE 189 Disconnecting the Rear Camera - ing inward in the Connector Bracket 2. glove box) to access the rear camera connector bracket located on the rear sill. 3 Locking Tab 3. Open the tailgate to the chassis wiring harness and insert the bracket back into the sill. 4. If Equipped 1.
Disconnect the chassis wiring harness, ensuring the connector bracket does not fall into the sill. Connect the chassis plug and bracket (provided in the locking tab. Remove the connector bracket from the sill by press- UNDERSTANDING THE FEATURES OF YOUR VEHICLE 189 Disconnecting the Rear Camera - ing inward in the Connector Bracket 2. glove box) to access the rear camera connector bracket located on the rear sill. 3 Locking Tab 3. Open the tailgate to the chassis wiring harness and insert the bracket back into the sill. 4. If Equipped 1.

Owner Manual
Page 192
.... 5. releasing the lock tang from the vehicle. This will prevent damaging the connector and bracket when storing or reinstalling the tailgate. If Equipped" in the glove box) to the tailgate wiring harness to ensure that the terminals do not corrode. 6. Unlatch the tailgate and remove the support cables by 3. Raise the right...
.... 5. releasing the lock tang from the vehicle. This will prevent damaging the connector and bracket when storing or reinstalling the tailgate. If Equipped" in the glove box) to the tailgate wiring harness to ensure that the terminals do not corrode. 6. Unlatch the tailgate and remove the support cables by 3. Raise the right...

User Guide
Page 37
... of the center console. • Connect the video game or other external media devices to "Uconnect™ Multimedia - Video Entertainment System (VES)™" in the glove box or on the radio faceplate. Location may vary. Use the remote control arrow buttons to scroll through a 16-pin connector using the remote, set the...
... of the center console. • Connect the video game or other external media devices to "Uconnect™ Multimedia - Video Entertainment System (VES)™" in the glove box or on the radio faceplate. Location may vary. Use the remote control arrow buttons to scroll through a 16-pin connector using the remote, set the...