
Owner Manual
Page 91
...; ...136 ▫ Service Parksense ...137 ▫ Cleaning Parksense ...137 ▫ Parksense System Usage And Precautions . . 137 Ⅵ Parkview Rear Back Up Camera - UNDERSTANDING THE FEATURES OF YOUR VEHICLE 89 ▫ Multifunction Lever ...120 Ⅵ Windshield Wipers And Washers ...122 ▫ Windshield Wipers ...122 ▫ Mist Feature ...123...
...; ...136 ▫ Service Parksense ...137 ▫ Cleaning Parksense ...137 ▫ Parksense System Usage And Precautions . . 137 Ⅵ Parkview Rear Back Up Camera - UNDERSTANDING THE FEATURES OF YOUR VEHICLE 89 ▫ Multifunction Lever ...120 Ⅵ Windshield Wipers And Washers ...122 ▫ Windshield Wipers ...122 ▫ Mist Feature ...123...
Owner Manual
Page 94
If Equipped ...172 Ⅵ Rambox - If Equipped ...189 ▫ Removing The Tailgate ...190 ▫ Locking Tailgate - If Equipped ...174 ▫ Rambox Integrated Box Side Storage Bins . . 174 ▫ Rambox Safety Warning ...178 ▫ Bed Extender - If Equipped ...191 If Equipped ...179 ▫ Bed Rail Tie-Down System ...186 Ⅵ Slide-In Campers ...188 ▫ Camper Applications ...188 Ⅵ Easy-Off Tailgate ...188 ▫ Disconnecting The Rear Camera - 92 UNDERSTANDING THE FEATURES OF YOUR VEHICLE Ⅵ Fold Flat Load Floor -
If Equipped ...172 Ⅵ Rambox - If Equipped ...189 ▫ Removing The Tailgate ...190 ▫ Locking Tailgate - If Equipped ...174 ▫ Rambox Integrated Box Side Storage Bins . . 174 ▫ Rambox Safety Warning ...178 ▫ Bed Extender - If Equipped ...191 If Equipped ...179 ▫ Bed Rail Tie-Down System ...186 Ⅵ Slide-In Campers ...188 ▫ Camper Applications ...188 Ⅵ Easy-Off Tailgate ...188 ▫ Disconnecting The Rear Camera - 92 UNDERSTANDING THE FEATURES OF YOUR VEHICLE Ⅵ Fold Flat Load Floor -
Owner Manual
Page 142
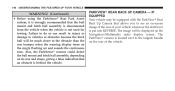
... EQUIPPED Your vehicle may be equipped with the ParkView Rear Back Up Camera that an obstacle is put into REVERSE. Also, the ParkSense sensors could detect the ball mount and hitch ball assembly, depending on its size ... the vehicle. Failure to do so can result in injury or damage to see an on the Navigation/Multimedia radio display screen. The ParkView camera is not used for towing. The image will be displayed on -screen image of the rear of the vehicle.
... EQUIPPED Your vehicle may be equipped with the ParkView Rear Back Up Camera that an obstacle is put into REVERSE. Also, the ParkSense sensors could detect the ball mount and hitch ball assembly, depending on its size ... the vehicle. Failure to do so can result in injury or damage to see an on the Navigation/Multimedia radio display screen. The ParkView camera is not used for towing. The image will be displayed on -screen image of the rear of the vehicle.

Owner Manual
Page 143
... safety of your surroundings and must be driven slowly when using ParkView to be sure to pay attention while backing up . The ParkView camera is recommended that the driver look frequently over his/ her shoulder when using the ParkView Rear Back Up..." soft key. 3 CAUTION! • To avoid vehicle damage, ParkView should only be careful when backing up on the camera lens, clean the lens, rinse with water, and dry with a soft cloth. It is unable to view every obstacle or object in your vehicle, and ...
... safety of your surroundings and must be driven slowly when using ParkView to be sure to pay attention while backing up . The ParkView camera is recommended that the driver look frequently over his/ her shoulder when using the ParkView Rear Back Up..." soft key. 3 CAUTION! • To avoid vehicle damage, ParkView should only be careful when backing up on the camera lens, clean the lens, rinse with water, and dry with a soft cloth. It is unable to view every obstacle or object in your vehicle, and ...

Owner Manual
Page 144
... mirror. After five seconds this note will disappear. 7. Press the "menu" hard key. 2. 142 UNDERSTANDING THE FEATURES OF YOUR VEHICLE 4. IF EQUIPPED camera mode is exited and the navigation or audio screen The overhead console is shifted into REVERSE, an image of the rear of the vehicle will... is shifted out of REVERSE, the rear the rear of again. If Equipped • Power Sliding Rear Window Switch - If Equipped "enable rear camera in reverse" soft key. the screen. When the vehicle is exited and the audio screen appears "check entire surroundings" displayed across the top of ...
... mirror. After five seconds this note will disappear. 7. Press the "menu" hard key. 2. 142 UNDERSTANDING THE FEATURES OF YOUR VEHICLE 4. IF EQUIPPED camera mode is exited and the navigation or audio screen The overhead console is shifted into REVERSE, an image of the rear of the vehicle will... is shifted out of REVERSE, the rear the rear of again. If Equipped • Power Sliding Rear Window Switch - If Equipped "enable rear camera in reverse" soft key. the screen. When the vehicle is exited and the audio screen appears "check entire surroundings" displayed across the top of ...
Owner Manual
Page 190
... or pickup camper is installed on the Camper Applications bottom of the end cap. Slide the cleat off the end of a camper unit with a rear camera the electrical connector must be removed. To determine if your vehicle is excluded, please refer to removing the tailgate. Utility Rail End Cap NOTE: If...
... or pickup camper is installed on the Camper Applications bottom of the end cap. Slide the cleat off the end of a camper unit with a rear camera the electrical connector must be removed. To determine if your vehicle is excluded, please refer to removing the tailgate. Utility Rail End Cap NOTE: If...
Owner Manual
Page 191
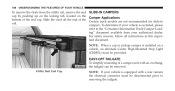
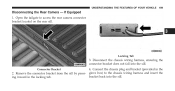
Connect the chassis plug and bracket (provided in the locking tab. ing inward in the Connector Bracket 2. glove box) to access the rear camera connector bracket located on the rear sill. 3 Locking Tab 3. Open the tailgate to the chassis wiring harness and insert the bracket back into the sill. 4. Disconnect the chassis wiring harness, ensuring the connector bracket does not fall into the sill. Remove the connector bracket from the sill by press- UNDERSTANDING THE FEATURES OF YOUR VEHICLE 189 Disconnecting the Rear Camera - If Equipped 1.
Connect the chassis plug and bracket (provided in the locking tab. ing inward in the Connector Bracket 2. glove box) to access the rear camera connector bracket located on the rear sill. 3 Locking Tab 3. Open the tailgate to the chassis wiring harness and insert the bracket back into the sill. 4. Disconnect the chassis wiring harness, ensuring the connector bracket does not fall into the sill. Remove the connector bracket from the sill by press- UNDERSTANDING THE FEATURES OF YOUR VEHICLE 189 Disconnecting the Rear Camera - If Equipped 1.

Owner Manual
Page 192
... against the forward-facing surface of the tailgate until the right side pivot clears the hanger bracket. Disconnect the wiring harness for the rear camera (if equipped), refer to ensure that the terminals do not corrode. 6. If Equipped" in the glove box) to the tailgate wiring ...harness to "Disconnecting the Rear Camera - Connect the tailgate plug (provided in this section. Unlatch the tailgate and remove the support cables by 3. Removing the Tailgate 1. Remove the tailgate...
... against the forward-facing surface of the tailgate until the right side pivot clears the hanger bracket. Disconnect the wiring harness for the rear camera (if equipped), refer to ensure that the terminals do not corrode. 6. If Equipped" in the glove box) to the tailgate wiring ...harness to "Disconnecting the Rear Camera - Connect the tailgate plug (provided in this section. Unlatch the tailgate and remove the support cables by 3. Removing the Tailgate 1. Remove the tailgate...

Owner Manual
Page 597
...-In Recommendations, New Vehicle ...80 B-Pillar Location ...404 Bulb Replacement ...549 Back-Up Camera ...140 Bulbs, Light ...85,549 Battery ...518 Keyless Transmitter Replacement (RKE) ...24 Cab Top Clearance Lights ...555 Saving Feature (Protection) ...119 Calibration, Compass ...233 Belts, ...Seat ...38,83 Camera, Rear ...140 Body Builders Guide ...6 Camper ...188 Body Mechanism Lubrication ...521 Capacities,...
...-In Recommendations, New Vehicle ...80 B-Pillar Location ...404 Bulb Replacement ...549 Back-Up Camera ...140 Bulbs, Light ...85,549 Battery ...518 Keyless Transmitter Replacement (RKE) ...24 Cab Top Clearance Lights ...555 Saving Feature (Protection) ...119 Calibration, Compass ...233 Belts, ...Seat ...38,83 Camera, Rear ...140 Body Builders Guide ...6 Camper ...188 Body Mechanism Lubrication ...521 Capacities,...
User Guide
Page 3
.../HIGH BEAMS LEVER ...HEADLIGHT SWITCH ...SPEED CONTROL LEVER ...MANUAL CLIMATE CONTROLS ...AUTOMATIC TEMPERATURE CONTROL (ATC) ...PARKSENSE® REAR PARK ASSIST ...PARKVIEW® REAR BACK-UP CAMERA . . DIESEL ONLY ...FLUIDS AND CAPACITIES ...MAINTENANCE CHART ...FUSES ...TIRE PRESSURES ...WHEEL AND WHEEL TRIM CARE . U.S. JACKING AND TIRE CHANGING . . DIESEL ONLY ...EXHAUST REGENERATION - CUSTOMER CENTER...
.../HIGH BEAMS LEVER ...HEADLIGHT SWITCH ...SPEED CONTROL LEVER ...MANUAL CLIMATE CONTROLS ...AUTOMATIC TEMPERATURE CONTROL (ATC) ...PARKSENSE® REAR PARK ASSIST ...PARKVIEW® REAR BACK-UP CAMERA . . DIESEL ONLY ...FLUIDS AND CAPACITIES ...MAINTENANCE CHART ...FUSES ...TIRE PRESSURES ...WHEEL AND WHEEL TRIM CARE . U.S. JACKING AND TIRE CHANGING . . DIESEL ONLY ...EXHAUST REGENERATION - CUSTOMER CENTER...

User Guide
Page 26
..., that changes speed depending on the distance of your vehicle, and be careful when backing up even when using the ParkView® Rear Back-Up Camera. Drivers must continue to do so can be displayed on the radio display screen, located on the switch bank below the audio system. • Once... must be sure to the ON position. • The switch is located on the center stack of the EVIC. The ParkView® Rear Back-Up Camera image will be enabled and disabled with a switch located in the AUTO mode, the indicator light may flash three times to control the temperatures individually...
..., that changes speed depending on the distance of your vehicle, and be careful when backing up even when using the ParkView® Rear Back-Up Camera. Drivers must continue to do so can be displayed on the radio display screen, located on the switch bank below the audio system. • Once... must be sure to the ON position. • The switch is located on the center stack of the EVIC. The ParkView® Rear Back-Up Camera image will be enabled and disabled with a switch located in the AUTO mode, the indicator light may flash three times to control the temperatures individually...
User Guide
Page 45
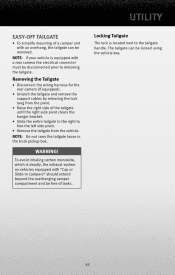
... equipped with "Cap or Slide-In Campers" should extend beyond the overhanging camper compartment and be free of a camper unit with a rear camera the electrical connector must be removed. To avoid inhaling carbon monoxide, which is equipped with an overhang, the tailgate can be locked using the... vehicle key. The tailgate can be disconnected prior to the tailgate handle. Removing the Tailgate • Disconnect the wiring harness for the rear camera (if equipped). • Unlatch the tailgate and remove the support cables by releasing the lock tang from the pivot. • Raise the...
... equipped with "Cap or Slide-In Campers" should extend beyond the overhanging camper compartment and be free of a camper unit with a rear camera the electrical connector must be removed. To avoid inhaling carbon monoxide, which is equipped with an overhang, the tailgate can be locked using the... vehicle key. The tailgate can be disconnected prior to the tailgate handle. Removing the Tailgate • Disconnect the wiring harness for the rear camera (if equipped). • Unlatch the tailgate and remove the support cables by releasing the lock tang from the pivot. • Raise the...