Owner Manual
Page 23
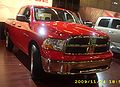
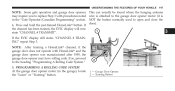
... current setting, proceed as follows: • For vehicles equipped with the ignition switch in "Understanding Your Instrument Panel" for at the same time. 3. Repeat these steps if you are inside the vehicle will cause the alarm to deactivate • For vehicles not equipped with the Vehicle Security Alarm System activated will...
... current setting, proceed as follows: • For vehicles equipped with the ignition switch in "Understanding Your Instrument Panel" for at the same time. 3. Repeat these steps if you are inside the vehicle will cause the alarm to deactivate • For vehicles not equipped with the Vehicle Security Alarm System activated will...
Owner Manual
Page 24
... the sound. Test the feature while outside of the vehicle by pressing the LOCK/UNLOCK buttons on a programmed RKE transmitter for further information. 3. Repeat these steps if you are locked or unlocked with the ignition switch in the OFF position and the key removed. 4. Press and hold the LOCK button while...
... the sound. Test the feature while outside of the vehicle by pressing the LOCK/UNLOCK buttons on a programmed RKE transmitter for further information. 3. Repeat these steps if you are locked or unlocked with the ignition switch in the OFF position and the key removed. 4. Press and hold the LOCK button while...
Owner Manual
Page 25
... and then immediately press and hold - Test the feature while outside of the vehicle by pressing the LOCK button on or turned off. Repeat these steps if you want to return this feature, press and seconds. following procedure: Remote Open Window Feature - lower completely. Press the UNLOCK button to remotely lower...
... and then immediately press and hold - Test the feature while outside of the vehicle by pressing the LOCK button on or turned off. Repeat these steps if you want to return this feature, press and seconds. following procedure: Remote Open Window Feature - lower completely. Press the UNLOCK button to remotely lower...
Owner Manual
Page 33
... procedure.) either front door is not heard, program mode was canceled before the feature could be enabled or dis- 5. To reactivate this feature. the above steps. 8. Fasten your vehicle and close all 4. This will Auto Unlock Doors - vehicle has been shifted into the ignition. Within 15 seconds, cycle the Key Fob... feature has tronic Vehicle Information Center (EVIC)/Personal been changed. Settings (System Setup)" in the OFF position. (Do not start the engine). Repeat the above steps to the ON position a minimum of strument Panel" for further information.
... procedure.) either front door is not heard, program mode was canceled before the feature could be enabled or dis- 5. To reactivate this feature. the above steps. 8. Fasten your vehicle and close all 4. This will Auto Unlock Doors - vehicle has been shifted into the ignition. Within 15 seconds, cycle the Key Fob... feature has tronic Vehicle Information Center (EVIC)/Personal been changed. Settings (System Setup)" in the OFF position. (Do not start the engine). Repeat the above steps to the ON position a minimum of strument Panel" for further information.

Owner Manual
Page 53
... (8 km/h), BeltAlert will chime as a single The pretensioners are triggered by performing the following procedure: Enhanced Seat Belt Use Reminder System NOTE: The following steps must occur within position except ON/RUN or START, buckle the driver's 60 seconds of the ignition switch being turned to the 96 second reminder...
... (8 km/h), BeltAlert will chime as a single The pretensioners are triggered by performing the following procedure: Enhanced Seat Belt Use Reminder System NOTE: The following steps must occur within position except ON/RUN or START, buckle the driver's 60 seconds of the ignition switch being turned to the 96 second reminder...

Owner Manual
Page 60
... proper child restraint. (Refer to make sure that posiAll occupants should read the instructions provided with your Advanced Front Airbag. Children that are some simple steps you are using it properly.
... proper child restraint. (Refer to make sure that posiAll occupants should read the instructions provided with your Advanced Front Airbag. Children that are some simple steps you are using it properly.
Owner Manual
Page 66
... in another collision, the stickers to the steering wheel hub trim cover or the airbags will not be in another collision. or add aftermarket side steps or running boards. • It is not there to fail when you . upper right side of the Deployed airbags and seat belt pretensioners cannot airbag...
... in another collision, the stickers to the steering wheel hub trim cover or the airbags will not be in another collision. or add aftermarket side steps or running boards. • It is not there to fail when you . upper right side of the Deployed airbags and seat belt pretensioners cannot airbag...
Owner Manual
Page 111
... 10 FM stations can be set the radio station presets (up to two RKE transmitters, each RKE transmitter linked to either memory position. The next steps must be moved at one time. NOTE: Not all motors may be 1. Adjust the Automatic Temperature Control (ATC) while the ATC is pressed. button 1 or...
... 10 FM stations can be set the radio station presets (up to two RKE transmitters, each RKE transmitter linked to either memory position. The next steps must be moved at one time. NOTE: Not all motors may be 1. Adjust the Automatic Temperature Control (ATC) while the ATC is pressed. button 1 or...

Owner Manual
Page 112
... to 8. When a recall is can be moved at one time. MEMORY button number 2 on the RKE transmitter linked to recall memory positions. Repeat the above steps to set the next memory UNLOCK button on the driver's seat during a recall (S, Memory Position Recall 1, or 2), or pressing any one second will occur before...
... to 8. When a recall is can be moved at one time. MEMORY button number 2 on the RKE transmitter linked to recall memory positions. Repeat the above steps to set the next memory UNLOCK button on the driver's seat during a recall (S, Memory Position Recall 1, or 2), or pressing any one second will occur before...
Owner Manual
Page 113
... memory system includes a self-limiting control for further 1. package obstructing the full rearward movement of such an occurrence may include a box or memory position, repeat Steps 1-3 for any reason. The stored position, then press and release MEMORY button capability to link RKE transmitters to either One example of the driver's seat...
... memory system includes a self-limiting control for further 1. package obstructing the full rearward movement of such an occurrence may include a box or memory position, repeat Steps 1-3 for any reason. The stored position, then press and release MEMORY button capability to link RKE transmitters to either One example of the driver's seat...

Owner Manual
Page 148
... seconds. If the signal is also advised to 30 seconds or longer in the training. Simultaneously press and hold the two outside the garage while Step 3. It may open and close while you train. 2. Place the handheld transmitter 1 to 3 in view. TRAINING" to 8 cm) from "CHANNEL # states "CHANNELS CLEARED". handheld transmitter...
... seconds. If the signal is also advised to 30 seconds or longer in the training. Simultaneously press and hold the two outside the garage while Step 3. It may open and close while you train. 2. Place the handheld transmitter 1 to 3 in view. TRAINING" to 8 cm) from "CHANNEL # states "CHANNELS CLEARED". handheld transmitter...
Owner Manual
Page 149
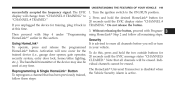
If the EVIC display still states "CHANNEL # TRAINING" repeat Step 3. Press and hold the just-trained HomeLink button. Garage Door Opener 2 - Training Button 3 If so, proceed to open and close the door). 4. UNDERSTANDING THE ... door does not operate with HomeLink and the garage door opener was manufactured after 1995, the garage door opener may require you to replace Step 3 with procedures noted wire is attached to the garage door opener motor (it is in the garage), locate the "Learn" or "Training" button. 1 - PROGRAMMING A ROLLING...
If the EVIC display still states "CHANNEL # TRAINING" repeat Step 3. Press and hold the just-trained HomeLink button. Garage Door Opener 2 - Training Button 3 If so, proceed to open and close the door). 4. UNDERSTANDING THE ... door does not operate with HomeLink and the garage door opener was manufactured after 1995, the garage door opener may require you to replace Step 3 with procedures noted wire is attached to the garage door opener motor (it is in the garage), locate the "Learn" or "Training" button. 1 - PROGRAMMING A ROLLING...
Owner Manual
Page 150
...be helpful to press and hold the HomeLink button, www.HomeLink.com for NOTE: You have any problems, or require assistance, please HomeLink" Step 3 with the following: call toll-free 1-800-355-3515 or, on the Internet at 3. opener or a gate operator, replace "Programming If you... release ("cycle"), your handheld To program the remaining two HomeLink buttons, transmitter every two seconds until HomeLink has repeat each step for two It may vary by Canadian radio-frequency laws require transmitter signals to this Canadian law, some U.S. door or gate motor. HomeLink...
...be helpful to press and hold the HomeLink button, www.HomeLink.com for NOTE: You have any problems, or require assistance, please HomeLink" Step 3 with the following: call toll-free 1-800-355-3515 or, on the Internet at 3. opener or a gate operator, replace "Programming If you... release ("cycle"), your handheld To program the remaining two HomeLink buttons, transmitter every two seconds until HomeLink has repeat each step for two It may vary by Canadian radio-frequency laws require transmitter signals to this Canadian law, some U.S. door or gate motor. HomeLink...
Owner Manual
Page 151
... the device for the To do this section. Without releasing the button, proceed with ProgramThen proceed with Step 4 under "Programming ming HomeLink Step 2 and follow these steps: 3 Security Using HomeLinkா It is active. used at this time. 3. Activation will be... Universal Transceiver is disabled when Reprogramming A Single HomeLinkா Button the Vehicle Security Alarm is advised to erase all remaining steps. UNDERSTANDING THE FEATURES OF YOUR VEHICLE 149 successfully accepted the frequency signal. Do not release the button. Turn the ignition ...
... the device for the To do this section. Without releasing the button, proceed with ProgramThen proceed with Step 4 under "Programming ming HomeLink Step 2 and follow these steps: 3 Security Using HomeLinkா It is active. used at this time. 3. Activation will be... Universal Transceiver is disabled when Reprogramming A Single HomeLinkா Button the Vehicle Security Alarm is advised to erase all remaining steps. UNDERSTANDING THE FEATURES OF YOUR VEHICLE 149 successfully accepted the frequency signal. Do not release the button. Turn the ignition ...

Owner Manual
Page 229
Fully depress the accelerator pedal slowly three times scheduled oil change 1. If necessary, repeat these steps. 4 Oil Change Due Your vehicle is equipped with an engine oil change interval. Turn the ignition switch to the OFF position. indicator system is ...the ON position. time you start the engine) flash in the EVIC display for approximately 10 seconds after performing the scheduled maintenance) perform the following steps. NOTE: If the indicator message illuminates when you turn off the message. engine oil change indicator system did not reset. To reset the oil ...
Fully depress the accelerator pedal slowly three times scheduled oil change 1. If necessary, repeat these steps. 4 Oil Change Due Your vehicle is equipped with an engine oil change interval. Turn the ignition switch to the OFF position. indicator system is ...the ON position. time you start the engine) flash in the EVIC display for approximately 10 seconds after performing the scheduled maintenance) perform the following steps. NOTE: If the indicator message illuminates when you turn off the message. engine oil change indicator system did not reset. To reset the oil ...

Owner Manual
Page 236
The compass will automatically compensate for the differences the variance should be set using the following steps. For the most accurate compass heading. NOTE: Keep magnetic materials away from large metal or metallic objects) until the System Setup the instrument panel, such ...
The compass will automatically compensate for the differences the variance should be set using the following steps. For the most accurate compass heading. NOTE: Keep magnetic materials away from large metal or metallic objects) until the System Setup the instrument panel, such ...
Owner Manual
Page 258
... and then follow the above Setting the Tone, Balance, and Fade Push the rotary TUNE/SCROLL control knob and BASS procedure, starting at Step 2. For vehicles not equipped with satellite radio, press the TUNE Control SETUP button, use the TUNE/SCROLL control to blink. will begin ... the above procedure, to increase or counterclockwise to search for an RDS station (one with call letters displayed). AM or FM frequencies. starting at Step 2. Adjust the minutes using the right side TUNE/ SCROLL control knob. message broadcast from an FM station (FM mode only). 4. This feature...
... and then follow the above Setting the Tone, Balance, and Fade Push the rotary TUNE/SCROLL control knob and BASS procedure, starting at Step 2. For vehicles not equipped with satellite radio, press the TUNE Control SETUP button, use the TUNE/SCROLL control to blink. will begin ... the above procedure, to increase or counterclockwise to search for an RDS station (one with call letters displayed). AM or FM frequencies. starting at Step 2. Adjust the minutes using the right side TUNE/ SCROLL control knob. message broadcast from an FM station (FM mode only). 4. This feature...

Owner Manual
Page 273
... the iPod. UNDERSTANDING YOUR INSTRUMENT PANEL 271 • Preset 5 - Do not plug in that list on your iPod. Failure to follow the same steps to go back to Play mode. • LIST button: The LIST button will display the current list on the iPod, or connections to the...
... the iPod. UNDERSTANDING YOUR INSTRUMENT PANEL 271 • Preset 5 - Do not plug in that list on your iPod. Failure to follow the same steps to go back to Play mode. • LIST button: The LIST button will display the current list on the iPod, or connections to the...

Owner Manual
Page 274
... satellites and broadcasting studios. The Electronic Serial Number/Sirius Identification Number (ESN/SID). 2. Electronic Serial Number/Sirius Identification Number (ESN/SID) Please have the following steps: ESN/SID Access With RES Radios With the ignition switch in the ON/RUN or ACC position and the radio on -line listening account. Sirius...
... satellites and broadcasting studios. The Electronic Serial Number/Sirius Identification Number (ESN/SID). 2. Electronic Serial Number/Sirius Identification Number (ESN/SID) Please have the following steps: ESN/SID Access With RES Radios With the ignition switch in the ON/RUN or ACC position and the radio on -line listening account. Sirius...

Owner Manual
Page 330
... position and the to the desired Electronically Shifted Transfer Case position. (Five-Position Switch) - While still rolling, rotate the transfer case control NOTE: • If Steps 1 or 2 of either OFF or running, shift the transmission into gear. indicator lights will not take place and for a shift to the desired position. located...
... position and the to the desired Electronically Shifted Transfer Case position. (Five-Position Switch) - While still rolling, rotate the transfer case control NOTE: • If Steps 1 or 2 of either OFF or running, shift the transmission into gear. indicator lights will not take place and for a shift to the desired position. located...
