Owner Manual
Page 18
... KNOW BEFORE STARTING YOUR VEHICLE 17 Repeat this procedure to program up to deactivate it. The horn will sound repeatedly for three minutes, while the headlights, park lamps and/or turn signals will flash for an additional 15 minutes. 2 General Information The Sentry Key system complies with FCC rules Part...
... KNOW BEFORE STARTING YOUR VEHICLE 17 Repeat this procedure to program up to deactivate it. The horn will sound repeatedly for three minutes, while the headlights, park lamps and/or turn signals will flash for an additional 15 minutes. 2 General Information The Sentry Key system complies with FCC rules Part...

Owner Manual
Page 24
... - If Equipped This feature allows you will stay on or off, press and hold the UNLOCK button until they lower completely. Using the Panic Alarm headlights and parking lights will flash, the horn will pulse on and off by pressing the PANIC button a second time or if the vehicle speed is...
... - If Equipped This feature allows you will stay on or off, press and hold the UNLOCK button until they lower completely. Using the Panic Alarm headlights and parking lights will flash, the horn will pulse on and off by pressing the PANIC button a second time or if the vehicle speed is...

Owner Manual
Page 95
... Split Folding Rear Seat With Fold-Flat Feature ...142 Ⅵ To Open And Close The Hood ...145 Ⅵ Lights ...147 ▫ Multifunction Lever ...147 ▫ Headlights And Parking Lights ...148 ▫ Instrument Panel Dimmer ...148 ▫ Lights-On Reminder ...149 ▫ High/Low Beam Switch ...149 ▫ Flash-To-Pass ...149...
... Split Folding Rear Seat With Fold-Flat Feature ...142 Ⅵ To Open And Close The Hood ...145 Ⅵ Lights ...147 ▫ Multifunction Lever ...147 ▫ Headlights And Parking Lights ...148 ▫ Instrument Panel Dimmer ...148 ▫ Lights-On Reminder ...149 ▫ High/Low Beam Switch ...149 ▫ Flash-To-Pass ...149...

Owner Manual
Page 98
UNDERSTANDING THE FEATURES OF YOUR VEHICLE 97 MIRRORS Inside Day/Night Mirror A two-point pivot system allows for horizontal and vertical adjustment of the vehicle). The mirror should be adjusted to the night position (toward the windshield). 3 Adjusting Rearview Mirror Headlight glare can be adjusted while set in the day position (toward the rear of the mirror. The mirror should be reduced by moving the small control under the mirror to center on the view through the rear window.
UNDERSTANDING THE FEATURES OF YOUR VEHICLE 97 MIRRORS Inside Day/Night Mirror A two-point pivot system allows for horizontal and vertical adjustment of the vehicle). The mirror should be adjusted to the night position (toward the windshield). 3 Adjusting Rearview Mirror Headlight glare can be adjusted while set in the day position (toward the rear of the mirror. The mirror should be reduced by moving the small control under the mirror to center on the view through the rear window.

Owner Manual
Page 99
... To receive maximum benefit, adjust the outside mirror(s) to indicate when the dimming feature is activated. A light next to the button will automatically adjust for headlight glare from vehicles behind you. 98 UNDERSTANDING THE FEATURES OF YOUR VEHICLE Automatic Dimming Mirror - Automatic Dimming Mirror CAUTION! If Equipped This mirror will illuminate...
... To receive maximum benefit, adjust the outside mirror(s) to indicate when the dimming feature is activated. A light next to the button will automatically adjust for headlight glare from vehicles behind you. 98 UNDERSTANDING THE FEATURES OF YOUR VEHICLE Automatic Dimming Mirror - Automatic Dimming Mirror CAUTION! If Equipped This mirror will illuminate...

Owner Manual
Page 148
... multifunction lever controls the operation of the steering column. 3 Multifunction Lever Be sure the hood is located on the left side of the parking lights, headlights, headlight beam selection, passing light, fog lights, instrument panel light dimming and turn signals. UNDERSTANDING THE FEATURES OF YOUR VEHICLE 147 WARNING!
... multifunction lever controls the operation of the steering column. 3 Multifunction Lever Be sure the hood is located on the left side of the parking lights, headlights, headlight beam selection, passing light, fog lights, instrument panel light dimming and turn signals. UNDERSTANDING THE FEATURES OF YOUR VEHICLE 147 WARNING!

Owner Manual
Page 149
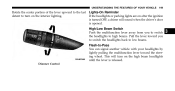
... Rotate the center portion of the lever upward to the next detent position to brighten the odometer and radio when the parking lights or headlights are on , a chime will sound. Turn to fully dim the instrument panel lights and prevent the interior lights from illuminating when a door is left open, ... parking lights are left on . 148 UNDERSTANDING THE FEATURES OF YOUR VEHICLE To change the brightness of the instrument panel lights, Headlights and Parking Lights Turn the end of the multifunction lever to the first detent rotate the center portion of the multifunction lever up to increase...
... Rotate the center portion of the lever upward to the next detent position to brighten the odometer and radio when the parking lights or headlights are on , a chime will sound. Turn to fully dim the instrument panel lights and prevent the interior lights from illuminating when a door is left open, ... parking lights are left on . 148 UNDERSTANDING THE FEATURES OF YOUR VEHICLE To change the brightness of the instrument panel lights, Headlights and Parking Lights Turn the end of the multifunction lever to the first detent rotate the center portion of the multifunction lever up to increase...
Owner Manual
Page 150
...Rotate the center portion of the lever upward to the last Lights-On Reminder If the headlights or parking lights are on after the ignition detent to -Pass You can signal another vehicle with your headlights by lightly pulling the multifunction lever toward the steering wheel. This will sound when the... driver's door is released. High/Low Beam Switch Push the multifunction lever away from you to switch the headlights to high beams. Pull the lever toward you to switch the headlights back to low beams. Flash-to turn on the interior lighting. Dimmer Control 3
...Rotate the center portion of the lever upward to the last Lights-On Reminder If the headlights or parking lights are on after the ignition detent to -Pass You can signal another vehicle with your headlights by lightly pulling the multifunction lever toward the steering wheel. This will sound when the... driver's door is released. High/Low Beam Switch Push the multifunction lever away from you to switch the headlights to high beams. Pull the lever toward you to switch the headlights back to low beams. Flash-to turn on the interior lighting. Dimmer Control 3

Owner Manual
Page 151
... of the instrument cluster flash to show proper operation of the lever. Turn Signal Operation Selecting high beam headlights will only operate with the parking lights or the headlights on the parking or low beam headlights and pull out the end of the front and rear turn on low beam. 150 UNDERSTANDING THE...
... of the instrument cluster flash to show proper operation of the lever. Turn Signal Operation Selecting high beam headlights will only operate with the parking lights or the headlights on the parking or low beam headlights and pull out the end of the front and rear turn on low beam. 150 UNDERSTANDING THE...

Owner Manual
Page 152
... for dimmer switch on the multifunction lever fully upward. If Equipped Certain instrument panel components (odometer, radio The high beam headlights will turn on as in a parade or headlight switch is off automatically when a turn signal is in the dome light position and the key is opened. left on ... defective outside light bulb. If an indicator fails to restore the the detent, and the turn off , the parking brake is running, the headlights on during the Running Lights (DRL) and operate at full brightness during the daytime, such as Daytime display) can be helpful when driving with...
... for dimmer switch on the multifunction lever fully upward. If Equipped Certain instrument panel components (odometer, radio The high beam headlights will turn on as in a parade or headlight switch is off automatically when a turn signal is in the dome light position and the key is opened. left on ... defective outside light bulb. If an indicator fails to restore the the detent, and the turn off , the parking brake is running, the headlights on during the Running Lights (DRL) and operate at full brightness during the daytime, such as Daytime display) can be helpful when driving with...

Owner Manual
Page 195
... to low beam. The malfunction light for 10. They should go lights are on when the ignition 8. If the "ESP/BAS Warning to switch the headlights to high beam, and pull toward Light" comes on after several miles This light will make buzzing or until the vehicle is actively operating. alarm...
... to low beam. The malfunction light for 10. They should go lights are on when the ignition 8. If the "ESP/BAS Warning to switch the headlights to high beam, and pull toward Light" comes on after several miles This light will make buzzing or until the vehicle is actively operating. alarm...
Owner Manual
Page 221
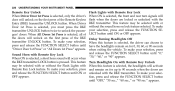
... This feature may be selected with or without the Flash Lights with When this feature is selected, the driver can choose to have the headlights remain on for up to unlock the passengers' doors. When Driver Door 1st Press is selected, you must press the RKE transmitter UNLOCK ... To make your selection, press and release the FUNCTION SELECT button until ON or unlocked with Remote Key Lock When ON is selected, the headlights will unlock on the first press of the Remote Keyless Entry (RKE) transmitter UNLOCK button. the RKE transmitter LOCK button is selected, the ...
... This feature may be selected with or without the Flash Lights with When this feature is selected, the driver can choose to have the headlights remain on for up to unlock the passengers' doors. When Driver Door 1st Press is selected, you must press the RKE transmitter UNLOCK ... To make your selection, press and release the FUNCTION SELECT button until ON or unlocked with Remote Key Lock When ON is selected, the headlights will unlock on the first press of the Remote Keyless Entry (RKE) transmitter UNLOCK button. the RKE transmitter LOCK button is selected, the ...

Owner Manual
Page 395
... located in this section carefully. NOTE: When using a portable battery booster pack follow the procedures in the front of the engine compartment, behind the left headlight assembly. It could rupture or explode and cause personal injury. CAUTION!
... located in this section carefully. NOTE: When using a portable battery booster pack follow the procedures in the front of the engine compartment, behind the left headlight assembly. It could rupture or explode and cause personal injury. CAUTION!
Owner Manual
Page 443
e. a. c. d. Remove eight fasteners. Reach behind the headlight unit in the engine compartment to remove. Reach between the front fascia and wheel liner from the center of each headlamp. Remove the grille assembly ...
e. a. c. d. Remove eight fasteners. Reach behind the headlight unit in the engine compartment to remove. Reach between the front fascia and wheel liner from the center of each headlamp. Remove the grille assembly ...
Owner Manual
Page 484
... Running Lights ...151 Dealer Service ...406 Defroster, Rear Window ...184 Defroster, Windshield ...89,277,283 Delay (Intermittent) Wipers ...154 Diagnostic System, Onboard ...403 Dimmer Switch, Headlight ...149 Dipsticks Oil (Engine) ...407 Power Steering ...316 Disposal Engine Oil ...409 Used Coolant (Antifreeze) ...421 Door Locks ...28 Door Opener, Garage ...165 Driving ...310...
... Running Lights ...151 Dealer Service ...406 Defroster, Rear Window ...184 Defroster, Windshield ...89,277,283 Delay (Intermittent) Wipers ...154 Diagnostic System, Onboard ...403 Dimmer Switch, Headlight ...149 Dipsticks Oil (Engine) ...407 Power Steering ...316 Disposal Engine Oil ...409 Used Coolant (Antifreeze) ...421 Door Locks ...28 Door Opener, Garage ...165 Driving ...310...

Owner Manual
Page 487
Headlights Bulb Replacement ...Dimmer Switch ...Replacing ...Switch ...Heated Seats ...Heater ...Heater, Engine Block ...Hitches Trailer Towing ...Holder, Coin ...Holder, Cup ...HomeLink (Garage Door Opener) Transmitter ...
Headlights Bulb Replacement ...Dimmer Switch ...Replacing ...Switch ...Heated Seats ...Heater ...Heater, Engine Block ...Hitches Trailer Towing ...Holder, Coin ...Holder, Cup ...HomeLink (Garage Door Opener) Transmitter ...

Owner Manual
Page 489
...328 Brake Warning ...196 Bulb Replacement ...440 Cargo ...180 Center Mounted Stop ...444 Cruise ...206 Daytime Running ...151 Dimmer Switch, Headlight ...149 Electronic Stability Program (ESP) Indicator ...194,326 Engine Temperature Warning ...193 Exterior ...90 Fog ...150,199,442 Four-Wheel ...Drive Indicator ...207 Hazard Warning Flasher ...386 Headlight Switch ...148 Headlights ...440 High Beam Indicator ...194 Illuminated Entry ...19 Instrument Cluster ...148,192 Interior ...151 Lights On Reminder ...149 Low ...
...328 Brake Warning ...196 Bulb Replacement ...440 Cargo ...180 Center Mounted Stop ...444 Cruise ...206 Daytime Running ...151 Dimmer Switch, Headlight ...149 Electronic Stability Program (ESP) Indicator ...194,326 Engine Temperature Warning ...193 Exterior ...90 Fog ...150,199,442 Four-Wheel ...Drive Indicator ...207 Hazard Warning Flasher ...386 Headlight Switch ...148 Headlights ...440 High Beam Indicator ...194 Illuminated Entry ...19 Instrument Cluster ...148,192 Interior ...151 Lights On Reminder ...149 Low ...

User Guide
Page 19
... on until the lever is released. Flash To Pass • Pull the lever toward you to the first detent for parking lights second detent for headlights . High Beam Operation • Push the lever forward to activate the high beams. NOTE: For safe driving, turn off high beams when oncoming ...; Rotate the center portion of the lever upward to the next detent position to brighten the odometer and radio controls when the parking lights or headlights are on. • Rotate the center portion of the lever upward to the last detent to other motorists. and to the Instrument Panel Dimmer ...
... on until the lever is released. Flash To Pass • Pull the lever toward you to the first detent for parking lights second detent for headlights . High Beam Operation • Push the lever forward to activate the high beams. NOTE: For safe driving, turn off high beams when oncoming ...; Rotate the center portion of the lever upward to the next detent position to brighten the odometer and radio controls when the parking lights or headlights are on. • Rotate the center portion of the lever upward to the last detent to other motorists. and to the Instrument Panel Dimmer ...

User Guide
Page 49
... skin or eyes and generate hydrogen gas which is OFF. WARNING! • Take care to the positive (+) post of the engine compartment, behind the left headlight assembly. You could result in damage to the charging system of the booster vehicle or the discharged vehicle. • Connect the positive (+) end of the...
... skin or eyes and generate hydrogen gas which is OFF. WARNING! • Take care to the positive (+) post of the engine compartment, behind the left headlight assembly. You could result in damage to the charging system of the booster vehicle or the discharged vehicle. • Connect the positive (+) end of the...
