
Owner Manual
Page 8
... registration, and the title. 1 This number also is visible from outside of the instrument panel. It also contains CAUTIONS against operating procedures that could result in damage to remove or alter the VIN. INTRODUCTION 7 WARNINGS AND CAUTIONS This Owner's Manual contains WARNINGS against ...procedures that could result in an accident or bodily injury. The VIN is stamped into the right front Vehicle Identification Number door sill (under the...
... registration, and the title. 1 This number also is visible from outside of the instrument panel. It also contains CAUTIONS against operating procedures that could result in damage to remove or alter the VIN. INTRODUCTION 7 WARNINGS AND CAUTIONS This Owner's Manual contains WARNINGS against ...procedures that could result in an accident or bodily injury. The VIN is stamped into the right front Vehicle Identification Number door sill (under the...
Owner Manual
Page 30
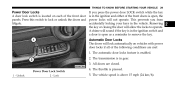
...(24 km/h). Automatic Door Locks The doors will not operate. All doors are met: 1. The vehicle speed is pressed. 5. Press this switch to operate. Removing the key or closing the door will sound if the key is in the ignition and either of the front door panels. Lock 4. The ...transmission is in the vehicle. Unlock 2 - The automatic door locks feature is enabled. 2. A chime will allow ...
...(24 km/h). Automatic Door Locks The doors will not operate. All doors are met: 1. The vehicle speed is pressed. 5. Press this switch to operate. Removing the key or closing the door will sound if the key is in the ignition and either of the front door panels. Lock 4. The ...transmission is in the vehicle. Unlock 2 - The automatic door locks feature is enabled. 2. A chime will allow ...

Owner Manual
Page 36
...the driver's and front passenger's (if equipped for further information. 2 Remove the obstacle and use the window window to stop the window from going... after the ignition switch is turned to the LOCK position. To stop . If this feature. door will cancel this happens, pull the switch lightly to the is turned to the LOCK position. ... switch again to "Electronic Vehicle Information Center (EVIC)/Personal Settings (CustomerProgrammable Features)" in "Understanding Your Instrument Panel" for passenger side) power window switches have an "Auto Up" feature. For vehicles not equipped with the...
...the driver's and front passenger's (if equipped for further information. 2 Remove the obstacle and use the window window to stop the window from going... after the ignition switch is turned to the LOCK position. To stop . If this feature. door will cancel this happens, pull the switch lightly to the is turned to the LOCK position. ... switch again to "Electronic Vehicle Information Center (EVIC)/Personal Settings (CustomerProgrammable Features)" in "Understanding Your Instrument Panel" for passenger side) power window switches have an "Auto Up" feature. For vehicles not equipped with the...

Owner Manual
Page 430
... scouring powder, which will scratch metal and painted surfaces. • Use of power washers exceeding 1,200 psi (8 274 kPa) can result in damage or removal of the doors, rocker panels and liftgate are kept clear finish. a month. • Avoid using abrasive compounds and power buffing • It is important that may diminish the...
... scouring powder, which will scratch metal and painted surfaces. • Use of power washers exceeding 1,200 psi (8 274 kPa) can result in damage or removal of the doors, rocker panels and liftgate are kept clear finish. a month. • Avoid using abrasive compounds and power buffing • It is important that may diminish the...

User Guide
Page 53
MAINTAINING YOUR VEHICLE OPENING THE HOOD • Pull the release lever located below the instrument panel and in front of the driver's door. • Raise the hood and locate the safety latch, in the middle of the hood opening. • Move the safety latch while lifting the hood ...at the same time. • Insert the support rod into the slot on the hood. • To close the hood, remove the support rod...
MAINTAINING YOUR VEHICLE OPENING THE HOOD • Pull the release lever located below the instrument panel and in front of the driver's door. • Raise the hood and locate the safety latch, in the middle of the hood opening. • Move the safety latch while lifting the hood ...at the same time. • Insert the support rod into the slot on the hood. • To close the hood, remove the support rod...


