

Owner Manual
Page 3
SECTION 1 2 3 4 5 6 7 8 9 10 INTRODUCTION TABLE OF CONTENTS PAGE ...3 1 ...9 2 THINGS TO KNOW BEFORE STARTING YOUR VEHICLE UNDERSTANDING THE FEATURES OF YOUR VEHICLE UNDERSTANDING YOUR INSTRUMENT PANEL STARTING AND OPERATING ...75 3 ...163 4 ...235 5 ...331 6 ...349 7 WHAT TO DO IN EMERGENCIES MAINTAINING YOUR VEHICLE MAINTENANCE SCHEDULES ...399 8 ...417 9 IF YOU NEED CONSUMER ASSISTANCE INDEX ...427 10
SECTION 1 2 3 4 5 6 7 8 9 10 INTRODUCTION TABLE OF CONTENTS PAGE ...3 1 ...9 2 THINGS TO KNOW BEFORE STARTING YOUR VEHICLE UNDERSTANDING THE FEATURES OF YOUR VEHICLE UNDERSTANDING YOUR INSTRUMENT PANEL STARTING AND OPERATING ...75 3 ...163 4 ...235 5 ...331 6 ...349 7 WHAT TO DO IN EMERGENCIES MAINTAINING YOUR VEHICLE MAINTENANCE SCHEDULES ...399 8 ...417 9 IF YOU NEED CONSUMER ASSISTANCE INDEX ...427 10

Owner Manual
Page 8
... accident or bodily injury. It also contains CAUTIONS against operating procedures that could result in damage to a window on the left front corner of the instrument panel pad, visible from outside of your vehicle identification number and optional equipment.
... accident or bodily injury. It also contains CAUTIONS against operating procedures that could result in damage to a window on the left front corner of the instrument panel pad, visible from outside of your vehicle identification number and optional equipment.

Owner Manual
Page 16
... from the LOCK position when starting your vehicle. To remove the key, depress and hold the release button located between the ignition switch and the instrument panel. Ignition Release Button 1 - LOCK 3 -
... from the LOCK position when starting your vehicle. To remove the key, depress and hold the release button located between the ignition switch and the instrument panel. Ignition Release Button 1 - LOCK 3 -

Owner Manual
Page 48
... in the instrument panel, above the glove compartment. Driver And Right Front Passenger Supplemental Restraint System (SRS) - Airbags 2 - The words SRS/AIRBAG are certified to the seat belt restraint systems. The driver's front airbag is mounted in the steering wheel. Using a seat belt extender when not ...the driver and right front passenger as a supplement to the Federal regulations that allow less forceful deployment. Remove and store the extender when not needed can increase the risk of injury in the recommended seating positions. 46 THINGS TO KNOW BEFORE STARTING YOUR VEHICLE...
... in the instrument panel, above the glove compartment. Driver And Right Front Passenger Supplemental Restraint System (SRS) - Airbags 2 - The words SRS/AIRBAG are certified to the seat belt restraint systems. The driver's front airbag is mounted in the steering wheel. Using a seat belt extender when not ...the driver and right front passenger as a supplement to the Federal regulations that allow less forceful deployment. Remove and store the extender when not needed can increase the risk of injury in the recommended seating positions. 46 THINGS TO KNOW BEFORE STARTING YOUR VEHICLE...
Owner Manual
Page 50
... side collisions. The seat belts are some simple steps you in an appropriate child restraint. But even in collisions where the airbags work with the instrument panel knee bolsters to provide improved protection for the airbags to protect you in moderate to minimize the risk of the vehicle is triggered in this...
... side collisions. The seat belts are some simple steps you in an appropriate child restraint. But even in collisions where the airbags work with the instrument panel knee bolsters to provide improved protection for the airbags to protect you in moderate to minimize the risk of the vehicle is triggered in this...

Owner Manual
Page 51
... Section 9. 2 WARNING! • Relying on the airbags alone could lead to the steering wheel or instrument panel during airbag deployment could cause serious injury. Airbags need room to reach the steering wheel or instrument panel. (Continued) Sit back, comfortably extending your seat belts even though you are using it properly. 2. THINGS TO KNOW BEFORE STARTING...
... Section 9. 2 WARNING! • Relying on the airbags alone could lead to the steering wheel or instrument panel during airbag deployment could cause serious injury. Airbags need room to reach the steering wheel or instrument panel. (Continued) Sit back, comfortably extending your seat belts even though you are using it properly. 2. THINGS TO KNOW BEFORE STARTING...

Owner Manual
Page 52
... Airbag • Passenger Airbag • Window Bags above , except the steering wheel and column, and knee bolsters. if equipped • Steering Wheel and Column • Instrument Panel • Interconnecting Wiring • Knee Impact Bolsters • Front Acceleration Sensors • Driver and Front Passenger Seat Belt Pretensioners How the Airbag System Works •...
... Airbag • Passenger Airbag • Window Bags above , except the steering wheel and column, and knee bolsters. if equipped • Steering Wheel and Column • Instrument Panel • Interconnecting Wiring • Knee Impact Bolsters • Front Acceleration Sensors • Driver and Front Passenger Seat Belt Pretensioners How the Airbag System Works •...

Owner Manual
Page 53
... the ACC position, or not in the ignition, the airbags are located in the center of the steering wheel and the right side of the instrument panel. If the ORC detects a malfunction in any part of nontoxic gas is first turned on as you in a collision. A large quantity of the system...-severe rear impact, the ORC may only deploy the seat belt pretensioners. • Also, the ORC turns on the AIRBAG warning light in your instrument panel could mean you won't have the airbags to eight seconds for a self-check when the ignition is generated to inflate the front airbags. When the...
... the ACC position, or not in the ignition, the airbags are located in the center of the steering wheel and the right side of the instrument panel. If the ORC detects a malfunction in any part of nontoxic gas is first turned on as you in a collision. A large quantity of the system...-severe rear impact, the ORC may only deploy the seat belt pretensioners. • Also, the ORC turns on the AIRBAG warning light in your instrument panel could mean you won't have the airbags to eight seconds for a self-check when the ignition is generated to inflate the front airbags. When the...

Owner Manual
Page 54
.... • The Knee Impact Bolsters help protect the knees of the vehicle. The steering wheel hub trim cover and the upper right side of the instrument panel separate and fold out of nontoxic gas is vented through vent holes in the sides of the airbag. The driver's front airbag gas is generated...
.... • The Knee Impact Bolsters help protect the knees of the vehicle. The steering wheel hub trim cover and the upper right side of the instrument panel separate and fold out of nontoxic gas is vented through vent holes in the sides of the airbag. The driver's front airbag gas is generated...
Owner Manual
Page 56
... protect you in a collision. 54 THINGS TO KNOW BEFORE STARTING YOUR VEHICLE WARNING! Maintaining Your Airbag System WARNING! • Modifications to any part of the instrument panel. Do not modify the components or wiring, including adding any aftermarket equipment on or behind the knee bolsters. (Continued) Do not mount or locate any...
... protect you in a collision. 54 THINGS TO KNOW BEFORE STARTING YOUR VEHICLE WARNING! Maintaining Your Airbag System WARNING! • Modifications to any part of the instrument panel. Do not modify the components or wiring, including adding any aftermarket equipment on or behind the knee bolsters. (Continued) Do not mount or locate any...
Owner Manual
Page 75
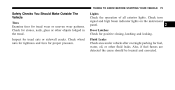
... located and corrected. 2 Inspect for proper pressure. Lights Check the operation of all exterior lights. Check turn signal and high beam indicator lights on the instrument panel. Check for fuel, water, oil, or other objects lodged in the tread. Fluid Leaks Check area under vehicle after overnight parking for stones, nails, glass...
... located and corrected. 2 Inspect for proper pressure. Lights Check the operation of all exterior lights. Check turn signal and high beam indicator lights on the instrument panel. Check for fuel, water, oil, or other objects lodged in the tread. Fluid Leaks Check area under vehicle after overnight parking for stones, nails, glass...
Owner Manual
Page 101
... the beep, say ЉMute.Љ In order to make a phone call using voice recognition. The UConnect system will work the same as the instrument panel cluster, and supported by your cell phone, the UConnect system will provide notification to inform you of mobile phones do not send the dial...
... the beep, say ЉMute.Љ In order to make a phone call using voice recognition. The UConnect system will work the same as the instrument panel cluster, and supported by your cell phone, the UConnect system will provide notification to inform you of mobile phones do not send the dial...

Owner Manual
Page 122
...the heated seat. Tilt Adjustment Extended Cab/Crew Cabா Rear Seat More cargo space is a 60/40 split cushion and full back. Press the switch a second time to obtain high heat level. The lower indicator on identifies high heat level. Flashing indicator lights on the center of the instrument panel. Both the high and... up or down. If Equipped The Heated Seat switches are located on the switch indicate that the Heated Seat system needs servicing. The Crew Cab Rear Seat is available by using the two toggle switches, tilting it up on the rear seat cushion.
...the heated seat. Tilt Adjustment Extended Cab/Crew Cabா Rear Seat More cargo space is a 60/40 split cushion and full back. Press the switch a second time to obtain high heat level. The lower indicator on identifies high heat level. Flashing indicator lights on the center of the instrument panel. Both the high and... up or down. If Equipped The Heated Seat switches are located on the switch indicate that the Heated Seat system needs servicing. The Crew Cab Rear Seat is available by using the two toggle switches, tilting it up on the rear seat cushion.

Owner Manual
Page 123
First pull the hood release lever located under the left side of the instrument panel. 3 Hood Release Lever Location This may cause burns even at low temperatures, especially if used for long periods of time. • Do not place anything ...
First pull the hood release lever located under the left side of the instrument panel. 3 Hood Release Lever Location This may cause burns even at low temperatures, especially if used for long periods of time. • Do not place anything ...
Owner Manual
Page 125
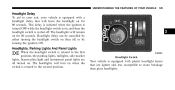
When a door is open for extended periods of time without discharging the vehicle's battery. The brightness of the odometer, trip odometer, radio and overhead ... UNLOCK button is pressed on , rotating the dimmer control all the way down (dimmer). wheel on the right side of the instrument panel next to read if the headlights are on during the day. If the dimmer control is not in this position, the audio ... opened, when the dimmer control (rotating When the headlights are on you can supplement the brightness of the instrument panel lighting can be difficult to the steering wheel.
When a door is open for extended periods of time without discharging the vehicle's battery. The brightness of the odometer, trip odometer, radio and overhead ... UNLOCK button is pressed on , rotating the dimmer control all the way down (dimmer). wheel on the right side of the instrument panel next to read if the headlights are on during the day. If the dimmer control is not in this position, the audio ... opened, when the dimmer control (rotating When the headlights are on you can supplement the brightness of the instrument panel lighting can be difficult to the steering wheel.
Owner Manual
Page 127
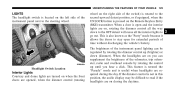
... When the headlight switch is rotated to the first position, the parking lights, taillights, side marker lights, license plate light and instrument panel lights are lighter and less susceptible to stone breakage than glass headlights. This delay is initiated when the ignition is turned OFF while the headlight ...
... When the headlight switch is rotated to the first position, the parking lights, taillights, side marker lights, license plate light and instrument panel lights are lighter and less susceptible to stone breakage than glass headlights. This delay is initiated when the ignition is turned OFF while the headlight ...
Owner Manual
Page 151
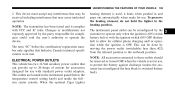
...outboard position. The outlets are located in the heating position. To preserve the heating element, do not hold the lighter in the instrument panel (below the temperature control setting knob) and inside the full size center console. NOTE: All accessories connected to these outlets should be...the device. ELECTRICAL POWER OUTLETS This vehicle has two 12-Volt auxiliary power outlets that Industry Canada technical specifications were met. The instrument panel outlet can provide up to switched battery feed). 3 When the optional Cigar Lighter heating element is not in and pops out ...
...outboard position. The outlets are located in the heating position. To preserve the heating element, do not hold the lighter in the instrument panel (below the temperature control setting knob) and inside the full size center console. NOTE: All accessories connected to these outlets should be...the device. ELECTRICAL POWER OUTLETS This vehicle has two 12-Volt auxiliary power outlets that Industry Canada technical specifications were met. The instrument panel outlet can provide up to switched battery feed). 3 When the optional Cigar Lighter heating element is not in and pops out ...

Owner Manual
Page 156
... 12-Volt power plug. The armrest lid will remain open armrest lid. • Tissue holder and two pen holders. • Coin slots (located under the instrument panel center stack). Two pen holders are both removable and dishwasher safe (upper rack of the console opens the console armrest lid. IF EQUIPPED Floor Console...
... 12-Volt power plug. The armrest lid will remain open armrest lid. • Tissue holder and two pen holders. • Coin slots (located under the instrument panel center stack). Two pen holders are both removable and dishwasher safe (upper rack of the console opens the console armrest lid. IF EQUIPPED Floor Console...
Owner Manual
Page 165
... Multimedia System Radio (RER/REN) - AM/FM Stereo Radio And 6-Disc CD/DVD Changer (MP3/WMA AUX Jack)...180 ▫ Operating Instructions - UNDERSTANDING YOUR INSTRUMENT PANEL CONTENTS Ⅵ Instruments And Controls ...166 Ⅵ Instrument Cluster ...167 Ⅵ Instrument Cluster Description ...168 Ⅵ Electronic Digital Clock ...179 ▫ Clock Setting Procedure ...179 Ⅵ Sales Code REQ -
... Multimedia System Radio (RER/REN) - AM/FM Stereo Radio And 6-Disc CD/DVD Changer (MP3/WMA AUX Jack)...180 ▫ Operating Instructions - UNDERSTANDING YOUR INSTRUMENT PANEL CONTENTS Ⅵ Instruments And Controls ...166 Ⅵ Instrument Cluster ...167 Ⅵ Instrument Cluster Description ...168 Ⅵ Electronic Digital Clock ...179 ▫ Clock Setting Procedure ...179 Ⅵ Sales Code REQ -
Owner Manual
Page 166
... Mode For MP3 Play) ...218 ▫ Info Button (CD Mode For MP3 Play) ...219 Ⅵ Sound Box Operation ...220 Ⅵ Satellite Radio - 164 UNDERSTANDING YOUR INSTRUMENT PANEL ▫ Operating Instructions - If Equipped ...196 ▫ Clock Setting Procedure ...196 Ⅵ Sales Code RES - Radio Mode ...208 ▫ Operation Instructions - Radio Mode ...199 ▫...
... Mode For MP3 Play) ...218 ▫ Info Button (CD Mode For MP3 Play) ...219 Ⅵ Sound Box Operation ...220 Ⅵ Satellite Radio - 164 UNDERSTANDING YOUR INSTRUMENT PANEL ▫ Operating Instructions - If Equipped ...196 ▫ Clock Setting Procedure ...196 Ⅵ Sales Code RES - Radio Mode ...208 ▫ Operation Instructions - Radio Mode ...199 ▫...