
Owner Manual
Page 56
... dealer as soon as possible. Do not modify the components or wiring, including adding any kind of the instrument panel. Do not modify the front bumper, vehicle body structure, or add aftermarket side steps or running boards. • You need it. Deployed airbags and seat belt pretensioners cannot protect you need...
... dealer as soon as possible. Do not modify the components or wiring, including adding any kind of the instrument panel. Do not modify the front bumper, vehicle body structure, or add aftermarket side steps or running boards. • You need it. Deployed airbags and seat belt pretensioners cannot protect you need...
Owner Manual
Page 162
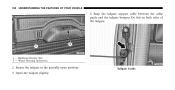
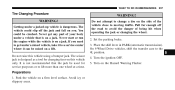
Do this on both sides of the tailgate. 1 - Bulkhead Divider Slot 2 - Open the tailgate slightly. Snap the tailgate support cable between the cable guide and the tailgate bumper. Wheel Housing Indentions 2. 160 UNDERSTANDING THE FEATURES OF YOUR VEHICLE 4. Tailgate Guide Secure the tailgate in the partially-open position: 3.
Do this on both sides of the tailgate. 1 - Bulkhead Divider Slot 2 - Open the tailgate slightly. Snap the tailgate support cable between the cable guide and the tailgate bumper. Wheel Housing Indentions 2. 160 UNDERSTANDING THE FEATURES OF YOUR VEHICLE 4. Tailgate Guide Secure the tailgate in the partially-open position: 3.

Owner Manual
Page 163
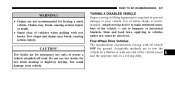
... rough roads may result in vehicle damage. • Ensure the load is securely tied down and is properly identified according to local laws if it extends beyond the tail lights. (Continued) Lift up on the tailgate. 2. CAUTION! (Continued) • Loading should not exceed 400 lbs (181 kg) of the cargo that... cause shifting or bouncing of material suspended above the wheelhouse and partially open position: 1. Remove both cables from between the cable guides and the tailgate bumpers, and lower the tailgate.
... rough roads may result in vehicle damage. • Ensure the load is securely tied down and is properly identified according to local laws if it extends beyond the tail lights. (Continued) Lift up on the tailgate. 2. CAUTION! (Continued) • Loading should not exceed 400 lbs (181 kg) of the cargo that... cause shifting or bouncing of material suspended above the wheelhouse and partially open position: 1. Remove both cables from between the cable guides and the tailgate bumpers, and lower the tailgate.

Owner Manual
Page 317
STARTING AND OPERATING 315 Trailer Hitch Classification The rear bumper is intended to tow trailers up to 2,000 lbs (907 kg) without added equipment or alterations to "Trailer Towing Weights (Maximum Trailer Weight Ratings)" for ...
STARTING AND OPERATING 315 Trailer Hitch Classification The rear bumper is intended to tow trailers up to 2,000 lbs (907 kg) without added equipment or alterations to "Trailer Towing Weights (Maximum Trailer Weight Ratings)" for ...

Owner Manual
Page 318
...15% of the Gross Trailer Weight (GTW) on your vehicle. Never exceed the maximum tongue weight stamped on the tow hitch of your bumper or trailer hitch. 316 STARTING AND OPERATING Trailer Towing Weights (Maximum Trailer Weight Ratings) NOTE: For additional trailer towing information (maximum trailer weight... to load trailers heavier in front is the cause of the trailer. Consider the following website addresses: • http:// www.dodge.com/towing • http:// www.dodge.ca (Canada) Trailer and Tongue Weight Always load a trailer with 60% to 65% of the weight in the rear can...
...15% of the Gross Trailer Weight (GTW) on your vehicle. Never exceed the maximum tongue weight stamped on the tow hitch of your bumper or trailer hitch. 316 STARTING AND OPERATING Trailer Towing Weights (Maximum Trailer Weight Ratings) NOTE: For additional trailer towing information (maximum trailer weight... to load trailers heavier in front is the cause of the trailer. Consider the following website addresses: • http:// www.dodge.com/towing • http:// www.dodge.ca (Canada) Trailer and Tongue Weight Always load a trailer with 60% to 65% of the weight in the rear can...
Owner Manual
Page 331
STARTING AND OPERATING 329 CAUTION! • Do not use a bumper mounted clamp-on tow bar on your vehicle. The bumper face bar will be damaged. • Do not disconnect the rear driveshaft because fluid will leak from the transfer case and damage internal parts. 5
STARTING AND OPERATING 329 CAUTION! • Do not use a bumper mounted clamp-on tow bar on your vehicle. The bumper face bar will be damaged. • Do not disconnect the rear driveshaft because fluid will leak from the transfer case and damage internal parts. 5
Owner Manual
Page 336
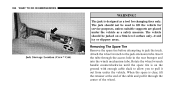
...! The jack should be used to pull it through the access hole in the rear bumper and into the winch mechanism tube. Insert the tube through the center of the wheel. Jack Stowage Location (Crew Cab) Attach the wheel wrench to jack the truck. Avoid icy or slippery areas. Removing The...
...! The jack should be used to pull it through the access hole in the rear bumper and into the winch mechanism tube. Insert the tube through the center of the wheel. Jack Stowage Location (Crew Cab) Attach the wheel wrench to jack the truck. Avoid icy or slippery areas. Removing The...

Owner Manual
Page 337
... tool from jack and set aside until jack is stowed. • Assemble the jack tools. • Locate the tire carrier access hole on the rear bumper. • Place assembled jack tool extension rod into the access hole in the direction of the arrow on the... bumper trim. • Rotate the tool counterclockwise to release and lower the spare tire to the ground so that it can be pulled from under the ...
... tool from jack and set aside until jack is stowed. • Assemble the jack tools. • Locate the tire carrier access hole on the rear bumper. • Place assembled jack tool extension rod into the access hole in the direction of the arrow on the... bumper trim. • Rotate the tool counterclockwise to release and lower the spare tire to the ground so that it can be pulled from under the ...
Owner Manual
Page 339
... body under a jacked-up vehicle is designed as a tool for service purposes or to a service center where it can be raised on this vehicle using a bumper jack. The vehicle could be used for changing tires on a lift. Do not raise this vehicle only. Place the shift lever in PARK (automatic transmission...
... body under a jacked-up vehicle is designed as a tool for service purposes or to a service center where it can be raised on this vehicle using a bumper jack. The vehicle could be used for changing tires on a lift. Do not raise this vehicle only. Place the shift lever in PARK (automatic transmission...
Owner Manual
Page 349
... recommended for tow truck hookup or highway towing. Four-Wheel Drive Vehicles The manufacturer recommends towing with tow hooks. State and local laws, applying to bumpers or associated brackets.
... recommended for tow truck hookup or highway towing. Four-Wheel Drive Vehicles The manufacturer recommends towing with tow hooks. State and local laws, applying to bumpers or associated brackets.

Owner Manual
Page 396
394 MAINTAINING YOUR VEHICLE License Lamps 1. Using a screwdriver, pry black rubber housing from the bumper. 2. Rotate the socket 1/4-turn counterclockwise.
394 MAINTAINING YOUR VEHICLE License Lamps 1. Using a screwdriver, pry black rubber housing from the bumper. 2. Rotate the socket 1/4-turn counterclockwise.

Quick Reference Guide
Page 5
...SCROLL control knob to Owner's Manual for proper jacking and tire change . Spare Tire Removal • The scissor jack and tire changing tools on Extended Cab models are located below the right rear seat. • Remove the jack from under the vehicle. • Refer to save the new time... can be pulled out from the stowage compartment. • Assemble jacking tools. • Locate the tire carrier access hole on the rear bumper. • Place assembled jack tool extension rod into the access hole in the direction of the arrow on the outboard side of the right...
...SCROLL control knob to Owner's Manual for proper jacking and tire change . Spare Tire Removal • The scissor jack and tire changing tools on Extended Cab models are located below the right rear seat. • Remove the jack from under the vehicle. • Refer to save the new time... can be pulled out from the stowage compartment. • Assemble jacking tools. • Locate the tire carrier access hole on the rear bumper. • Place assembled jack tool extension rod into the access hole in the direction of the arrow on the outboard side of the right...
