

Owner Manual
Page 29
... or down. Doors locked before closing will disable the one time, or allow the engine to drive the vehicle. To Exit Remote Start Mode without lifting the lock plunger. DOOR LOCKS Manual Door Locks Front and rear doors may be in the ON/RUN position in order to run for two...
... or down. Doors locked before closing will disable the one time, or allow the engine to drive the vehicle. To Exit Remote Start Mode without lifting the lock plunger. DOOR LOCKS Manual Door Locks Front and rear doors may be in the ON/RUN position in order to run for two...
Owner Manual
Page 74
... the tether strap is greatly improved by raising the head restraints and reaching between the rear glass and rear seat. Accessibility to the "up" position. Lift the cover (if so equipped), and attach the hook to the square opening in the tether strap according to the anchor behind the child seat...
... the tether strap is greatly improved by raising the head restraints and reaching between the rear glass and rear seat. Accessibility to the "up" position. Lift the cover (if so equipped), and attach the hook to the square opening in the tether strap according to the anchor behind the child seat...
Owner Manual
Page 77
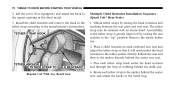
... the square opening in the seat. THINGS TO KNOW BEFORE STARTING YOUR VEHICLE 75 Tether Anchorage Points at All Three Seating Positions (Mega Cab) 1. Lift the cover, and attach the hook to bend over the front of the seat when their back is upright in the sheet metal. 3. Install the...
... the square opening in the seat. THINGS TO KNOW BEFORE STARTING YOUR VEHICLE 75 Tether Anchorage Points at All Three Seating Positions (Mega Cab) 1. Lift the cover, and attach the hook to bend over the front of the seat when their back is upright in the sheet metal. 3. Install the...
Owner Manual
Page 128
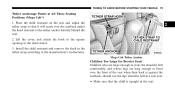
... Pull up on the outside of the seat cushion. Mega Cab Models Both the left and right rear seatbacks can be folded down (Table Mode), lift the handle and fold the seatback forward. Verify that it is on the handle, as a table. Rear Seat Recliner Handle Mega Cab Models The ... is locked in place. Folding Rear Seat (Table Mode) - To fold either rear seatback down and used as shown, to the upright position. Simply lift the seat back to return the seat to release the seatback and adjust for comfort. 126 UNDERSTANDING THE FEATURES OF YOUR VEHICLE Rear Seat Features -
... Pull up on the outside of the seat cushion. Mega Cab Models Both the left and right rear seatbacks can be folded down (Table Mode), lift the handle and fold the seatback forward. Verify that it is on the handle, as a table. Rear Seat Recliner Handle Mega Cab Models The ... is locked in place. Folding Rear Seat (Table Mode) - To fold either rear seatback down and used as shown, to the upright position. Simply lift the seat back to return the seat to release the seatback and adjust for comfort. 126 UNDERSTANDING THE FEATURES OF YOUR VEHICLE Rear Seat Features -

Owner Manual
Page 132
Verify that it is locked in place. Simply lift the seatback to return the seat to the upright position. 130 UNDERSTANDING THE FEATURES OF YOUR VEHICLE To fold either rear seat flat (Kneel Mode), lift the handle and fold the seat forward. Kneel Mode Kneel Mode Handle
Verify that it is locked in place. Simply lift the seatback to return the seat to the upright position. 130 UNDERSTANDING THE FEATURES OF YOUR VEHICLE To fold either rear seat flat (Kneel Mode), lift the handle and fold the seat forward. Kneel Mode Kneel Mode Handle
Owner Manual
Page 177
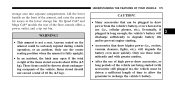
... storage bin. On Quad Cab and Mega Cab models the rear of the items stored exceeds about endangering occupants of 10 lbs (4.5 kg). Lift the lower handle on the armrest could be thrown about 10 lbs (4.5 kg). Only use these intermittently and with greater caution. • After the use...
... storage bin. On Quad Cab and Mega Cab models the rear of the items stored exceeds about endangering occupants of 10 lbs (4.5 kg). Lift the lower handle on the armrest could be thrown about 10 lbs (4.5 kg). Only use these intermittently and with greater caution. • After the use...

Owner Manual
Page 178
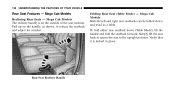
Quad Cab Storage Regular Cab models also have storage behind the seat. Lift the seat to access the storage compartment. The Quad Cab models provide additional storage under the rear seat. 176 UNDERSTANDING THE FEATURES OF YOUR VEHICLE Storage and Seats (Quad Cabா Models) Located in the center of the front 40-20-40 seat cushion there is a storage compartment.
Quad Cab Storage Regular Cab models also have storage behind the seat. Lift the seat to access the storage compartment. The Quad Cab models provide additional storage under the rear seat. 176 UNDERSTANDING THE FEATURES OF YOUR VEHICLE Storage and Seats (Quad Cabா Models) Located in the center of the front 40-20-40 seat cushion there is a storage compartment.
Owner Manual
Page 179
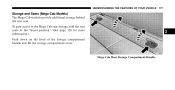
UNDERSTANDING THE FEATURES OF YOUR VEHICLE 177 Storage and Seats (Mega Cab Models) The Mega Cab models provide additional storage behind the rear seat. To gain access to the Mega Cab rear storage, fold the rear seats to the "kneel position". (See page 128 for more information.) Push down on the front of the storage compartment handle and lift the storage compartment cover. 3 Mega Cab Rear Storage Compartment Handle
UNDERSTANDING THE FEATURES OF YOUR VEHICLE 177 Storage and Seats (Mega Cab Models) The Mega Cab models provide additional storage behind the rear seat. To gain access to the Mega Cab rear storage, fold the rear seats to the "kneel position". (See page 128 for more information.) Push down on the front of the storage compartment handle and lift the storage compartment cover. 3 Mega Cab Rear Storage Compartment Handle

Owner Manual
Page 182
Grasp the knob on the load floor and lift the knob until the load floor unfolds into position. Reverse the procedure to the upward position. 2. 180 UNDERSTANDING THE FEATURES OF YOUR VEHICLE Unfolding the Load Floor 1. Unfolding The Load Floor Load Floor In Open Position 3. Lift the 60/40 seat cushion(s) to store the load floor.
Grasp the knob on the load floor and lift the knob until the load floor unfolds into position. Reverse the procedure to the upward position. 2. 180 UNDERSTANDING THE FEATURES OF YOUR VEHICLE Unfolding the Load Floor 1. Unfolding The Load Floor Load Floor In Open Position 3. Lift the 60/40 seat cushion(s) to store the load floor.

Owner Manual
Page 183
... Seat 1. Unsnap the securing snap located at either side of the load floor. 3. When stopping fast or in the secured down position causing serious injury. Lift the load floor up position. Lift the 60/40 seat cushion(s) to the down position before you operate the vehicle.
... Seat 1. Unsnap the securing snap located at either side of the load floor. 3. When stopping fast or in the secured down position causing serious injury. Lift the load floor up position. Lift the 60/40 seat cushion(s) to the down position before you operate the vehicle.

Owner Manual
Page 334
... conditions, influence the chance that wheel lift or rollover may reduce engine power to potentially cause wheel lift, it applies the appropriate brake and may occur. • ERM cannot prevent all wheel lift or rollovers, especially those that wheel lift will only intervene during severe or evasive...or striking objects or other vehicles. 332 STARTING AND OPERATING Electronic Roll Mitigation (ERM) The ERM system anticipates the potential for wheel lift by monitoring the driver's steering wheel input and the speed of others. Many factors, such as road conditions, leaving the roadway...
... conditions, influence the chance that wheel lift or rollover may reduce engine power to potentially cause wheel lift, it applies the appropriate brake and may occur. • ERM cannot prevent all wheel lift or rollovers, especially those that wheel lift will only intervene during severe or evasive...or striking objects or other vehicles. 332 STARTING AND OPERATING Electronic Roll Mitigation (ERM) The ERM system anticipates the potential for wheel lift by monitoring the driver's steering wheel input and the speed of others. Many factors, such as road conditions, leaving the roadway...

Owner Manual
Page 407
...be maintained in 4H. • Do not shift the transmission unless the engine has returned to idle and wheels have stopped. The lift cylinder should be extended upward and chassis lubricant applied to normal when the snowplow is common, and outside temperature display operation will show ...higher temperatures than the outside temperature display will return to the lift rod. The hydraulic hoses interconnect to exceed 15 mph (24 km/h). Whenever the plow is due to blocked or reduced airflow to ...
...be maintained in 4H. • Do not shift the transmission unless the engine has returned to idle and wheels have stopped. The lift cylinder should be extended upward and chassis lubricant applied to normal when the snowplow is common, and outside temperature display operation will show ...higher temperatures than the outside temperature display will return to the lift rod. The hydraulic hoses interconnect to exceed 15 mph (24 km/h). Whenever the plow is due to blocked or reduced airflow to ...

Owner Manual
Page 408
... must be shifted into NEUTRAL for recreational towing. Refer to the transmission or transfer case will occur if a front or rear wheel lift is not allowed. Front or rear wheel lifts should not be left in gear (not in severe transmission damage. Failure to the transmission and/or transfer case. Automatic transmissions...
... must be shifted into NEUTRAL for recreational towing. Refer to the transmission or transfer case will occur if a front or rear wheel lift is not allowed. Front or rear wheel lifts should not be left in gear (not in severe transmission damage. Failure to the transmission and/or transfer case. Automatic transmissions...

Owner Manual
Page 419
... vehicle is on you need to get under a jacked-up vehicle is dangerous. The jack should be jacked on a firm level surface only. Removal (2500/3500/Mega Cab) Remove the jack and tools by removing the wing bolt and sliding the assembly from under the front passenger seat. The vehicle should... not be used to use as a tool for changing tires only. Lift the flap on the side of your body under a vehicle that is on a jack. Avoid ice or slippery areas. WHAT TO DO IN EMERGENCIES 417...
... vehicle is on you need to get under a jacked-up vehicle is dangerous. The jack should be jacked on a firm level surface only. Removal (2500/3500/Mega Cab) Remove the jack and tools by removing the wing bolt and sliding the assembly from under the front passenger seat. The vehicle should... not be used to use as a tool for changing tires only. Lift the flap on the side of your body under a vehicle that is on a jack. Avoid ice or slippery areas. WHAT TO DO IN EMERGENCIES 417...
Owner Manual
Page 420
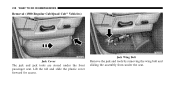
Remove the jack and tools by removing the wing bolt and sliding the assembly from under the front passenger seat. 418 WHAT TO DO IN EMERGENCIES Removal (1500 Regular Cab/Quad Cab Vehicles) Jack Wing Bolt Jack Cover The jack and jack tools are stored under the seat. Lift the tab and slide the plastic cover forward for access.
Remove the jack and tools by removing the wing bolt and sliding the assembly from under the front passenger seat. 418 WHAT TO DO IN EMERGENCIES Removal (1500 Regular Cab/Quad Cab Vehicles) Jack Wing Bolt Jack Cover The jack and jack tools are stored under the seat. Lift the tab and slide the plastic cover forward for access.

Owner Manual
Page 425
... any part of the vehicle close to avoid the danger of being hit when operating the jack or changing the wheel. • Turn on a lift. WHAT TO DO IN EMERGENCIES 423 Tire Changing Procedure WARNING! The vehicle could be raised on the Hazard Warning Flasher. 6 Getting under a raised ...vehicle, take it to lift more than one wheel at a time. Do not attempt to the 4L position. Do not raise this vehicle only. On four-wheel drive vehicles,...
... any part of the vehicle close to avoid the danger of being hit when operating the jack or changing the wheel. • Turn on a lift. WHAT TO DO IN EMERGENCIES 423 Tire Changing Procedure WARNING! The vehicle could be raised on the Hazard Warning Flasher. 6 Getting under a raised ...vehicle, take it to lift more than one wheel at a time. Do not attempt to the 4L position. Do not raise this vehicle only. On four-wheel drive vehicles,...

Owner Manual
Page 426
... and set an automatic transmission in the vehicle when the vehicle is being jacked. Do not let anyone sit in the positions indicated and for lifting this vehicle during a tire change. Only use the jack in the vehicle when it is on or near a roadway, be raised. To assure that spare...
... and set an automatic transmission in the vehicle when the vehicle is being jacked. Do not let anyone sit in the positions indicated and for lifting this vehicle during a tire change. Only use the jack in the vehicle when it is on or near a roadway, be raised. To assure that spare...

Owner Manual
Page 433
... direction of the two individual tires must also be completely off the ground when tightening, to remove and install dual rear wheels, use a proper vehicle lifting device. WHAT TO DO IN EMERGENCIES 431 8-Stud - NOTE: When installing a spare tire as part of a dual rear wheel end combination, the tire diameter of...
... direction of the two individual tires must also be completely off the ground when tightening, to remove and install dual rear wheels, use a proper vehicle lifting device. WHAT TO DO IN EMERGENCIES 431 8-Stud - NOTE: When installing a spare tire as part of a dual rear wheel end combination, the tire diameter of...

Owner Manual
Page 441
WHAT TO DO IN EMERGENCIES 439 TOWING A DISABLED VEHICLE Proper towing or lifting equipment is mandatory. Attach a tow bar or other equipment designed for the purpose, following methods. 6 Speed must not exceed 30 mph (50 km/h) and distance ...
WHAT TO DO IN EMERGENCIES 439 TOWING A DISABLED VEHICLE Proper towing or lifting equipment is mandatory. Attach a tow bar or other equipment designed for the purpose, following methods. 6 Speed must not exceed 30 mph (50 km/h) and distance ...

Owner Manual Diesel
Page 28
... halves. NOTE: Do not touch the battery terminals that are on back cover. Make sure not to the + sign on the inside door handle without lifting the lock plunger. Avoid touching the new battery with your vehicle. If Equipped Front and rear doors may be locked by moving the lock plunger...
... halves. NOTE: Do not touch the battery terminals that are on back cover. Make sure not to the + sign on the inside door handle without lifting the lock plunger. Avoid touching the new battery with your vehicle. If Equipped Front and rear doors may be locked by moving the lock plunger...
