Owner Manual
Page 82
... Window Features ...157 ▫ Rear Window Wiper/Washer - Express ...146 ▫ Sunshade Operation ...146 ▫ Wind Buffeting ...146 ▫ Sunroof Maintenance ...147 Ⅵ Electrical Power Outlet ...147 ▫ Electrical Outlet Use With Engine Off ...148 Ⅵ Power Inverter ...149 Ⅵ Cup Holders ...151 Ⅵ Storage ...152 ▫ Front Storage Compartment ...152 ▫...
... Window Features ...157 ▫ Rear Window Wiper/Washer - Express ...146 ▫ Sunshade Operation ...146 ▫ Wind Buffeting ...146 ▫ Sunroof Maintenance ...147 Ⅵ Electrical Power Outlet ...147 ▫ Electrical Outlet Use With Engine Off ...148 Ⅵ Power Inverter ...149 Ⅵ Cup Holders ...151 Ⅵ Storage ...152 ▫ Front Storage Compartment ...152 ▫...

Owner Manual
Page 147
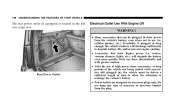
... cleaner and a soft cloth to 20 Amps of the instrument panel has a snap on plastic cap so that can be covered when not in use. ELECTRICAL POWER OUTLET This vehicle has two auxiliary power outlets that it heats when pushed in the instrument panel only operates with the standard power outlet...
... cleaner and a soft cloth to 20 Amps of the instrument panel has a snap on plastic cap so that can be covered when not in use. ELECTRICAL POWER OUTLET This vehicle has two auxiliary power outlets that it heats when pushed in the instrument panel only operates with the standard power outlet...
Owner Manual
Page 148
... draw power from the plug. Rear Power Outlet 148 UNDERSTANDING THE FEATURES OF YOUR VEHICLE The rear power outlet (if equipped) is located in use (i.e. Electrical Outlet Use With Engine Off WARNING! • Many accessories that draw higher power (i.e. Do not hang any type of time to allow the alternator to...
... draw power from the plug. Rear Power Outlet 148 UNDERSTANDING THE FEATURES OF YOUR VEHICLE The rear power outlet (if equipped) is located in use (i.e. Electrical Outlet Use With Engine Off WARNING! • Many accessories that draw higher power (i.e. Do not hang any type of time to allow the alternator to...

Owner Manual
Page 150
150 UNDERSTANDING THE FEATURES OF YOUR VEHICLE WARNING! To Avoid Serious Injury or Death: • Do not use a 3-Prong Adaptor. • Do not insert any objects into the receptacles. • Do not touch with wet hands. • Close the lid when not in overload protection the inverter will shut down if the power rating is mishandled it may cause an electric shock and failure. Power Inverter Switch NOTE: Due to build in use. • If this outlet is exceeded.
150 UNDERSTANDING THE FEATURES OF YOUR VEHICLE WARNING! To Avoid Serious Injury or Death: • Do not use a 3-Prong Adaptor. • Do not insert any objects into the receptacles. • Do not touch with wet hands. • Close the lid when not in overload protection the inverter will shut down if the power rating is mishandled it may cause an electric shock and failure. Power Inverter Switch NOTE: Due to build in use. • If this outlet is exceeded.

Owner Manual
Page 159
... reservoir for the windshield washers and the rear window washer is on. The defroster will automatically turn on the rear window defroster, and the optional electric remote control heated mirrors. It is located in the front of the blower control knob.
... reservoir for the windshield washers and the rear window washer is on. The defroster will automatically turn on the rear window defroster, and the optional electric remote control heated mirrors. It is located in the front of the blower control knob.
Owner Manual
Page 164
... RER - Satellite Radio ...226 ▫ Clock Setting Procedure ...226 Ⅵ Satellite Radio (RSC) - 164 INSTRUMENT PANEL AND CONTROLS ▫ Two Types Of Signals ...196 ▫ Electrical Disturbances ...196 ▫ AM Reception ...197 ▫ FM Reception ...197 Ⅵ Sales Code REQ - AM/FM Stereo Radio And 6-Disc CD/DVD Changer (MP3/WMA...
... RER - Satellite Radio ...226 ▫ Clock Setting Procedure ...226 Ⅵ Satellite Radio (RSC) - 164 INSTRUMENT PANEL AND CONTROLS ▫ Two Types Of Signals ...196 ▫ Electrical Disturbances ...196 ▫ AM Reception ...197 ▫ FM Reception ...197 Ⅵ Sales Code REQ - AM/FM Stereo Radio And 6-Disc CD/DVD Changer (MP3/WMA...

Owner Manual
Page 173
... started. Anti-Lock Brake Warning Light This light monitors the Anti-Lock Brake System which is required. 19. Voltage Warning Light This light monitors the electrical system voltage. Immediate service should go out with the charging system. If the light stays on or comes on during driving, it indicates a problem with...
... started. Anti-Lock Brake Warning Light This light monitors the Anti-Lock Brake System which is required. 19. Voltage Warning Light This light monitors the electrical system voltage. Immediate service should go out with the charging system. If the light stays on or comes on during driving, it indicates a problem with...
Owner Manual
Page 196
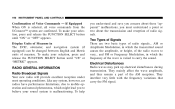
......and FM or Frequency Modulation, in which might lead you must understand a point or two about the transmission and reception of measure. Electrical Disturbances Radio waves may pick up electrical disturbances during transmission. Display Units of Measure in which the transmitted sound causes the amplitude, or height, of the radio waves to...
......and FM or Frequency Modulation, in which might lead you must understand a point or two about the transmission and reception of measure. Electrical Disturbances Radio waves may pick up electrical disturbances during transmission. Display Units of Measure in which the transmitted sound causes the amplitude, or height, of the radio waves to...
Owner Manual
Page 246
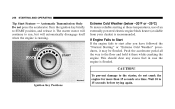
... pedal all the way to the starter, do not crank the engine for more than 15 seconds at these temperatures, use of an externally powered electric engine block heater (available from your dealer) is flooded. To prevent damage to the floor and hold it may be flooded. If Engine Fails to...
... pedal all the way to the starter, do not crank the engine for more than 15 seconds at these temperatures, use of an externally powered electric engine block heater (available from your dealer) is flooded. To prevent damage to the floor and hold it may be flooded. If Engine Fails to...
Owner Manual
Page 248
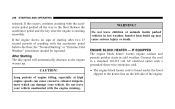
... in cold weather. Release the accelerator pedal and the key once the engine is found under the hood clipped to a standard 110-115 volt AC electrical outlet with the engine running smoothly. Connect the cord to the heater line on the left side of the engine. ENGINE BLOCK HEATER - Long periods...
... in cold weather. Release the accelerator pedal and the key once the engine is found under the hood clipped to a standard 110-115 volt AC electrical outlet with the engine running smoothly. Connect the cord to the heater line on the left side of the engine. ENGINE BLOCK HEATER - Long periods...

Owner Manual
Page 249
... or others could cause electrocution. Manual Shift Controls Use the heater when temperatures below 0°F (-18°C) are expected to the 110-115 volt AC electrical cord could be applied when the driver is not in the vehicle, especially on when your vehicle is in R (Reverse) gear and the ignition is...
... or others could cause electrocution. Manual Shift Controls Use the heater when temperatures below 0°F (-18°C) are expected to the 110-115 volt AC electrical cord could be applied when the driver is not in the vehicle, especially on when your vehicle is in R (Reverse) gear and the ignition is...
Owner Manual
Page 265
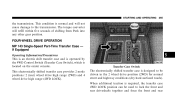
... not cause damage to lock the front and rear driveshafts together and force the front and rear If Equipped Operating Information/Precautions This is an electric shift transfer case and is operated by the 4WD Control Switch (Transfer Case Switch), which is normal and will refill within five seconds of shifting...
... not cause damage to lock the front and rear driveshafts together and force the front and rear If Equipped Operating Information/Precautions This is an electric shift transfer case and is operated by the 4WD Control Switch (Transfer Case Switch), which is normal and will refill within five seconds of shifting...

Owner Manual
Page 328
Pin Connector 4 - Pin Connector Refer to a trailer connector. 328 STARTING AND OPERATING The electrical connections are all complete to the vehicle but you must mate the harness to the following illustrations. 7-
Pin Connector 4 - Pin Connector Refer to a trailer connector. 328 STARTING AND OPERATING The electrical connections are all complete to the vehicle but you must mate the harness to the following illustrations. 7-

Owner Manual
Page 342
... to the negative terminal of the booster battery and then to the positive terminal of the discharged battery. Wear eye protection and remove all unnecessary electrical loads. 4. Turn OFF heater, radio and all metal jewelry such as this could establish a ground connection and personal injury could result. 5. WARNING! Set the parking... automatic transmission in PARK and turn the ignition OFF on the engine. Connect the other as watch bands or bracelets which might make an unintended electrical contact. 2.
... to the negative terminal of the booster battery and then to the positive terminal of the discharged battery. Wear eye protection and remove all unnecessary electrical loads. 4. Turn OFF heater, radio and all metal jewelry such as this could establish a ground connection and personal injury could result. 5. WARNING! Set the parking... automatic transmission in PARK and turn the ignition OFF on the engine. Connect the other as watch bands or bracelets which might make an unintended electrical contact. 2.

Owner Manual
Page 343
... engine idle a few minutes, then start . 6. When removing the jumper cables, reverse the above freezing point before attempting jump start the engine in : 1. The resulting electrical spark could rupture or explode. Any procedure other than above could result in the vehicle with the discharged battery. 7. Use of the moving belts and...
... engine idle a few minutes, then start . 6. When removing the jumper cables, reverse the above freezing point before attempting jump start the engine in : 1. The resulting electrical spark could rupture or explode. Any procedure other than above could result in the vehicle with the discharged battery. 7. Use of the moving belts and...

Owner Manual
Page 380
... Mopar Total Clean, then Mopar Spot & Stain Remover if absolutely necessary. Glass Surfaces All glass surfaces should be cleaned on a regular basis with electric defrosters. Use caution when cleaning inside rear windows equipped with Mopar Glass Cleaner or any solvents or protectants on Yes Essentials products. Use...
... Mopar Total Clean, then Mopar Spot & Stain Remover if absolutely necessary. Glass Surfaces All glass surfaces should be cleaned on a regular basis with electric defrosters. Use caution when cleaning inside rear windows equipped with Mopar Glass Cleaner or any solvents or protectants on Yes Essentials products. Use...
Owner Manual
Page 388
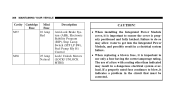
... with a rating other than indicated may allow water to get into the Integrated Power Module, and possibly result in a electrical system failure. • When replacing a blown fuse, it indicates a problem in a dangerous electrical system overload. 388 MAINTAINING YOUR VEHICLE Cavity Cartridge Mini Fuse Fuse M37 10 Amp Red Description Anti-Lock Brake...
... with a rating other than indicated may allow water to get into the Integrated Power Module, and possibly result in a electrical system failure. • When replacing a blown fuse, it indicates a problem in a dangerous electrical system overload. 388 MAINTAINING YOUR VEHICLE Cavity Cartridge Mini Fuse Fuse M37 10 Amp Red Description Anti-Lock Brake...

Owner Manual
Page 390
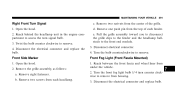
Remove the door in the left wheel liner by twisting counter clockwise. Left Front Turn Signal 1. Disconnect the electrical connector. 4. Access to remove. Twist the bulb counter clockwise to the bulb can be gained through the wheel liner hole. 3. Turn the steering wheel all the way to the right (full right lock). 2. Disconnect the electrical connector and replace the bulb. 390 MAINTAINING YOUR VEHICLE 5.
Remove the door in the left wheel liner by twisting counter clockwise. Left Front Turn Signal 1. Disconnect the electrical connector. 4. Access to remove. Twist the bulb counter clockwise to the bulb can be gained through the wheel liner hole. 3. Turn the steering wheel all the way to the right (full right lock). 2. Disconnect the electrical connector and replace the bulb. 390 MAINTAINING YOUR VEHICLE 5.
Owner Manual
Page 391
...Pull the grille assembly toward you to disconnect the grille clips to the fender and the headlamp ballstuds to remove. 4. Disconnect electrical connector. 4. Disconnect the electrical connector and replace the bulb. b. Remove one push pin from each fender. Remove two screws from the top of the grille.... Remove two scrivets from the center of each headlamp. Disconnect the electrical connector and replace bulb. 7 Open the hood. 2. Front Fog Light (Front Fascia Mounted) 1. Open the hood. 2. Twist the ...
...Pull the grille assembly toward you to disconnect the grille clips to the fender and the headlamp ballstuds to remove. 4. Disconnect electrical connector. 4. Disconnect the electrical connector and replace the bulb. b. Remove one push pin from each fender. Remove two screws from the top of the grille.... Remove two scrivets from the center of each headlamp. Disconnect the electrical connector and replace bulb. 7 Open the hood. 2. Front Fog Light (Front Fascia Mounted) 1. Open the hood. 2. Twist the ...
Owner Manual
Page 392
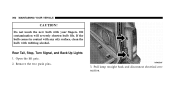
Remove the two push pins. 3. If the bulb comes in contact with any oily surface, clean the bulb with your fingers. Do not touch the new bulb with rubbing alcohol. Pull lamp straight back and disconnect electrical connection. Rear Tail, Stop, Turn Signal, and Back-Up Lights 1. Open the lift gate. 2. Oil contamination will severely shorten bulb life. 392 MAINTAINING YOUR VEHICLE CAUTION!
Remove the two push pins. 3. If the bulb comes in contact with any oily surface, clean the bulb with your fingers. Do not touch the new bulb with rubbing alcohol. Pull lamp straight back and disconnect electrical connection. Rear Tail, Stop, Turn Signal, and Back-Up Lights 1. Open the lift gate. 2. Oil contamination will severely shorten bulb life. 392 MAINTAINING YOUR VEHICLE CAUTION!
