Owner's Manual
Page 18
... alarm is still present, the system will disable the alarm. After the alarm is set . For an additional 15 minutes only the headlights and security telltale will flash repeatedly. Rearming of the System: The security system will rearm itself after the 15 additional minutes of the ...Sentry Key will ignore that may be received, including interference that condition and monitor the remaining doors and ignition. Use of headlights and security telltale flashing, if the system has not been disabled. If the condition which initiated the alarm is being set , the ...
... alarm is still present, the system will disable the alarm. After the alarm is set . For an additional 15 minutes only the headlights and security telltale will flash repeatedly. Rearming of the System: The security system will rearm itself after the 15 additional minutes of the ...Sentry Key will ignore that may be received, including interference that condition and monitor the remaining doors and ignition. Use of headlights and security telltale flashing, if the system has not been disabled. If the condition which initiated the alarm is being set , the ...
Owner's Manual
Page 116
.../Mega Cab Models) ...151 ▫ Adjustable Head Restraints ...151 ▫ Manual Rotary Lumbar Support Adjustment - If Equipped ...152 ▫ Power Seats (1500 Standard And Quad Cab Models) - If Equipped ...153 ▫ Power Seats (2500/3500/Mega Cab Models) - If Equipped ...154 ▫ Rear... Open And Close The Hood ...163 Lights ...164 ▫ Interior Lights ...165 ▫ Battery Saver ...166 ▫ Headlamp Delay ...166 ▫ Headlights, Parking Lights, Panel Lights ...166 ▫ Daytime Running Lights (Canada Only And Fleet Vehicles) ...167 ▫ Lights-On Reminder ...168 ▫ ...
.../Mega Cab Models) ...151 ▫ Adjustable Head Restraints ...151 ▫ Manual Rotary Lumbar Support Adjustment - If Equipped ...152 ▫ Power Seats (1500 Standard And Quad Cab Models) - If Equipped ...153 ▫ Power Seats (2500/3500/Mega Cab Models) - If Equipped ...154 ▫ Rear... Open And Close The Hood ...163 Lights ...164 ▫ Interior Lights ...165 ▫ Battery Saver ...166 ▫ Headlamp Delay ...166 ▫ Headlights, Parking Lights, Panel Lights ...166 ▫ Daytime Running Lights (Canada Only And Fleet Vehicles) ...167 ▫ Lights-On Reminder ...168 ▫ ...
Owner's Manual
Page 121
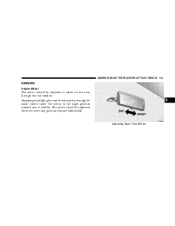
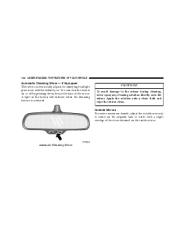
The mirror should be adjusted while set in the day position (toward rear of vehicle). UNDERSTANDING THE FEATURES OF YOUR VEHICLE 121 MIRRORS Inside Mirror The mirror should be adjusted to the night position (toward windshield). 3 Adjusting Rear View Mirror Annoying headlight glare can be reduced by moving the small control under the mirror to center on the view through the rear window.
The mirror should be adjusted while set in the day position (toward rear of vehicle). UNDERSTANDING THE FEATURES OF YOUR VEHICLE 121 MIRRORS Inside Mirror The mirror should be adjusted to the night position (toward windshield). 3 Adjusting Rear View Mirror Annoying headlight glare can be reduced by moving the small control under the mirror to center on the view through the rear window.
Owner's Manual
Page 122
... a clean cloth and wipe the mirror clean. 122 UNDERSTANDING THE FEATURES OF YOUR VEHICLE Automatic Dimming Mirror- If Equipped This mirror automatically adjusts for annoying headlight glare from vehicles behind you. To avoid damage to center on the adjacent lane of traffic with a slight overlap of the view obtained on or...
... a clean cloth and wipe the mirror clean. 122 UNDERSTANDING THE FEATURES OF YOUR VEHICLE Automatic Dimming Mirror- If Equipped This mirror automatically adjusts for annoying headlight glare from vehicles behind you. To avoid damage to center on the adjacent lane of traffic with a slight overlap of the view obtained on or...
Owner's Manual
Page 164
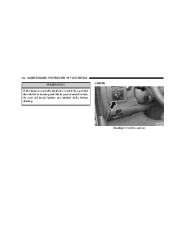
If the hood is not fully latched, it could fly up when the vehicle is moving and block your forward vision. LIGHTS Headlight Switch Location Be sure all hood latches are latched fully before driving. 164 UNDERSTANDING THE FEATURES OF YOUR VEHICLE WARNING!
If the hood is not fully latched, it could fly up when the vehicle is moving and block your forward vision. LIGHTS Headlight Switch Location Be sure all hood latches are latched fully before driving. 164 UNDERSTANDING THE FEATURES OF YOUR VEHICLE WARNING!
Owner's Manual
Page 165
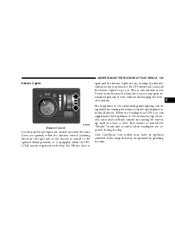
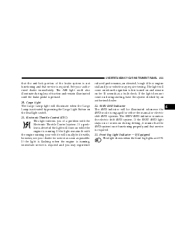
This feature is termed the "Parade" mode and is useful when headlights are on, rotating the dimmer control all the interior lights to the upward detent position, or if equipped, when the UNLOCK button is rotated to ...go out. The brightness of the switch) is pressed on the key fob. When the headlights are opened, when the dimmer control (rotating wheel on the right side of the instrument panel lighting can be operated by rotating the control up...
This feature is termed the "Parade" mode and is useful when headlights are on, rotating the dimmer control all the interior lights to the upward detent position, or if equipped, when the UNLOCK button is rotated to ...go out. The brightness of the switch) is pressed on the key fob. When the headlights are opened, when the dimmer control (rotating wheel on the right side of the instrument panel lighting can be operated by rotating the control up...
Owner's Manual
Page 166
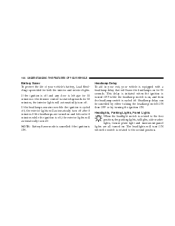
..., Panel Lights When the headlight switch is cycled off . The headlights will turn off after 8 minutes. If the headlamps are all turned on for 90 seconds. Headlamp Delay To aid in your exit, your vehicle's battery, ...
..., Panel Lights When the headlight switch is cycled off . The headlights will turn off after 8 minutes. If the headlamps are all turned on for 90 seconds. Headlamp Delay To aid in your exit, your vehicle's battery, ...

Owner's Manual
Page 167
... and therefore different lens cleaning procedures must be followed. Plastic is turned OFF. Daytime Running Lights (Canada Only and Fleet Vehicles) The headlights on your vehicle will turn off. 3 Light Switch Rotation Your vehicle is started. Do not use abrasive cleaning components, solvents, steel ...50% of scratching the lenses and reducing light output, avoid wiping with a dry cloth. To remove road dirt, wash with plastic headlight lenses that are lighter and less susceptible to clean the lenses. UNDERSTANDING THE FEATURES OF YOUR VEHICLE 167 To minimize the possibility of normal...
... and therefore different lens cleaning procedures must be followed. Plastic is turned OFF. Daytime Running Lights (Canada Only and Fleet Vehicles) The headlights on your vehicle will turn off. 3 Light Switch Rotation Your vehicle is started. Do not use abrasive cleaning components, solvents, steel ...50% of scratching the lenses and reducing light output, avoid wiping with a dry cloth. To remove road dirt, wash with plastic headlight lenses that are lighter and less susceptible to clean the lenses. UNDERSTANDING THE FEATURES OF YOUR VEHICLE 167 To minimize the possibility of normal...

Owner's Manual
Page 168
... will also turn on for 30 seconds when a key fob Unlock is opened. 168 UNDERSTANDING THE FEATURES OF YOUR VEHICLE Lights-on Reminder If the headlights, parking lights, or cargo lights are left on the CARGO button. The fog lights will operate only when the parking lights are ON or when... turned ON by pressing on , after the ignition is turned off when the switch is pushed a second time, when the headlight switch is rotated to the OFF position, or the high beam is selected. The cargo lights will sound when the driver's door is pressed, as ...
... will also turn on for 30 seconds when a key fob Unlock is opened. 168 UNDERSTANDING THE FEATURES OF YOUR VEHICLE Lights-on Reminder If the headlights, parking lights, or cargo lights are left on the CARGO button. The fog lights will operate only when the parking lights are ON or when... turned ON by pressing on , after the ignition is turned off when the switch is pushed a second time, when the headlight switch is rotated to the OFF position, or the high beam is selected. The cargo lights will sound when the driver's door is pressed, as ...
Owner's Manual
Page 170
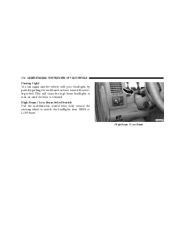
High Beam / Low Beam 170 UNDERSTANDING THE FEATURES OF YOUR VEHICLE Passing Light You can signal another vehicle with your headlights by partially pulling the multifunction lever toward the steering wheel to turn on until the lever is released. High Beam / Low Beam Select Switch Pull the multifunction control lever fully toward the steering wheel. This will cause the high beam headlights to switch the headlights from HIGH or LOW beam.
High Beam / Low Beam 170 UNDERSTANDING THE FEATURES OF YOUR VEHICLE Passing Light You can signal another vehicle with your headlights by partially pulling the multifunction lever toward the steering wheel to turn on until the lever is released. High Beam / Low Beam Select Switch Pull the multifunction control lever fully toward the steering wheel. This will cause the high beam headlights to switch the headlights from HIGH or LOW beam.

Owner's Manual
Page 228
... check or when driving, if the driver seat belt remains unbuckled, the Seat Belt Warning Light will sound. High Beam Indicator This indicator shows that headlights are on while driving, have the airbag system checked by an authorized dealer. 6. Seat Belt Reminder Light When the ignition switch is first turned on...
... check or when driving, if the driver seat belt remains unbuckled, the Seat Belt Warning Light will sound. High Beam Indicator This indicator shows that headlights are on while driving, have the airbag system checked by an authorized dealer. 6. Seat Belt Reminder Light When the ignition switch is first turned on...
Owner's Manual
Page 233
... engine stall and your vehicle will be drivable, however, see your authorized dealer immediately. If the SERV 4WD light stays on or comes on the headlight switch. 21. UNDERSTANDING YOUR INSTRUMENT PANEL 233 that the anti-lock portion of a problem with the engine running your vehicle may require towing. SERV 4WD...
... engine stall and your vehicle will be drivable, however, see your authorized dealer immediately. If the SERV 4WD light stays on or comes on the headlight switch. 21. UNDERSTANDING YOUR INSTRUMENT PANEL 233 that the anti-lock portion of a problem with the engine running your vehicle may require towing. SERV 4WD...
Owner's Manual
Page 447
......483 ▫ Appearance Care And Protection From Corrosion ...487 Fuses (Integrated Power Module) ...492 Vehicle Storage ...497 Replacement Light Bulbs ...498 Bulb Replacement ...499 ▫ Headlight (Halogen)/Front Park And Turn Lights ...499 ▫ Fog Lights ...502 ▫ Tail, Stop, Turn And Backup Lights ...503 ▫ Center High-Mounted Stoplight (CHMSL...
......483 ▫ Appearance Care And Protection From Corrosion ...487 Fuses (Integrated Power Module) ...492 Vehicle Storage ...497 Replacement Light Bulbs ...498 Bulb Replacement ...499 ▫ Headlight (Halogen)/Front Park And Turn Lights ...499 ▫ Fog Lights ...502 ▫ Tail, Stop, Turn And Backup Lights ...503 ▫ Center High-Mounted Stoplight (CHMSL...

Owner's Manual
Page 490
... best preserved by rinsing. Please do not use abrasive cleaning components, solvents, steel wool or other aggressive material to stone breakage than glass headlights. Cleaning Headlights Your vehicle has plastic headlights that are potentially flammable, and if used in closed areas they may cause respiratory harm. To remove road dirt, wash with a mild...
... best preserved by rinsing. Please do not use abrasive cleaning components, solvents, steel wool or other aggressive material to stone breakage than glass headlights. Cleaning Headlights Your vehicle has plastic headlights that are potentially flammable, and if used in closed areas they may cause respiratory harm. To remove road dirt, wash with a mild...
Owner's Manual
Page 499
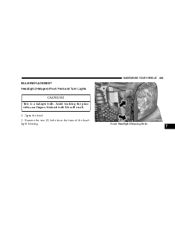
Reduced bulb life will result. 1. Front Headlight Housing Bolts 7 Open the hood 2. Remove the two (2) bolts from the front of the headlight housing. Avoid touching the glass with your fingers. MAINTAINING YOUR VEHICLE 499 BULB REPLACEMENT Headlight (Halogen)/Front Park and Turn Lights CAUTION! This is a halogen bulb.
Reduced bulb life will result. 1. Front Headlight Housing Bolts 7 Open the hood 2. Remove the two (2) bolts from the front of the headlight housing. Avoid touching the glass with your fingers. MAINTAINING YOUR VEHICLE 499 BULB REPLACEMENT Headlight (Halogen)/Front Park and Turn Lights CAUTION! This is a halogen bulb.

Owner's Manual
Page 500
Pull the housing out from the inner fender well and remove the nut through the access hole. Remove the plug from the fender to allow room to disconnect the electrical connectors. 500 MAINTAINING YOUR VEHICLE 3. Rear Headlight Housing Nut Access Inner Fender Plug 4.
Pull the housing out from the inner fender well and remove the nut through the access hole. Remove the plug from the fender to allow room to disconnect the electrical connectors. 500 MAINTAINING YOUR VEHICLE 3. Rear Headlight Housing Nut Access Inner Fender Plug 4.

Owner's Manual
Page 501
MAINTAINING YOUR VEHICLE 501 NOTE: For easier removal, pull the headlight assembly straight forward, applying the greatest amount of force to the outer edge of the headlight halogen bulb. Twist connector on the side marker/turn signal/park light bulb 1⁄4 turn and remove connector and bulb from the base of the headlight assembly. Bulb Removal 5. Headlight Removal 7 6. Unlock and pull connector straight from housing.
MAINTAINING YOUR VEHICLE 501 NOTE: For easier removal, pull the headlight assembly straight forward, applying the greatest amount of force to the outer edge of the headlight halogen bulb. Twist connector on the side marker/turn signal/park light bulb 1⁄4 turn and remove connector and bulb from the base of the headlight assembly. Bulb Removal 5. Headlight Removal 7 6. Unlock and pull connector straight from housing.

Owner's Manual
Page 502
Do not touch the headlight halogen bulb. 10. Fog Lights 1. Replace headlight or side marker/turn and remove connector and bulb from the housing. 9. Twist the headlight halogen bulb 1⁄4 turn and remove headlight bulb from housing. Reach under the vehicle, unlock and twist connector counterclockwise 1⁄4 turn signal/park light bulb. Reverse procedure for installation of bulbs and housing. Remove housing from vehicle with headlight halogen bulb in housing. 8. 502 MAINTAINING YOUR VEHICLE 7.
Do not touch the headlight halogen bulb. 10. Fog Lights 1. Replace headlight or side marker/turn and remove connector and bulb from the housing. 9. Twist the headlight halogen bulb 1⁄4 turn and remove headlight bulb from housing. Reach under the vehicle, unlock and twist connector counterclockwise 1⁄4 turn signal/park light bulb. Reverse procedure for installation of bulbs and housing. Remove housing from vehicle with headlight halogen bulb in housing. 8. 502 MAINTAINING YOUR VEHICLE 7.
Owner's Manual
Page 556
... Bag Retainer ...208 Gross Axle Weight Rating ...393 Gross Vehicle Weight Rating ...392 GVWR ...389 Hands-Free Phone (UConnect™) ...Hazard Warning Flasher ...Head Restraints ...Headlights ...Cleaning ...High Beam ...High Beam/Low Beam Select Switch Lights On Reminder ...Passing ...Switch ...126 420 151 499 490 170 170 168 170 166 Heated...
... Bag Retainer ...208 Gross Axle Weight Rating ...393 Gross Vehicle Weight Rating ...392 GVWR ...389 Hands-Free Phone (UConnect™) ...Hazard Warning Flasher ...Head Restraints ...Headlights ...Cleaning ...High Beam ...High Beam/Low Beam Select Switch Lights On Reminder ...Passing ...Switch ...126 420 151 499 490 170 170 168 170 166 Heated...
Owner's Manual
Page 558
... Dual Wheel Assembly Rear ...509 Electronic Stability Program (ESP) Indicator . 234,353 Fog ...168,233,502 Four-Wheel Drive Indicator ...320 Hazard Warning Flasher ...420 Headlights ...166 High Beam ...170,228 High Beam Indicator ...228 High Beam/Low Beam Select ...170 Illuminated Entry ...19 Instrument Cluster ...227 Intensity Control ...165 Interior...
... Dual Wheel Assembly Rear ...509 Electronic Stability Program (ESP) Indicator . 234,353 Fog ...168,233,502 Four-Wheel Drive Indicator ...320 Hazard Warning Flasher ...420 Headlights ...166 High Beam ...170,228 High Beam Indicator ...228 High Beam/Low Beam Select ...170 Illuminated Entry ...19 Instrument Cluster ...227 Intensity Control ...165 Interior...

