
Owner Manual
Page 9
...YOUR VEHICLE CONTENTS Ⅵ A Word About Your Keys ...12 ▫ Ignition Key Removal ...12 ▫ Locking Doors With The Key ...14 Ⅵ Steering Wheel Lock - If Equipped ...15 ▫ Replacement Keys ...16 ▫ Customer Key Programming ...17 ▫ General Information ...18 Ⅵ Security Alarm System - ...If Equipped ...15 ▫ If You Wish To Manually Lock The Steering Wheel ...15 ▫ To Release The Steering Wheel Lock ...15 ▫ Automatic Transmission Ignition Interlock System ...15 Ⅵ Sentry Key -
...YOUR VEHICLE CONTENTS Ⅵ A Word About Your Keys ...12 ▫ Ignition Key Removal ...12 ▫ Locking Doors With The Key ...14 Ⅵ Steering Wheel Lock - If Equipped ...15 ▫ Replacement Keys ...16 ▫ Customer Key Programming ...17 ▫ General Information ...18 Ⅵ Security Alarm System - ...If Equipped ...15 ▫ If You Wish To Manually Lock The Steering Wheel ...15 ▫ To Release The Steering Wheel Lock ...15 ▫ Automatic Transmission Ignition Interlock System ...15 Ⅵ Sentry Key -

Owner Manual
Page 14
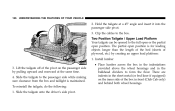
... the key forward. To remove the key, depress and hold the release button located between the ignition switch and the instrument panel. Move the steering wheel left and right while turning the key until it turns easily. 14 THINGS TO KNOW BEFORE STARTING YOUR VEHICLE Manual Transmission-If Equipped When the...
... the key forward. To remove the key, depress and hold the release button located between the ignition switch and the instrument panel. Move the steering wheel left and right while turning the key until it turns easily. 14 THINGS TO KNOW BEFORE STARTING YOUR VEHICLE Manual Transmission-If Equipped When the...

Owner Manual
Page 15
...(transponder), to start the engine. THINGS TO KNOW BEFORE STARTING YOUR VEHICLE 15 STEERING WHEEL LOCK - NOTE: If you turned the wheel to the right to engage the lock, you turned the wheel to the left to disengage it . Automatic Transmission Ignition Interlock System This system prevents the... PARK. If You Wish To Manually Lock The Steering Wheel: With the engine running, turn the steering wheel upside down, turn the wheel slightly to the left to be equipped with a passive steering wheel lock. To Release The Steering Wheel Lock: Insert the key in either direction until the ...
...(transponder), to start the engine. THINGS TO KNOW BEFORE STARTING YOUR VEHICLE 15 STEERING WHEEL LOCK - NOTE: If you turned the wheel to the right to engage the lock, you turned the wheel to the left to disengage it . Automatic Transmission Ignition Interlock System This system prevents the... PARK. If You Wish To Manually Lock The Steering Wheel: With the engine running, turn the steering wheel upside down, turn the wheel slightly to the left to be equipped with a passive steering wheel lock. To Release The Steering Wheel Lock: Insert the key in either direction until the ...

Owner Manual
Page 44
This vehicle may also be obvious in the steering wheel. Their covers are located above the glove compartment. This vehicle has airbags for both the driver and right front passenger as a supplement to have a multistage ...
This vehicle may also be obvious in the steering wheel. Their covers are located above the glove compartment. This vehicle has airbags for both the driver and right front passenger as a supplement to have a multistage ...
Owner Manual
Page 47
... YOUR VEHICLE 47 WARNING! • Relying on the airbags alone could cause serious injury. Always wear your arms to reach the steering wheel or instrument panel. • If the vehicle has window bags, they also need room to inflate. Sit upright in a collision. ...Sit back, comfortably extending your seat belts even though you properly. Do not lean against the door or window. If Equipped • Steering Wheel and Column • Instrument Panel • Interconnecting Wiring • Knee Impact Bolsters • Front Acceleration Sensors 2 If Equipped • Airbag ...
... YOUR VEHICLE 47 WARNING! • Relying on the airbags alone could cause serious injury. Always wear your arms to reach the steering wheel or instrument panel. • If the vehicle has window bags, they also need room to inflate. Sit upright in a collision. ...Sit back, comfortably extending your seat belts even though you properly. Do not lean against the door or window. If Equipped • Steering Wheel and Column • Instrument Panel • Interconnecting Wiring • Knee Impact Bolsters • Front Acceleration Sensors 2 If Equipped • Airbag ...
Owner Manual
Page 48
..., in the ACC position, or not in the ignition, the airbags are designed to provide different rates of the items listed above except the steering wheel and column, and knee bolsters. A single chime will not inflate. After the selfcheck, the AIRBAG warning light will not detect roll over. How the Airbag...
..., in the ACC position, or not in the ignition, the airbags are designed to provide different rates of the items listed above except the steering wheel and column, and knee bolsters. A single chime will not inflate. After the selfcheck, the AIRBAG warning light will not detect roll over. How the Airbag...
Owner Manual
Page 50
... generated to restrain the driver and front passenger. The passenger's front airbag gas is vented through vent holes in the center of the steering wheel and the right side of nontoxic gas is vented through vent holes in about one quarter of the time it takes to inflate the window...way and covers the window. The bags then quickly deflate while helping to inflate the front airbags. A large quantity of the instrument panel. The steering wheel hub trim cover and the upper right side of the instrument panel separate and fold out of the time it signals the inflator units. This...
... generated to restrain the driver and front passenger. The passenger's front airbag gas is vented through vent holes in the center of the steering wheel and the right side of nontoxic gas is vented through vent holes in about one quarter of the time it takes to inflate the window...way and covers the window. The bags then quickly deflate while helping to inflate the front airbags. A large quantity of the instrument panel. The steering wheel hub trim cover and the upper right side of the instrument panel separate and fold out of the time it signals the inflator units. This...
Owner Manual
Page 53
... not there to protect you. If it . Do not modify the components or wiring, including adding any kind of badges or stickers to the steering wheel hub trim cover or the upper right side of seat attachment bolts), take the vehicle to any advanced airbag system service. You need it is...
... not there to protect you. If it . Do not modify the components or wiring, including adding any kind of badges or stickers to the steering wheel hub trim cover or the upper right side of seat attachment bolts), take the vehicle to any advanced airbag system service. You need it is...
Owner Manual
Page 73
... flash. Check for tread wear or uneven wear patterns. If the light stays on, flickers or comes on for cuts, frays and loose parts. Check wheel nuts for tightness and tires for proper operation. THINGS TO KNOW BEFORE STARTING YOUR VEHICLE 73 Safety Checks You Should Make Inside The Vehicle Heater...
... flash. Check for tread wear or uneven wear patterns. If the light stays on, flickers or comes on for cuts, frays and loose parts. Check wheel nuts for tightness and tires for proper operation. THINGS TO KNOW BEFORE STARTING YOUR VEHICLE 73 Safety Checks You Should Make Inside The Vehicle Heater...

Owner Manual
Page 90
90 UNDERSTANDING THE FEATURES OF YOUR VEHICLE LIGHTS Interior Lights Courtesy and dome lights are turned on when the front doors are opened, when the dimmer control (rotating wheel on the right side of the switch) is rotated to the second upward detent position, or if equipped, when the UNLOCK button is pressed on the key fob.When a door is open and the interior lights are on, rotating the dimmer
90 UNDERSTANDING THE FEATURES OF YOUR VEHICLE LIGHTS Interior Lights Courtesy and dome lights are turned on when the front doors are opened, when the dimmer control (rotating wheel on the right side of the switch) is rotated to the second upward detent position, or if equipped, when the UNLOCK button is pressed on the key fob.When a door is open and the interior lights are on, rotating the dimmer

Owner Manual
Page 95
... off. If a defective bulb or wiring circuit is defective. Passing Light You can signal a lane change by partially pulling the multifunction lever toward the steering wheel.
... off. If a defective bulb or wiring circuit is defective. Passing Light You can signal a lane change by partially pulling the multifunction lever toward the steering wheel.
Owner Manual
Page 96
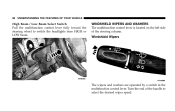
96 UNDERSTANDING THE FEATURES OF YOUR VEHICLE High Beam / Low Beam Select Switch Pull the multifunction control lever fully toward the steering wheel to select the desired wiper speed. Windshield Wipers The wipers and washers are operated by a switch in the multifunction control lever. WINDSHIELD WIPERS AND WASHERS The multifunction control lever is located on the left side of the handle to switch the headlights from HIGH or LOW beam. Turn the end of the steering column.
96 UNDERSTANDING THE FEATURES OF YOUR VEHICLE High Beam / Low Beam Select Switch Pull the multifunction control lever fully toward the steering wheel to select the desired wiper speed. Windshield Wipers The wipers and washers are operated by a switch in the multifunction control lever. WINDSHIELD WIPERS AND WASHERS The multifunction control lever is located on the left side of the handle to switch the headlights from HIGH or LOW beam. Turn the end of the steering column.
Owner Manual
Page 98
... column, pull rearward on most washer fluid containers. This rating information can be found on the lever below the turn signal control and move the wheel up of your climate. If the washer knob is pushed, for a period greater than 1 second, while in the OFF position, the wiper will then resume...
... column, pull rearward on most washer fluid containers. This rating information can be found on the lever below the turn signal control and move the wheel up of your climate. If the washer knob is pushed, for a period greater than 1 second, while in the OFF position, the wiper will then resume...

Owner Manual
Page 99
.... ELECTRONIC SPEED CONTROL - Without a stable steering column, you could lose control of the vehicle and have an accident. Be sure it is on the steering wheel. 3 To Activate Push the ON/OFF button to the table below for the speed for your specific engine). Adjust the column only while the vehicle...
.... ELECTRONIC SPEED CONTROL - Without a stable steering column, you could lose control of the vehicle and have an accident. Be sure it is on the steering wheel. 3 To Activate Push the ON/OFF button to the table below for the speed for your specific engine). Adjust the column only while the vehicle...
Owner Manual
Page 126
... the same time. 4. Slide the tailgate onto the driver's side pivot. • Place lumber across the box in the indentations provided above the wheel housings and in front (Club Cab only) and behind both wheel housings. 126 UNDERSTANDING THE FEATURES OF YOUR VEHICLE 2. Clip the cables to form the floor. Install lumber 3.
... the same time. 4. Slide the tailgate onto the driver's side pivot. • Place lumber across the box in the indentations provided above the wheel housings and in front (Club Cab only) and behind both wheel housings. 126 UNDERSTANDING THE FEATURES OF YOUR VEHICLE 2. Clip the cables to form the floor. Install lumber 3.

Owner Manual
Page 145
FM Reception Because FM transmission is the major feature of FM radio. NOTE: The radio, steering wheel radio controls (if equipped), and 6 disc CD/DVD changer (if equipped) will cancel this feature. 4 INSTRUMENT PANEL AND CONTROLS 145 Electrical Disturbances Radio waves may ...
FM Reception Because FM transmission is the major feature of FM radio. NOTE: The radio, steering wheel radio controls (if equipped), and 6 disc CD/DVD changer (if equipped) will cancel this feature. 4 INSTRUMENT PANEL AND CONTROLS 145 Electrical Disturbances Radio waves may ...

Owner Manual
Page 172
... remote sound system controls are in each mode. The left hand control is a rocker type switch with a push button in the center. Reach behind the wheel to Radio or CD. The right hand control is different depending on which mode you are located on the rear surface of the switch will... the center. Radio Operation Pressing the top of the switch will SEEK down for the next listenable station and pressing the bottom of the steering wheel. The function of the left hand control operation in . 172 INSTRUMENT PANEL AND CONTROLS REMOTE SOUND SYSTEM CONTROLS -
... remote sound system controls are in each mode. The left hand control is a rocker type switch with a push button in the center. Reach behind the wheel to Radio or CD. The right hand control is different depending on which mode you are located on the rear surface of the switch will... the center. Radio Operation Pressing the top of the switch will SEEK down for the next listenable station and pressing the bottom of the steering wheel. The function of the left hand control operation in . 172 INSTRUMENT PANEL AND CONTROLS REMOTE SOUND SYSTEM CONTROLS -
Owner Manual
Page 183
... ...190 ▫ Brake/Transmission Interlock System ...191 ▫ Automatic Transmission ...191 Ⅵ Manual Transmission ...196 ▫ Recommended Shift Speeds ...197 ▫ Downshifting ...198 Ⅵ Four-Wheel Drive Operation ...199 ▫ NV233/243 GII Transfer Case Operating Information/Precautions ...199 ▫ Shifting Procedure - STARTING AND OPERATING CONTENTS Ⅵ Starting Procedures ...187 ▫...
... ...190 ▫ Brake/Transmission Interlock System ...191 ▫ Automatic Transmission ...191 Ⅵ Manual Transmission ...196 ▫ Recommended Shift Speeds ...197 ▫ Downshifting ...198 Ⅵ Four-Wheel Drive Operation ...199 ▫ NV233/243 GII Transfer Case Operating Information/Precautions ...199 ▫ Shifting Procedure - STARTING AND OPERATING CONTENTS Ⅵ Starting Procedures ...187 ▫...
Owner Manual
Page 184
If Equipped ...213 ▫ Four-Wheel Anti-Lock Brake System ...214 Ⅵ Power Steering ...216 Ⅵ Rocking The Vehicle ...217 Ⅵ Tire Safety Information ...218 ▫ Tire Markings ...218 ▫ Tire ... Tires ...229 ▫ Compact Spare Tire - If Equipped 210 Ⅵ Driving On Slippery Surfaces ...211 Ⅵ Parking Brake ...212 Ⅵ Brake System ...213 ▫ Rear Wheel Anti-Lock Brake System - 184 STARTING AND OPERATING ▫ NV 244 Generation II Transfer Case Operating Information / Precautions ...205 ▫ Shifting Procedure - NV 244 Generation...
If Equipped ...213 ▫ Four-Wheel Anti-Lock Brake System ...214 Ⅵ Power Steering ...216 Ⅵ Rocking The Vehicle ...217 Ⅵ Tire Safety Information ...218 ▫ Tire Markings ...218 ▫ Tire ... Tires ...229 ▫ Compact Spare Tire - If Equipped 210 Ⅵ Driving On Slippery Surfaces ...211 Ⅵ Parking Brake ...212 Ⅵ Brake System ...213 ▫ Rear Wheel Anti-Lock Brake System - 184 STARTING AND OPERATING ▫ NV 244 Generation II Transfer Case Operating Information / Precautions ...205 ▫ Shifting Procedure - NV 244 Generation...

Owner Manual
Page 199
...the front and rear driveshafts together and force the front and rear wheels to the desired position - The NV233/243 transfer case provides 4 mode positions: 2 (rear) wheel drive high range, 4 wheel drive high range, 4 wheel drive low range, and neutral. The transfer case Neutral (N) position... is located on the instrument panel. NOTE: The transfer case Neutral (N) position is two-wheel drive 5 STARTING AND OPERATING 199 FOUR-WHEEL DRIVE OPERATION NV233/243 GII Transfer Case Operating Information/Precautions The NV233/243 is an electric shift transfer case ...
...the front and rear driveshafts together and force the front and rear wheels to the desired position - The NV233/243 transfer case provides 4 mode positions: 2 (rear) wheel drive high range, 4 wheel drive high range, 4 wheel drive low range, and neutral. The transfer case Neutral (N) position... is located on the instrument panel. NOTE: The transfer case Neutral (N) position is two-wheel drive 5 STARTING AND OPERATING 199 FOUR-WHEEL DRIVE OPERATION NV233/243 GII Transfer Case Operating Information/Precautions The NV233/243 is an electric shift transfer case ...


